> ## Documentation Index
> Fetch the complete documentation index at: https://docs.quickblox.com/llms.txt
> Use this file to discover all available pages before exploring further.
# Custom Identity Provider
> Learn how to easily integrate your existing user base into QuickBlox.
This feature is available for customers on the **Enterprise plan** only.
QuickBlox Custom Identity Provider (CIdP) allows you to use **external authentication**. In this case, user credentials and password management are handled by Identity Provider (IdP).
When CIdP is enabled and configured, users can log in to QuickBlox API with token generated by a service external to QuickBlox.
This is especially helpful when you have existing user base.
## Recommended workflow
**Application** - web or mobile application that integrates QuickBlox.
**Identity provider (IdP)** - service that authenticates and verifies user credentials, it's external to QuickBlox.
**IdP\_user\_ID** - user ID in external service.
**IdP\_token** - access token to external service.
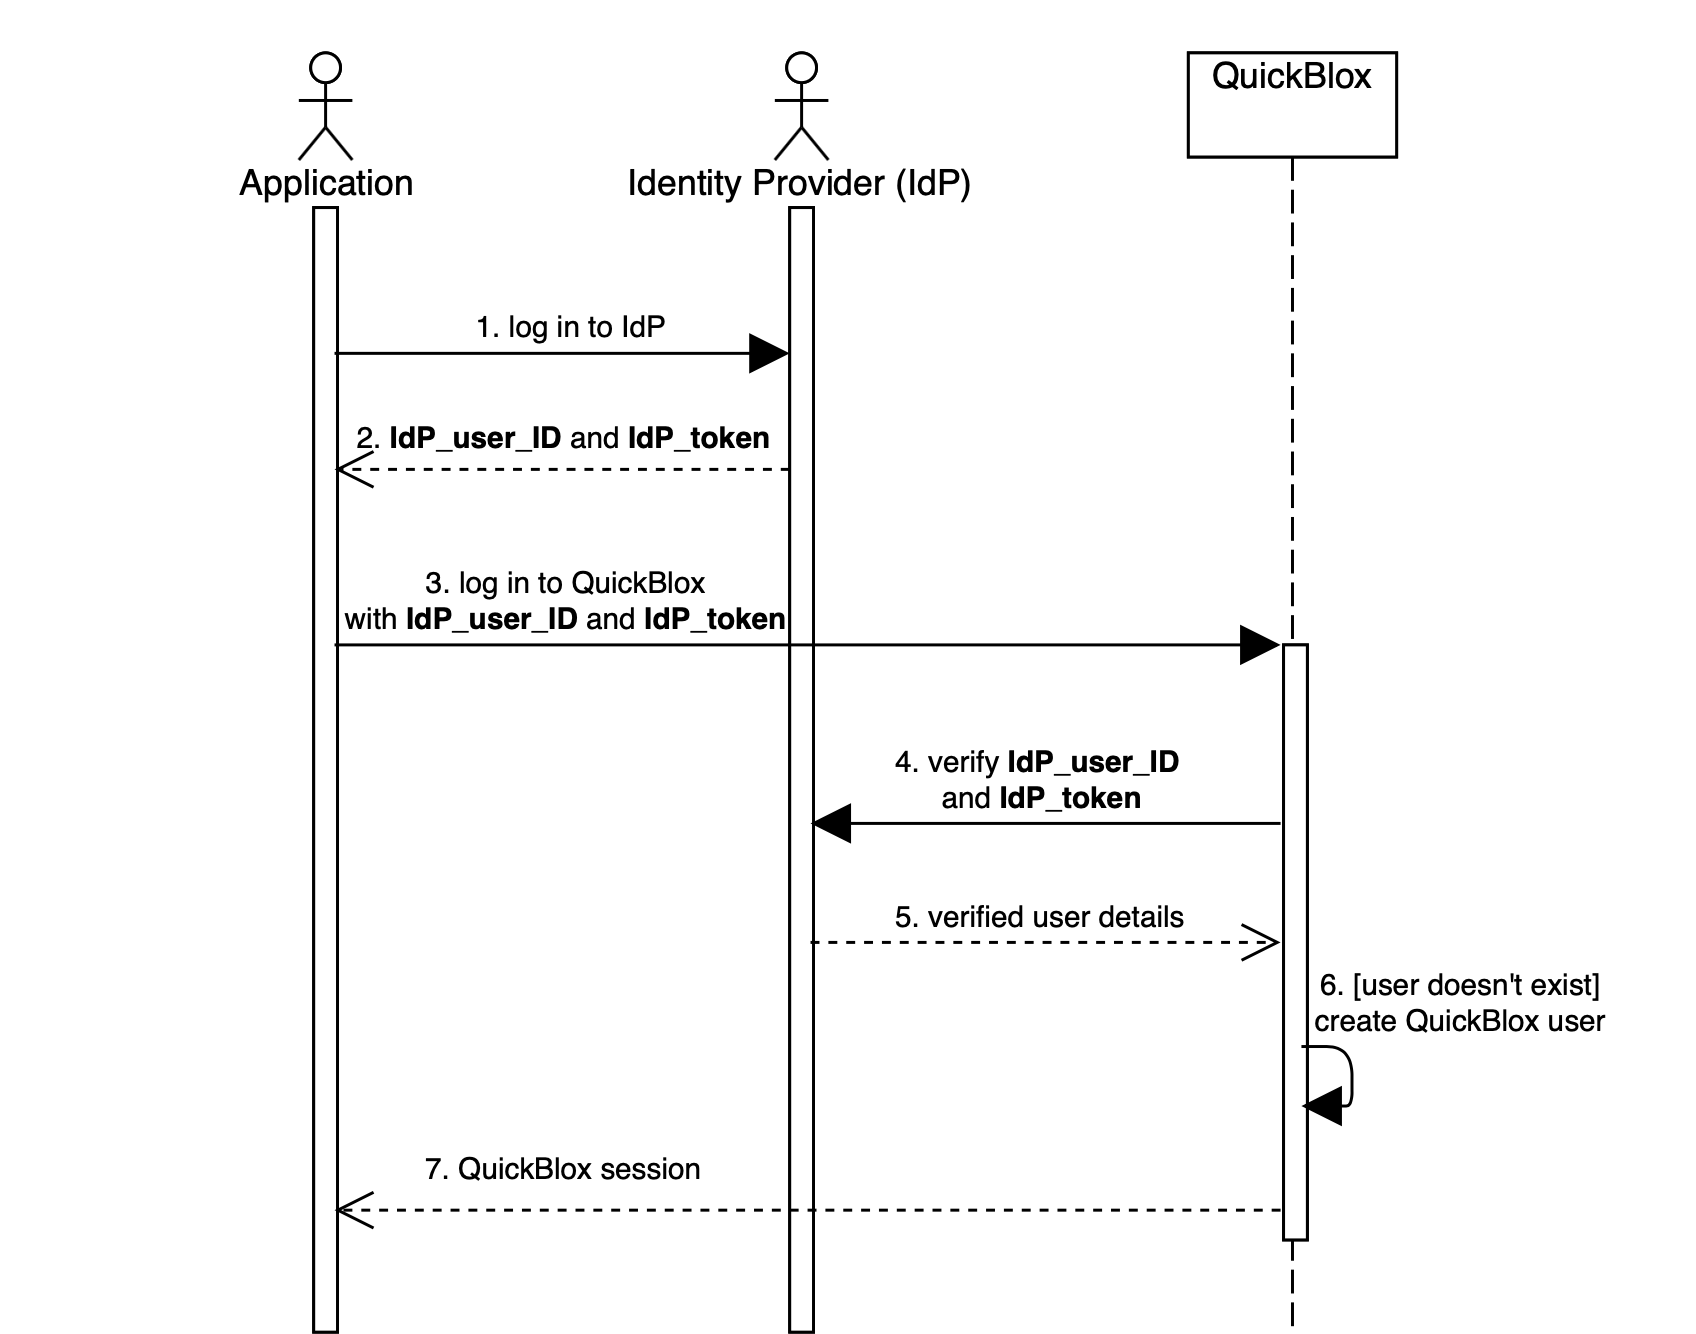 **Detailed description:**
1. The application logs in user to the identity provider.
2. The identity provider returns the **IdP\_user\_ID** and **IdP\_token**.
3. The application logs in user to QuickBlox. **IdP\_user\_ID** and **IdP\_token** must be set as `user[login]` and `user[password]` (see [Create Session](https://docs.quickblox.com/reference/create-session)).
4. The QuickBlox server sends **IdP\_user\_ID** and **IdP\_token** to identity provider for verification.
5. The identity provider checks that credentials are correct and sends user details back to QuickBlox server.
6. The QuickBlox server parses response from IdP and creates a new QuickBlox user if it doesn't exist.
7. The QuickBlox server sends a **user** session token back to the application.
## Step 1: Create verification endpoint
Identity provider must provide interface for QuickBlox to verify users - verification endpoint. This endpoint will be triggered every time when user tries to log in to QuickBlox API. There are no strict rules how endpoint must look. The only requirement it must receive some **credentials**, for example, token, and return **unique identifier** of the user.
You can send additional information about user that can be parsed into QuickBlox user, for example, full name or email, the full list is available [here](#response-params).
**Example:**
In this example, `IdP_user_ID` and `IdP_token` are credentials, `user.id` is unique identifier.
```HTTP HTTP theme={null}
GET https://youripserver.com/users/identity?IdP_user_ID=4324&IdP_token=8b75a6c7191285499d890a81df4ee7fe49bc732a
```
```JSON JSON theme={null}
{
“user”: {
“id”: 4324,
“login”: “samuel456”,
“full_name”: “Samuel Johnson”
}
}
```
**Note**
If identity provider returns an error QuickBlox will resend the error **as is** to the application.
## Step 2: Configure CIdP
Once verification endpoint is set and running, you can configure QuickBlox CIdP.
1. Go to the **Dashboard => *YOUR\_APP* => Overview** page.
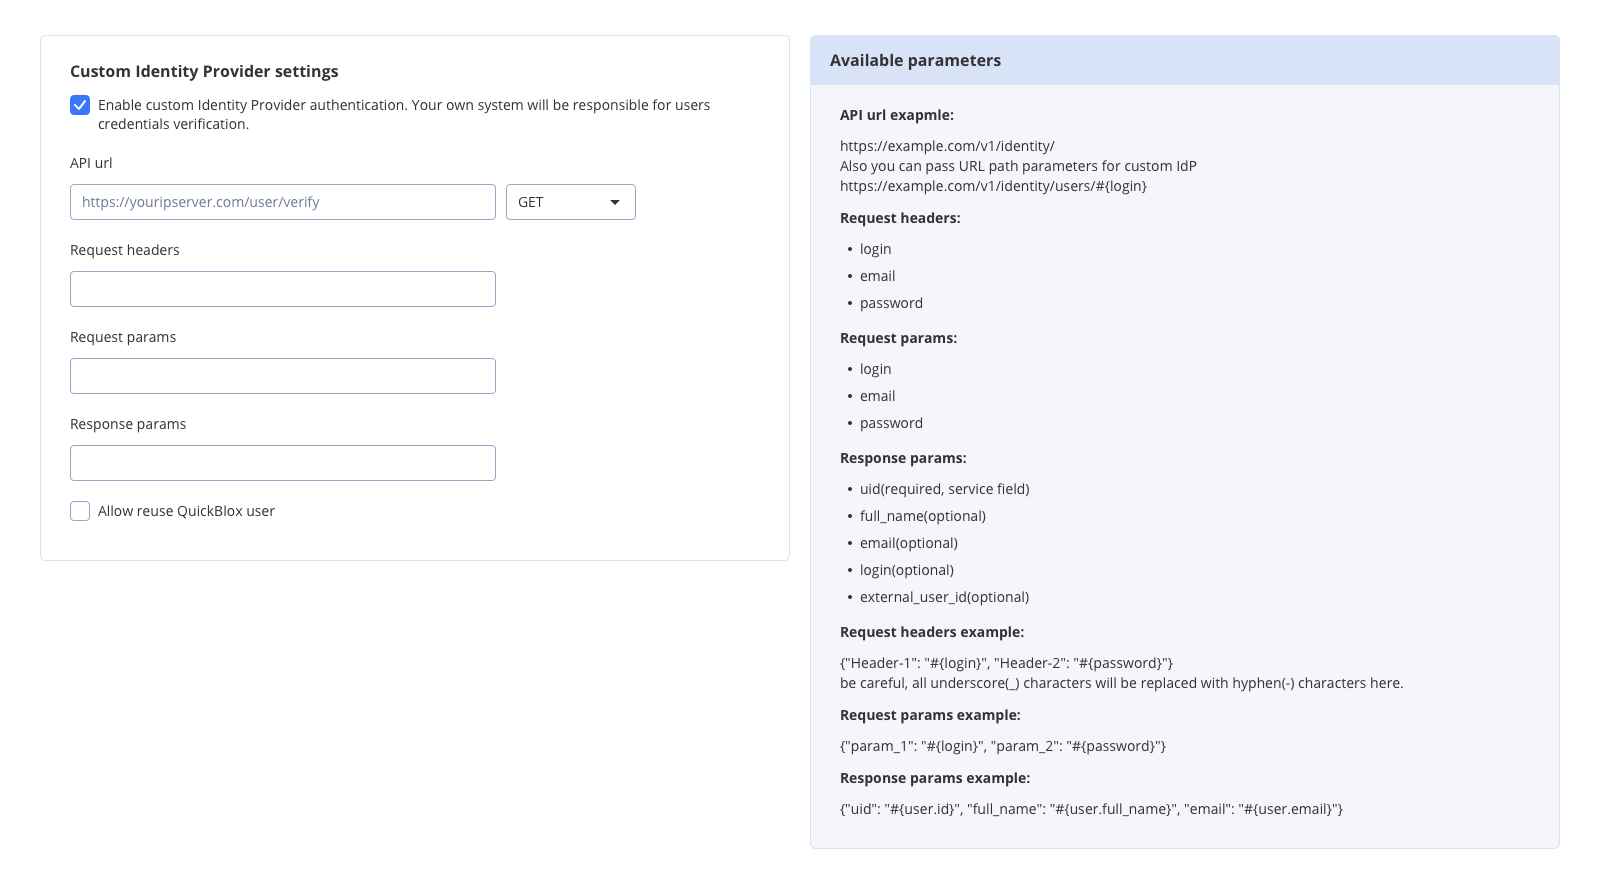
2. Locate the **Custom Identity Provider** groupbox at the bottom of the page.
3. Check **Enable custom Identity Provider authentication**.
4. Fill in the [API URL](#api-url) field with your verification request URL.
5. Choose a request type from the dropdown: GET or POST.
6. Fill in [Request headers](#request-headers) or [Request params](#request-params).
7. Fill in [Response params](#response-params).
8. Click the **Update** button. Now users authenticate via your Identity Provider.
**Detailed description:**
1. The application logs in user to the identity provider.
2. The identity provider returns the **IdP\_user\_ID** and **IdP\_token**.
3. The application logs in user to QuickBlox. **IdP\_user\_ID** and **IdP\_token** must be set as `user[login]` and `user[password]` (see [Create Session](https://docs.quickblox.com/reference/create-session)).
4. The QuickBlox server sends **IdP\_user\_ID** and **IdP\_token** to identity provider for verification.
5. The identity provider checks that credentials are correct and sends user details back to QuickBlox server.
6. The QuickBlox server parses response from IdP and creates a new QuickBlox user if it doesn't exist.
7. The QuickBlox server sends a **user** session token back to the application.
## Step 1: Create verification endpoint
Identity provider must provide interface for QuickBlox to verify users - verification endpoint. This endpoint will be triggered every time when user tries to log in to QuickBlox API. There are no strict rules how endpoint must look. The only requirement it must receive some **credentials**, for example, token, and return **unique identifier** of the user.
You can send additional information about user that can be parsed into QuickBlox user, for example, full name or email, the full list is available [here](#response-params).
**Example:**
In this example, `IdP_user_ID` and `IdP_token` are credentials, `user.id` is unique identifier.
```HTTP HTTP theme={null}
GET https://youripserver.com/users/identity?IdP_user_ID=4324&IdP_token=8b75a6c7191285499d890a81df4ee7fe49bc732a
```
```JSON JSON theme={null}
{
“user”: {
“id”: 4324,
“login”: “samuel456”,
“full_name”: “Samuel Johnson”
}
}
```
**Note**
If identity provider returns an error QuickBlox will resend the error **as is** to the application.
## Step 2: Configure CIdP
Once verification endpoint is set and running, you can configure QuickBlox CIdP.
1. Go to the **Dashboard => *YOUR\_APP* => Overview** page.
2. Locate the **Custom Identity Provider** groupbox at the bottom of the page.
3. Check **Enable custom Identity Provider authentication**.
4. Fill in the [API URL](#api-url) field with your verification request URL.
5. Choose a request type from the dropdown: GET or POST.
6. Fill in [Request headers](#request-headers) or [Request params](#request-params).
7. Fill in [Response params](#response-params).
8. Click the **Update** button. Now users authenticate via your Identity Provider.
 ### API URL
URL of the verification request. It will be triggered every time when user tries to log in to QuickBlox API.
**Example:**
[https://youripserver.com/users/identity](https://youripserver.com/users/identity)
### Request headers
Headers of the verification request. Header name can be any, as a value you can set one of available variables. Here you define how to map params of QuickBlox [Create Session](https://docs.quickblox.com/reference/create-session) request to headers of your verification request.
You can pass data via request headers or request params, both are valid and optional.
**Format:**
`{"Header-1": "#{variable-1}", "Header-2": "#{variable-2}"}`
*\*All underscore(\_) characters will be replaced with hyphen(-) characters here.*
**Example:**
`{"IdP_user_ID": "#{login}", "IdP_token": "#{password}"}`
**Allowed variables:**
| Variable | Type | Description |
| -------- | ------ | ----------------------------------------------------------------------------------------------------- |
| login | string | Value of user\[login] (see [Create Session](https://docs.quickblox.com/reference/create-session)). |
| password | string | Value of user\[password] (see [Create Session](https://docs.quickblox.com/reference/create-session)). |
| email | string | Value of user\[email] (see [Create Session](https://docs.quickblox.com/reference/create-session)). |
### Request params
Params of the verification request. Param name can be any, as a value you can set one of available variables. Here you define how to map params of QuickBlox [Create Session](https://docs.quickblox.com/reference/create-session) request to params of your verification request.
You can pass data via request headers or request params, both are valid and optional.
**Format:**
`{"param_1": "#{variable-1}", "param_2": "#{variable-2}"}`
**Example:**
`{"IdP_user_ID": "#{login}", "IdP_token": "#{password}"}`
**Allowed variables:**
| Variable | Type | Description |
| -------- | ------ | ----------------------------------------------------------------------------------------------------- |
| login | string | Value of user\[login] (see [Create Session](https://docs.quickblox.com/reference/create-session)). |
| password | string | Value of user\[password] (see [Create Session](https://docs.quickblox.com/reference/create-session)). |
| email | string | Value of user\[email] (see [Create Session](https://docs.quickblox.com/reference/create-session)). |
**Note**
`GET` request will use query params.
`POST` request will use body params.
### Response params
Response parameters are received as a result of the verification request. Here you define how to map received data to QuickBlox user.
QuickBlox will create **user** session if response is valid and parsed.
New user will be created if **UID** is not found in QuickBlox database.
**Format:**
`{"qb_user_field_1": "#{param_1}", "qb_user_field_2": "#{param_2}", "qb_user_field_3": "#{param_3}"}`
**Example:**
`{"uid": "#{user.id}", "login": "#{user.login}", "full_name": "#{user.full_name}", "external_user_id": "#{user.id}"}`
```JSON JSON theme={null}
{
“user”: {
“id”: 4324,
“login”: “samuel456”,
“full_name”: “Samuel Johnson”
}
}
```
**Allowed QuickBlox user fields:**
| Field | Type | Required | Description |
| ------------------ | ------ | -------- | ------------------------------------------------------------------------------------------------------------------------- |
| `uid` | string | yes | Unique identifier. Hidden system field that links QuickBlox user with external system. |
| `login` | string | no | User's login (see [Users](https://docs.quickblox.com/reference/user-model)). Generated based on **UID** if not specified. |
| `email` | string | no | User's email (see [Users](https://docs.quickblox.com/reference/user-model)). Empty if not specified. |
| `full_name` | string | no | User's full name (see [Users](https://docs.quickblox.com/reference/user-model)). Empty if not specified. |
| `external_user_id` | int | no | ID of user in external system (see [Users](https://docs.quickblox.com/reference/user-model)). Empty if not specified. |
### Allow reuse QuickBlox user
Any user registered with CIdP has **UID**. This system field links QuickBlox users and external users. If **UID** doesn’t exist in the QuickBlox database - a new user will be created. This checkbox tells how to act when external service responds with **UID** that is already in use and QuickBlox user exists:
* If checked - QuickBlox session is created with an existing user.
* If not checked - QuickBlox session is created with a new user, **UID** will be assigned to the new QuickBlox user.
It's recommend to set **UID** as user\_id in your system.
## Step 3: Implement app authentication
On the application side you must implement regular login/password authentication. It's important to set your credentials into `login` and `password` parameters, for example, put **IdP\_user\_ID** to `login` and **IdP\_token** to `password`.
This is done for easy migration of applications that are already published on Apple Store and Google Play.
```bash theme={null}
curl -X POST \
-H "Content-Type: application/json" \
-d '{
"application_id":"76730",
"auth_key":"gqneCwWtz8dqF4F",
"timestamp":"1567350955",
"nonce":"71334",
"signature":"1924a2c84b96347d66b6b2c8489a3cf1d35a8d74",
"user":{
"login":"4324",
"password":"8b75a6c7191285499d890a81df4ee7fe49bc732a"
}
}' \
https://api.quickblox.com/session.json
```
```javascript theme={null}
let externalUserId = "4324";
let externalUserToken = "8b75a6c7191285499d890a81df4ee7fe49bc732a";
QB.createSession({login: externalUserId, password: externalUserToken}, function(err, result) {
});
```
```swift theme={null}
let externalUserId = "4324" //
let externalUserToken = "8b75a6c7191285499d890a81df4ee7fe49bc732a" //
QBRequest.logIn(withUserLogin: externalUserId, password: externalUserToken, successBlock: { (response, user) in
}, errorBlock: { (response) in
})
```
```kotlin theme={null}
val externalUserId = "4324"
val externalUserToken = "8b75a6c7191285499d890a81df4ee7fe49bc732a"
val user = QBUser()
user.login = externalUserId
user.password = externalUserToken
QBUsers.signIn(user).performAsync(object : QBEntityCallback {
override fun onSuccess(qbUser: QBUser?, bundle: Bundle?) {
}
override fun onError(e: QBResponseException?) {
}
})
```
If you can't find code example for your language or platform, check Authentication page of the SDK that you choose.
## Step 4: Implement Chat connection
When CIdP is enabled you must connect to chat with QuickBlox user ID and session token.
```javascript theme={null}
var session = QB.service.getSession();
var params = {userId: session.user_id, password: session.token};
QB.chat.connect(params, function(error, contactList) {});
```
```swift theme={null}
let userID = QBSession.current.currentUserID
let userPassword = QBSession.current.sessionDetails?.token
QBChat.instance.connect(withUserID: userID, password: userPassword, completion: { (error) in
})
```
```kotlin theme={null}
val user = QBUser()
user.id = 47892
user.password = QBSessionManager.getInstance().token
QBChatService.getInstance().login(user, callback)
```
### API URL
URL of the verification request. It will be triggered every time when user tries to log in to QuickBlox API.
**Example:**
[https://youripserver.com/users/identity](https://youripserver.com/users/identity)
### Request headers
Headers of the verification request. Header name can be any, as a value you can set one of available variables. Here you define how to map params of QuickBlox [Create Session](https://docs.quickblox.com/reference/create-session) request to headers of your verification request.
You can pass data via request headers or request params, both are valid and optional.
**Format:**
`{"Header-1": "#{variable-1}", "Header-2": "#{variable-2}"}`
*\*All underscore(\_) characters will be replaced with hyphen(-) characters here.*
**Example:**
`{"IdP_user_ID": "#{login}", "IdP_token": "#{password}"}`
**Allowed variables:**
| Variable | Type | Description |
| -------- | ------ | ----------------------------------------------------------------------------------------------------- |
| login | string | Value of user\[login] (see [Create Session](https://docs.quickblox.com/reference/create-session)). |
| password | string | Value of user\[password] (see [Create Session](https://docs.quickblox.com/reference/create-session)). |
| email | string | Value of user\[email] (see [Create Session](https://docs.quickblox.com/reference/create-session)). |
### Request params
Params of the verification request. Param name can be any, as a value you can set one of available variables. Here you define how to map params of QuickBlox [Create Session](https://docs.quickblox.com/reference/create-session) request to params of your verification request.
You can pass data via request headers or request params, both are valid and optional.
**Format:**
`{"param_1": "#{variable-1}", "param_2": "#{variable-2}"}`
**Example:**
`{"IdP_user_ID": "#{login}", "IdP_token": "#{password}"}`
**Allowed variables:**
| Variable | Type | Description |
| -------- | ------ | ----------------------------------------------------------------------------------------------------- |
| login | string | Value of user\[login] (see [Create Session](https://docs.quickblox.com/reference/create-session)). |
| password | string | Value of user\[password] (see [Create Session](https://docs.quickblox.com/reference/create-session)). |
| email | string | Value of user\[email] (see [Create Session](https://docs.quickblox.com/reference/create-session)). |
**Note**
`GET` request will use query params.
`POST` request will use body params.
### Response params
Response parameters are received as a result of the verification request. Here you define how to map received data to QuickBlox user.
QuickBlox will create **user** session if response is valid and parsed.
New user will be created if **UID** is not found in QuickBlox database.
**Format:**
`{"qb_user_field_1": "#{param_1}", "qb_user_field_2": "#{param_2}", "qb_user_field_3": "#{param_3}"}`
**Example:**
`{"uid": "#{user.id}", "login": "#{user.login}", "full_name": "#{user.full_name}", "external_user_id": "#{user.id}"}`
```JSON JSON theme={null}
{
“user”: {
“id”: 4324,
“login”: “samuel456”,
“full_name”: “Samuel Johnson”
}
}
```
**Allowed QuickBlox user fields:**
| Field | Type | Required | Description |
| ------------------ | ------ | -------- | ------------------------------------------------------------------------------------------------------------------------- |
| `uid` | string | yes | Unique identifier. Hidden system field that links QuickBlox user with external system. |
| `login` | string | no | User's login (see [Users](https://docs.quickblox.com/reference/user-model)). Generated based on **UID** if not specified. |
| `email` | string | no | User's email (see [Users](https://docs.quickblox.com/reference/user-model)). Empty if not specified. |
| `full_name` | string | no | User's full name (see [Users](https://docs.quickblox.com/reference/user-model)). Empty if not specified. |
| `external_user_id` | int | no | ID of user in external system (see [Users](https://docs.quickblox.com/reference/user-model)). Empty if not specified. |
### Allow reuse QuickBlox user
Any user registered with CIdP has **UID**. This system field links QuickBlox users and external users. If **UID** doesn’t exist in the QuickBlox database - a new user will be created. This checkbox tells how to act when external service responds with **UID** that is already in use and QuickBlox user exists:
* If checked - QuickBlox session is created with an existing user.
* If not checked - QuickBlox session is created with a new user, **UID** will be assigned to the new QuickBlox user.
It's recommend to set **UID** as user\_id in your system.
## Step 3: Implement app authentication
On the application side you must implement regular login/password authentication. It's important to set your credentials into `login` and `password` parameters, for example, put **IdP\_user\_ID** to `login` and **IdP\_token** to `password`.
This is done for easy migration of applications that are already published on Apple Store and Google Play.
```bash theme={null}
curl -X POST \
-H "Content-Type: application/json" \
-d '{
"application_id":"76730",
"auth_key":"gqneCwWtz8dqF4F",
"timestamp":"1567350955",
"nonce":"71334",
"signature":"1924a2c84b96347d66b6b2c8489a3cf1d35a8d74",
"user":{
"login":"4324",
"password":"8b75a6c7191285499d890a81df4ee7fe49bc732a"
}
}' \
https://api.quickblox.com/session.json
```
```javascript theme={null}
let externalUserId = "4324";
let externalUserToken = "8b75a6c7191285499d890a81df4ee7fe49bc732a";
QB.createSession({login: externalUserId, password: externalUserToken}, function(err, result) {
});
```
```swift theme={null}
let externalUserId = "4324" //
let externalUserToken = "8b75a6c7191285499d890a81df4ee7fe49bc732a" //
QBRequest.logIn(withUserLogin: externalUserId, password: externalUserToken, successBlock: { (response, user) in
}, errorBlock: { (response) in
})
```
```kotlin theme={null}
val externalUserId = "4324"
val externalUserToken = "8b75a6c7191285499d890a81df4ee7fe49bc732a"
val user = QBUser()
user.login = externalUserId
user.password = externalUserToken
QBUsers.signIn(user).performAsync(object : QBEntityCallback {
override fun onSuccess(qbUser: QBUser?, bundle: Bundle?) {
}
override fun onError(e: QBResponseException?) {
}
})
```
If you can't find code example for your language or platform, check Authentication page of the SDK that you choose.
## Step 4: Implement Chat connection
When CIdP is enabled you must connect to chat with QuickBlox user ID and session token.
```javascript theme={null}
var session = QB.service.getSession();
var params = {userId: session.user_id, password: session.token};
QB.chat.connect(params, function(error, contactList) {});
```
```swift theme={null}
let userID = QBSession.current.currentUserID
let userPassword = QBSession.current.sessionDetails?.token
QBChat.instance.connect(withUserID: userID, password: userPassword, completion: { (error) in
})
```
```kotlin theme={null}
val user = QBUser()
user.id = 47892
user.password = QBSessionManager.getInstance().token
QBChatService.getInstance().login(user, callback)
```