> ## Documentation Index
> Fetch the complete documentation index at: https://docs.quickblox.com/llms.txt
> Use this file to discover all available pages before exploring further.
# Users
> Learn how to manage your users with QuickBlox.
All your users are confined to a QuickBlox application. Thus, there is no conflict when the same user is created by another QuickBlox application.
All users in your QuickBlox application can communicate across multiple platforms. In other words, your iOS, Android, or web users can communicate with each other.
Visit [Key Concepts](/docs/key-concepts) page to learn the most important QuickBlox concepts.
## View list of users
To list users, follow the steps below:
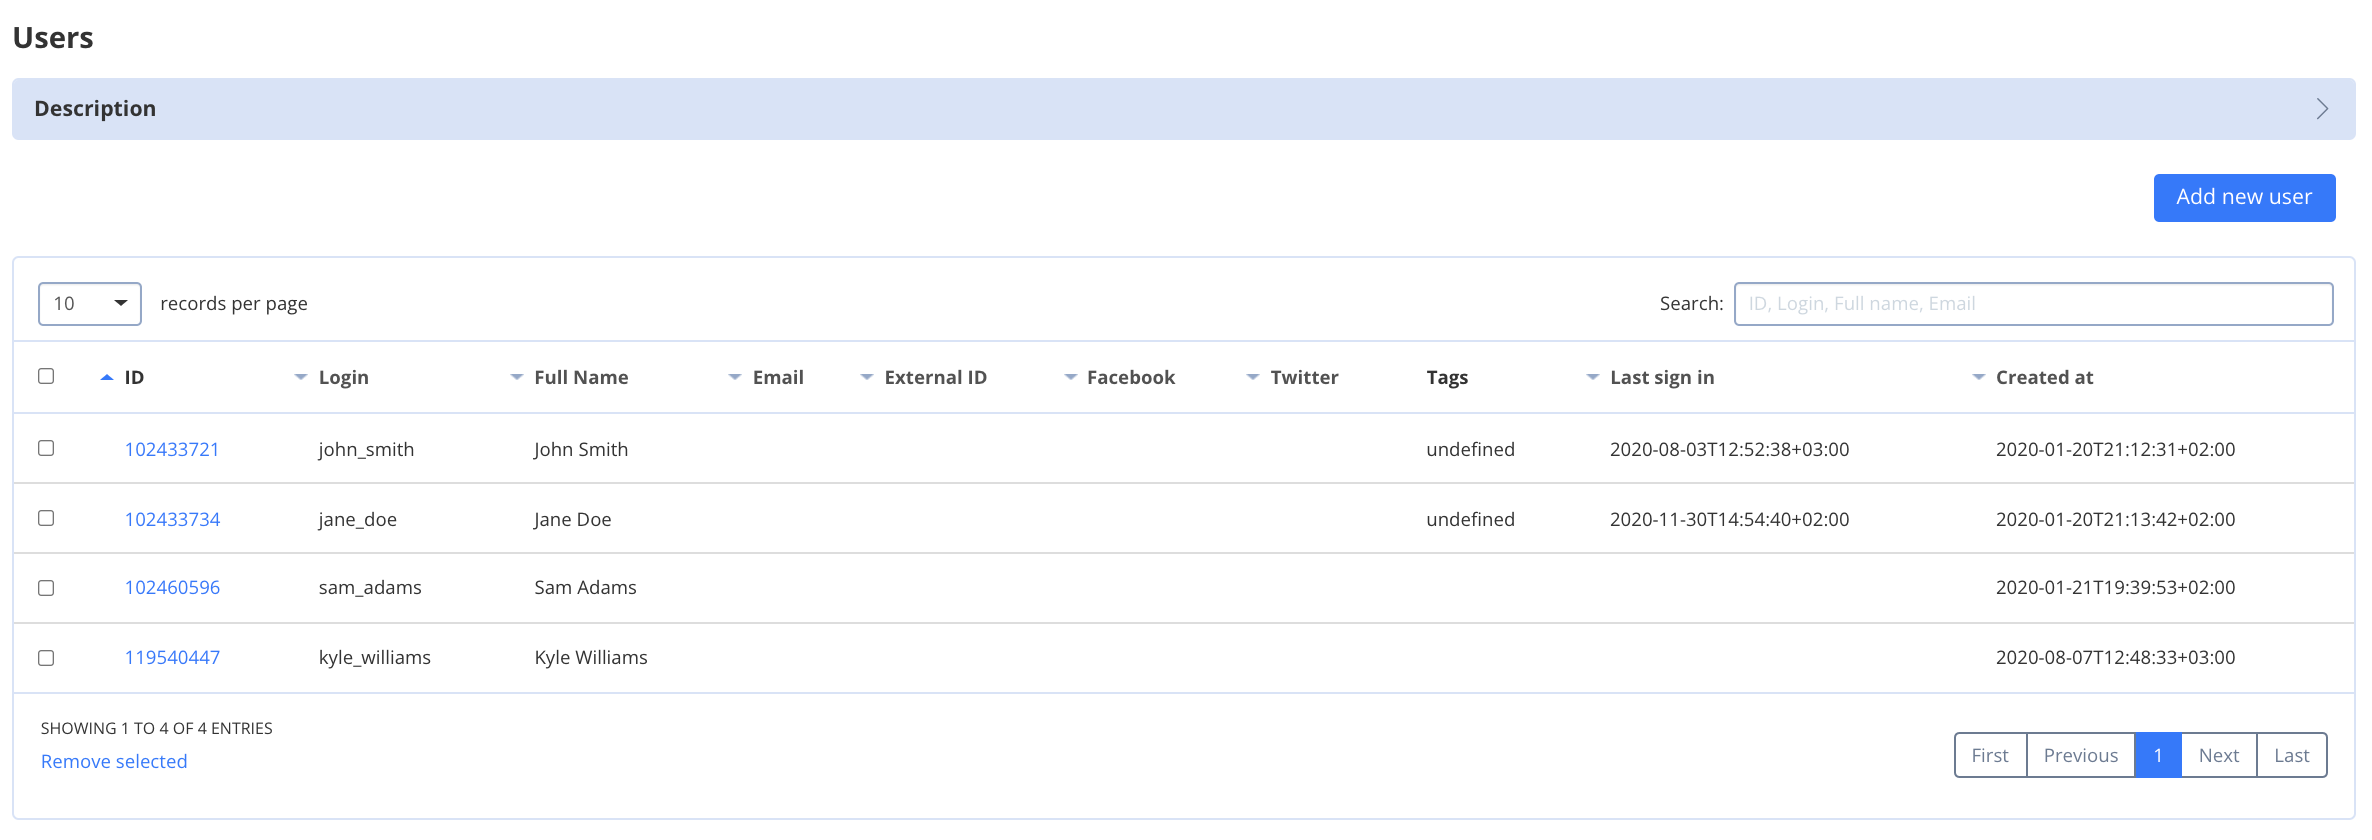
1. Navigate to the **Dashboard => *YOUR\_APP* => Users** page. Here you will see a list of all existing application users.
2. Enter a user ID into the search to list a specific user.
 ## Create user
There are two ways you can create users for your QuickBlox application:
* Create users using [Server API](https://docs.quickblox.com/reference/create-user).
* Create users in the QuickBlox Dashboard.
To create an application user via the Dashboard, follow the steps below:
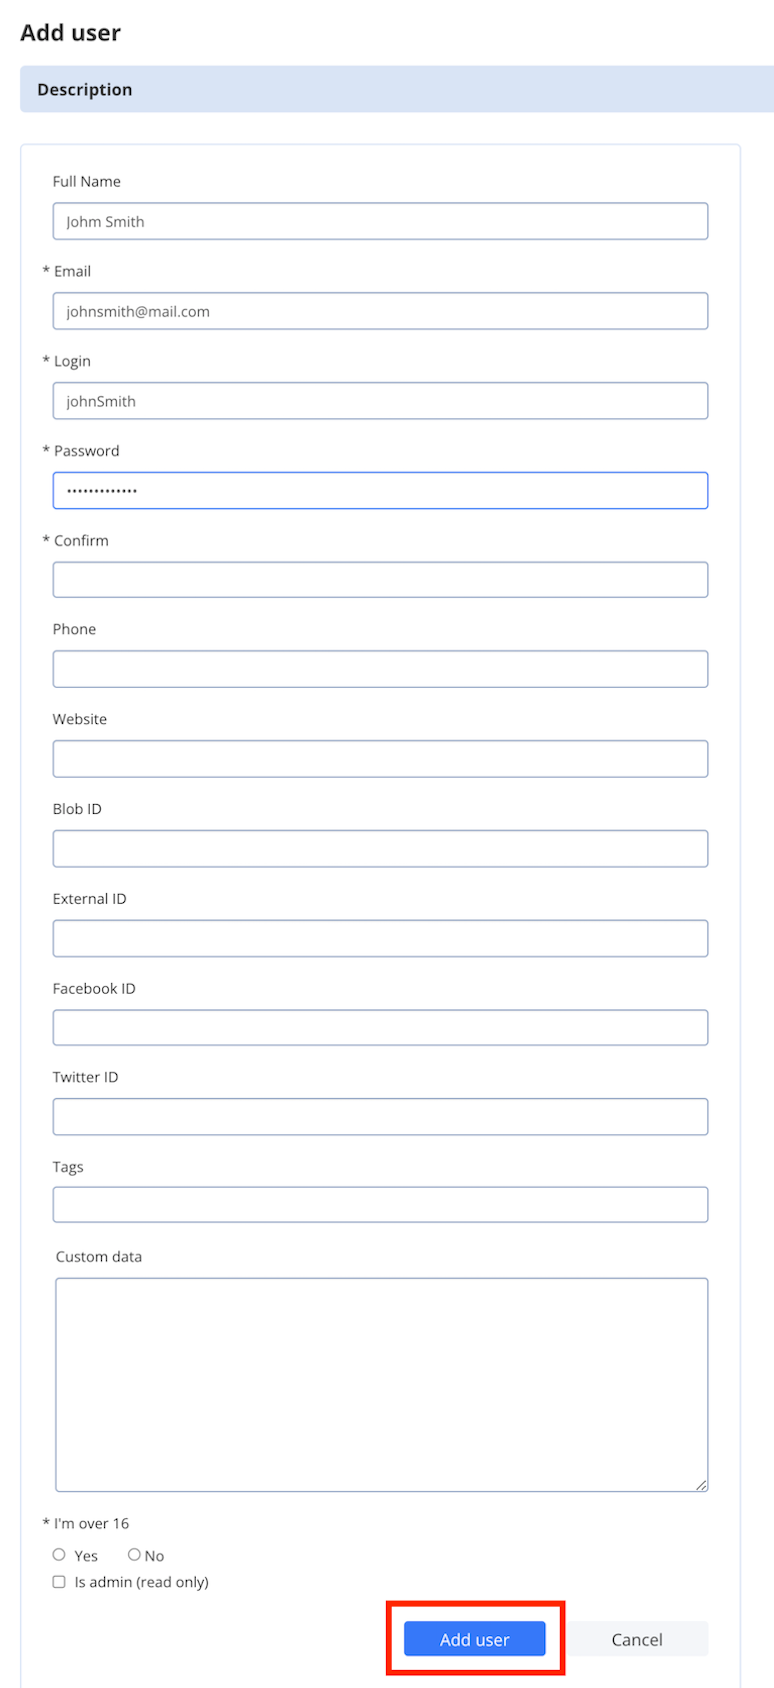
1. Navigate to **Dashboard => *YOUR\_APP* => Add new user** in the QuickBlox Dashboard.
2. Fill in the **Add user** profile info. Enter the email/login, password, and confirm the password for the new user account. These parameters are required for creating a user.
3. Click the **Add user** button. Similarly, you can create more users in the Dashboard.
## Create user
There are two ways you can create users for your QuickBlox application:
* Create users using [Server API](https://docs.quickblox.com/reference/create-user).
* Create users in the QuickBlox Dashboard.
To create an application user via the Dashboard, follow the steps below:
1. Navigate to **Dashboard => *YOUR\_APP* => Add new user** in the QuickBlox Dashboard.
2. Fill in the **Add user** profile info. Enter the email/login, password, and confirm the password for the new user account. These parameters are required for creating a user.
3. Click the **Add user** button. Similarly, you can create more users in the Dashboard.
 You can create a read-only admin user. The read-only admin user is a user with an administrator role who has view access to most data in the Dashboard. They are unable to edit data. To grant a read-only access to a user, follow the steps below:
1. Navigate to the **Dashboard => *YOUR\_APP* => Users** in the QuickBlox Dashboard.
2. Find a user you want to grant a read-only access to.
3. Check the **Is admin (read only)**.
4. Click the **Save and close** button.
## Update user
To update a user, follow the steps below:
1. Navigate to the **Dashboard => *YOUR\_APP* => Users** page. Here you will see a list of all existing application users.
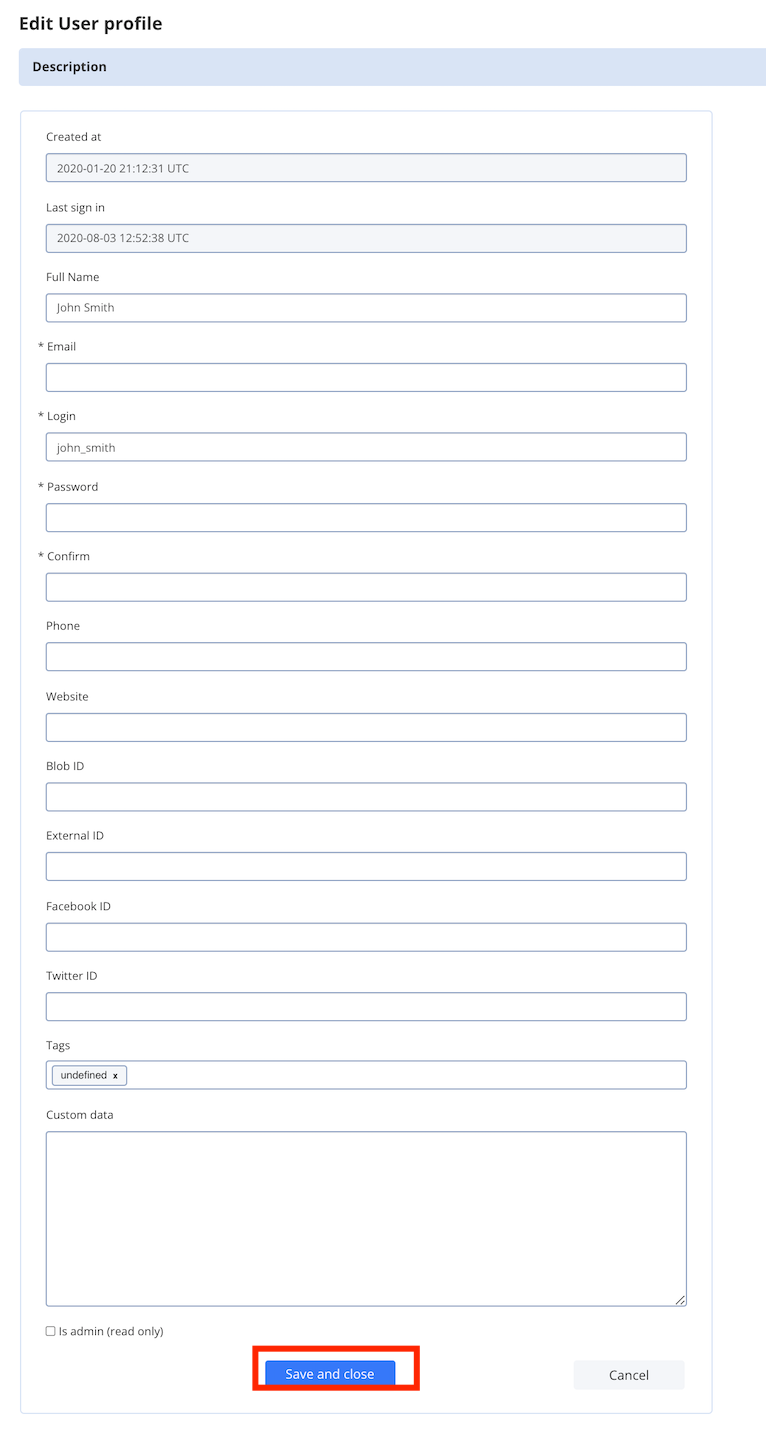
2. Choose the ID of the user you want to update and click on it.
3. Edit the profile of the user.
4. Click the **Save and close** button to save changes.
You can create a read-only admin user. The read-only admin user is a user with an administrator role who has view access to most data in the Dashboard. They are unable to edit data. To grant a read-only access to a user, follow the steps below:
1. Navigate to the **Dashboard => *YOUR\_APP* => Users** in the QuickBlox Dashboard.
2. Find a user you want to grant a read-only access to.
3. Check the **Is admin (read only)**.
4. Click the **Save and close** button.
## Update user
To update a user, follow the steps below:
1. Navigate to the **Dashboard => *YOUR\_APP* => Users** page. Here you will see a list of all existing application users.
2. Choose the ID of the user you want to update and click on it.
3. Edit the profile of the user.
4. Click the **Save and close** button to save changes.
 Confirmed addresses cannot be updated right away. As soon as the email is confirmed, it is updated. See [this section](/docs/users-dashboard#email-confirmation) to learn more about email confirmation.
## Delete user
To delete a user, follow the steps below:
1. Navigate to the **Dashboard => *YOUR\_APP* => Users** page. Here you will see a list of all existing application users.
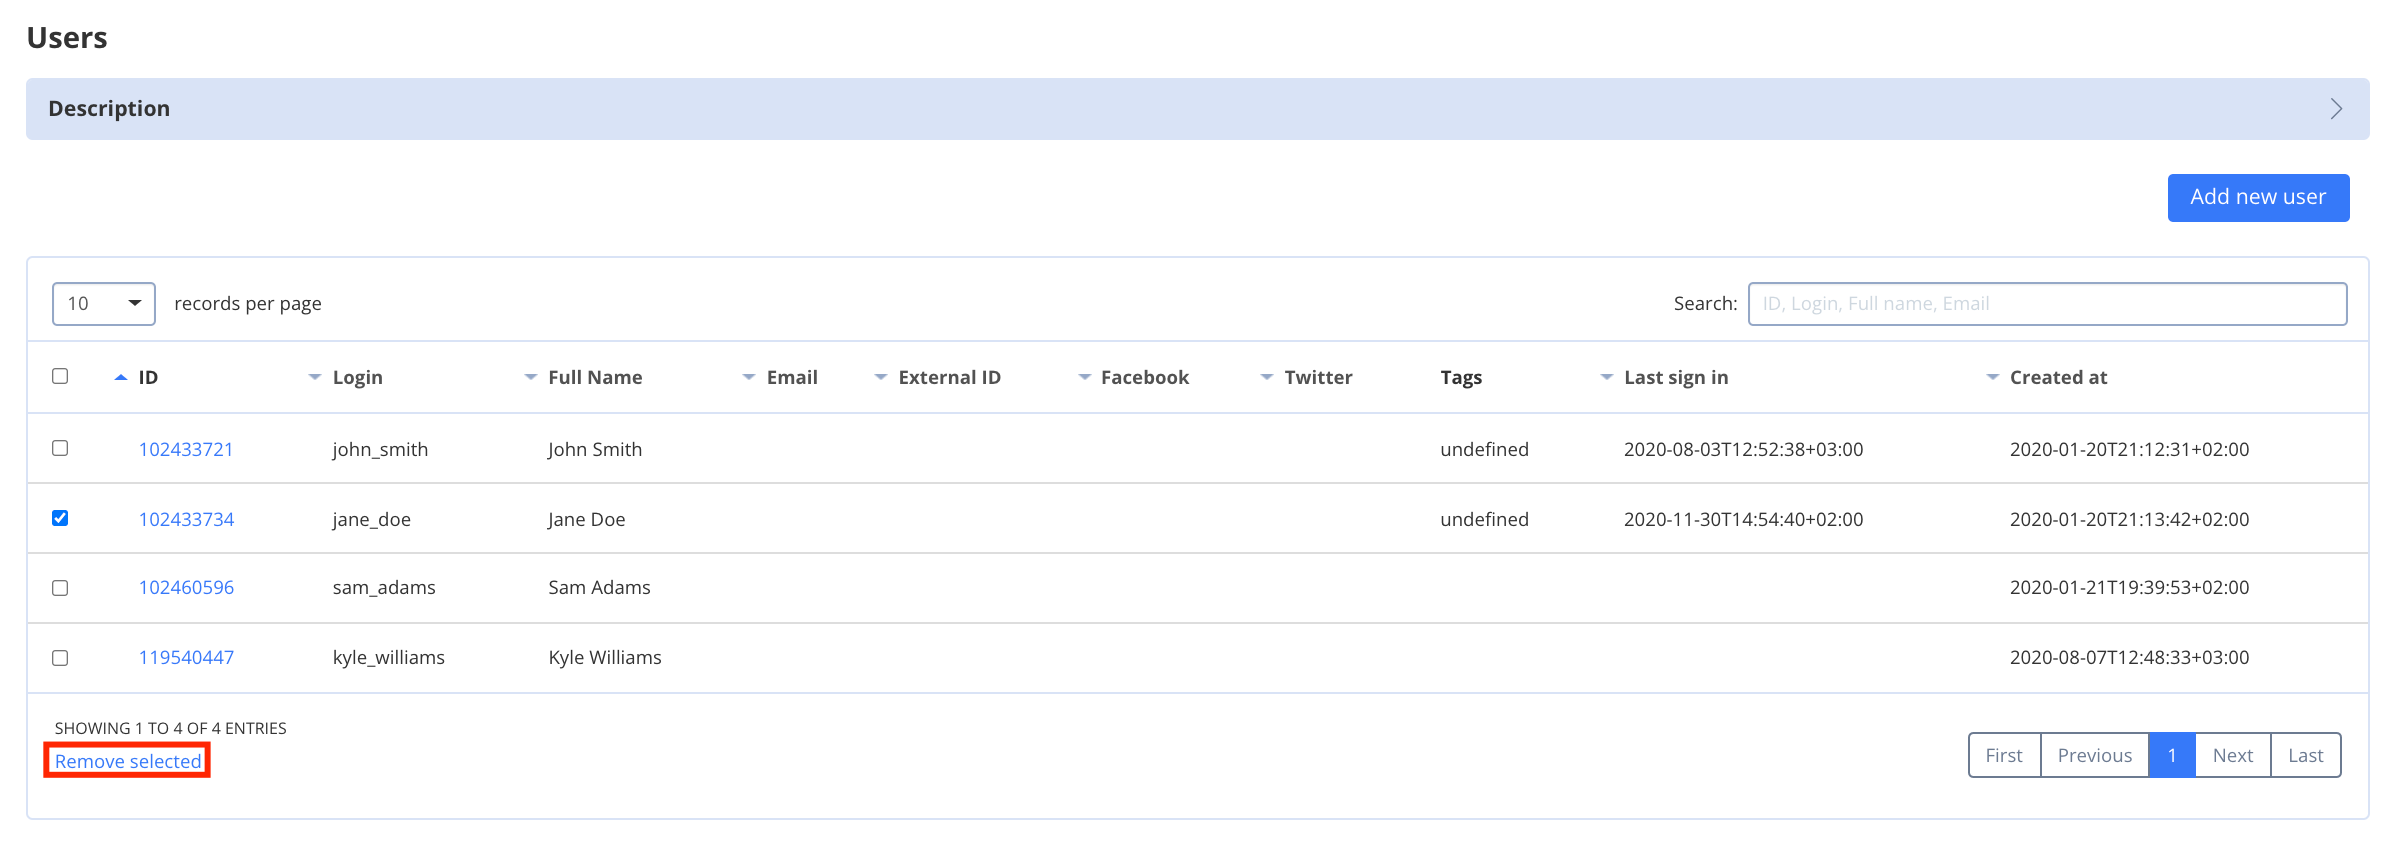
2. Check the user you need to delete.
3. Click the **Remove selected**.
Confirmed addresses cannot be updated right away. As soon as the email is confirmed, it is updated. See [this section](/docs/users-dashboard#email-confirmation) to learn more about email confirmation.
## Delete user
To delete a user, follow the steps below:
1. Navigate to the **Dashboard => *YOUR\_APP* => Users** page. Here you will see a list of all existing application users.
2. Check the user you need to delete.
3. Click the **Remove selected**.
 When the account owner deletes a user, all data associated with the user are deleted from the system. Thus:
1. All files associated with the user are deleted.
2. All custom objects associated with the user are deleted.
3. All dialogs where the user is a dialog owner are deleted.
If a user is a dialog occupant and not a dialog owner, their ID is deleted from the occupants IDs list of all group dialogs they participate in. However, a user isn't removed from occupants IDs list of private dialogs.
## Configure email notifications
You can set templates of email notifications that will be sent to your users. You can use the user-specific tags described below:
User:
* `user.full_name`
* `user.email`
* `user.login`
* `user.phone`
* `user.website`
* `user.created_at`
* `user.updated_at`
* `user.last_request_at`
* `user.external_user_id`
* `user.facebook_id`
* `user.twitter_id`
* `user.blob_id`
* `user.get_reset_password_token`
* `user.get_confirmation_token`
* `user.show_name`
App:
* `app.title`
* `app.url`
* `app.description`
Make sure to enable the [email confirmation](/docs/users-dashboard#email-confirmation). This functionality allows application users to confirm their emails. If a user doesn't confirm the email, the emails won't be sent to this user.
HTML `` tag would be present in email subject.
If you want to use your custom template, be aware that many mail servers disallow most of standard HTML tags.
</Note>
### Greetings template
You can set a 'Greetings' template of email notifications that will be sent to your app users when they sign up. To set the 'Greetings' email, follow the steps below:
1. Enable the email confirmation functionality. See [this section](/docs/users-dashboard#email-confirmation) for more details.
2. Navigate to the **Dashboard => *YOUR\_APP* => Users => Email Notifications** page.
3. Check the **Enable 'Greetings' email** template.
4. Choose the **Greetings email** from the dropdown.
5. Create an email template using the supported tags listed above.
6. Click the **Save changes** button. You can also click the **Save and preview** or **Save and send test** email option to preview or test the email template.
<Note>
Note that many mail servers block some standard HTML tags.
</Note>
<Frame>
<img src="https://mintcdn.com/quickblox/Ue7oFsbTxPKULNVC/images/ec7d252-set_greetings_email.png?fit=max&auto=format&n=Ue7oFsbTxPKULNVC&q=85&s=305f050b4d29738ed1dffb701800b30e" width="1396" height="1434" data-path="images/ec7d252-set_greetings_email.png" />
</Frame>
<Warning>
If the **Enable 'Greetings' email** is not checked, the users won't receive any emails.
</Warning>
### Reset password template
You can set the 'Reset password' template of email notifications that will be sent to your app users who want to reset their passwords. To set the 'Reset password' template, follow the steps below:
1. Enable the email confirmation functionality. See [this section](/docs/users-dashboard#email-confirmation) for more details.
2. Navigate to **Dashboard => *YOUR\_APP* => Users => Email Notifications** page.
3. Check the **Enable custom 'Reset password' email** template.
4. Choose the **Password reset email** from the dropdown.
5. Create an email template using the supported tags listed above. Add the `#{user.get_reset_password_token}` to reset password link to the template. For example, ` https://api.quickblox.com/password_reset?token=#{user.get_reset_password_token}`. Thus, when the user clicks on the emailed link, the token is going to be sent back to the application as part of the URL.
6. Click the **Save changes** button. You can also click the **Save and preview** or **Save and send test** email option to preview or test the email template.
<Frame>
<img src="https://mintcdn.com/quickblox/e8BObhqG0WJty0gE/images/6b04faf-reset_password.png?fit=max&auto=format&n=e8BObhqG0WJty0gE&q=85&s=bb4fe3904df316a2a6db530474010c77" width="1352" height="1426" data-path="images/6b04faf-reset_password.png" />
</Frame>
<Warning>
If the **Enable custom 'Reset password' email** is not checked, the users will receive a default QuickBlox email.
</Warning>
<Note>
You can also use your own server/page to perform the password reset operation. In this case, your web page should perform a request to QuickBlox server to save new password:
`PUT https://api.quickblox.com/update_password.json`.
Pass the following parameters within the request body:
* `user[reset_password_token]`
* `user[password]`
* `user[password_confirmation]`
</Note>
### Email confirmation template
You can set the 'Email confirmation' template of email notifications that will be sent to users when they sign up. To set the 'Email confirmation' template, follow the steps below:
1. Enable the email confirmation functionality. See [this section](/docs/users-dashboard#email-confirmation) for more details.
2. Navigate to the **Dashboard => *YOUR\_APP* => Users => Email Notifications** page.
3. Check the **Enable custom 'Email confirmation' email** template.
4. Choose the **Confirmation email** from the dropdown.
5. Create an email template using the supported tags listed above. Add the `#{user.get_confirmation_token}` to the email confirmation link in the template. For example, `https://api.quickblox.com/confirm_email?token=#{user.get_confirmation_token}`. Thus, when the user clicks on the emailed link, the token is going to be sent back to the application as part of the URL.
6. Click the **Save changes** button. You can also click the **Save and preview** or **Save and send test** email option to preview or test the email template.
<Frame>
<img src="https://mintcdn.com/quickblox/-4CiPyZYUlxdCa4v/images/71ac52e-email_confirmation.png?fit=max&auto=format&n=-4CiPyZYUlxdCa4v&q=85&s=3d67ac85777c946efbb1b86f86e55256" width="1372" height="1404" data-path="images/71ac52e-email_confirmation.png" />
</Frame>
<Warning>
If the **Enable custom 'Email confirmation' email** is not checked, the users will receive a default QuickBlox email.
</Warning>
## Configure user settings
You can set the following settings for your users:
### Email confirmation
The functionality enables application users to confirm their emails. Make sure to enable the email confirmation. To enable the email confirmation, proceed as follows:
1. Go to the **Dashboard => *YOUR\_APP* => Users => Settings => User registration confirmation** and check the box.
2. Click the **Save** button.
<Frame>
<img src="https://mintcdn.com/quickblox/e8BObhqG0WJty0gE/images/5139796-user_registration.png?fit=max&auto=format&n=e8BObhqG0WJty0gE&q=85&s=a97c46f0f17f4a55305304cf5cd7eb84" alt="user registration.png" width="1512" height="322" data-path="images/5139796-user_registration.png" />
</Frame>
<Warning>
If a user doesn't confirm the email, the emails won't be sent to this user. As a result, password reset functionality won't work.
</Warning>
### New contact joined from address book notifications
There is a way to get a push notification when some contact from your address book has been registered in the app. You can enable this feature at QuickBlox Dashboard as follows:
1. Follow the **Dashboard => *YOUR\_APP* => Users => Settings** direction
2. Enable push notifications for new contacts.
3. Click the **Save** button.
<Frame>
<img src="https://mintcdn.com/quickblox/Ue7oFsbTxPKULNVC/images/e7429c4-new_contact_joined.png?fit=max&auto=format&n=Ue7oFsbTxPKULNVC&q=85&s=35c02ccc2b51115d7cdef92b53584193" alt="new contact joined.png" width="1544" height="764" data-path="images/e7429c4-new_contact_joined.png" />
</Frame>
When the account owner deletes a user, all data associated with the user are deleted from the system. Thus:
1. All files associated with the user are deleted.
2. All custom objects associated with the user are deleted.
3. All dialogs where the user is a dialog owner are deleted.
If a user is a dialog occupant and not a dialog owner, their ID is deleted from the occupants IDs list of all group dialogs they participate in. However, a user isn't removed from occupants IDs list of private dialogs.
## Configure email notifications
You can set templates of email notifications that will be sent to your users. You can use the user-specific tags described below:
User:
* `user.full_name`
* `user.email`
* `user.login`
* `user.phone`
* `user.website`
* `user.created_at`
* `user.updated_at`
* `user.last_request_at`
* `user.external_user_id`
* `user.facebook_id`
* `user.twitter_id`
* `user.blob_id`
* `user.get_reset_password_token`
* `user.get_confirmation_token`
* `user.show_name`
App:
* `app.title`
* `app.url`
* `app.description`
Make sure to enable the [email confirmation](/docs/users-dashboard#email-confirmation). This functionality allows application users to confirm their emails. If a user doesn't confirm the email, the emails won't be sent to this user.
HTML `` tag would be present in email subject.
If you want to use your custom template, be aware that many mail servers disallow most of standard HTML tags.
</Note>
### Greetings template
You can set a 'Greetings' template of email notifications that will be sent to your app users when they sign up. To set the 'Greetings' email, follow the steps below:
1. Enable the email confirmation functionality. See [this section](/docs/users-dashboard#email-confirmation) for more details.
2. Navigate to the **Dashboard => *YOUR\_APP* => Users => Email Notifications** page.
3. Check the **Enable 'Greetings' email** template.
4. Choose the **Greetings email** from the dropdown.
5. Create an email template using the supported tags listed above.
6. Click the **Save changes** button. You can also click the **Save and preview** or **Save and send test** email option to preview or test the email template.
<Note>
Note that many mail servers block some standard HTML tags.
</Note>
<Frame>
<img src="https://mintcdn.com/quickblox/Ue7oFsbTxPKULNVC/images/ec7d252-set_greetings_email.png?fit=max&auto=format&n=Ue7oFsbTxPKULNVC&q=85&s=305f050b4d29738ed1dffb701800b30e" width="1396" height="1434" data-path="images/ec7d252-set_greetings_email.png" />
</Frame>
<Warning>
If the **Enable 'Greetings' email** is not checked, the users won't receive any emails.
</Warning>
### Reset password template
You can set the 'Reset password' template of email notifications that will be sent to your app users who want to reset their passwords. To set the 'Reset password' template, follow the steps below:
1. Enable the email confirmation functionality. See [this section](/docs/users-dashboard#email-confirmation) for more details.
2. Navigate to **Dashboard => *YOUR\_APP* => Users => Email Notifications** page.
3. Check the **Enable custom 'Reset password' email** template.
4. Choose the **Password reset email** from the dropdown.
5. Create an email template using the supported tags listed above. Add the `#{user.get_reset_password_token}` to reset password link to the template. For example, ` https://api.quickblox.com/password_reset?token=#{user.get_reset_password_token}`. Thus, when the user clicks on the emailed link, the token is going to be sent back to the application as part of the URL.
6. Click the **Save changes** button. You can also click the **Save and preview** or **Save and send test** email option to preview or test the email template.
<Frame>
<img src="https://mintcdn.com/quickblox/e8BObhqG0WJty0gE/images/6b04faf-reset_password.png?fit=max&auto=format&n=e8BObhqG0WJty0gE&q=85&s=bb4fe3904df316a2a6db530474010c77" width="1352" height="1426" data-path="images/6b04faf-reset_password.png" />
</Frame>
<Warning>
If the **Enable custom 'Reset password' email** is not checked, the users will receive a default QuickBlox email.
</Warning>
<Note>
You can also use your own server/page to perform the password reset operation. In this case, your web page should perform a request to QuickBlox server to save new password:
`PUT https://api.quickblox.com/update_password.json`.
Pass the following parameters within the request body:
* `user[reset_password_token]`
* `user[password]`
* `user[password_confirmation]`
</Note>
### Email confirmation template
You can set the 'Email confirmation' template of email notifications that will be sent to users when they sign up. To set the 'Email confirmation' template, follow the steps below:
1. Enable the email confirmation functionality. See [this section](/docs/users-dashboard#email-confirmation) for more details.
2. Navigate to the **Dashboard => *YOUR\_APP* => Users => Email Notifications** page.
3. Check the **Enable custom 'Email confirmation' email** template.
4. Choose the **Confirmation email** from the dropdown.
5. Create an email template using the supported tags listed above. Add the `#{user.get_confirmation_token}` to the email confirmation link in the template. For example, `https://api.quickblox.com/confirm_email?token=#{user.get_confirmation_token}`. Thus, when the user clicks on the emailed link, the token is going to be sent back to the application as part of the URL.
6. Click the **Save changes** button. You can also click the **Save and preview** or **Save and send test** email option to preview or test the email template.
<Frame>
<img src="https://mintcdn.com/quickblox/-4CiPyZYUlxdCa4v/images/71ac52e-email_confirmation.png?fit=max&auto=format&n=-4CiPyZYUlxdCa4v&q=85&s=3d67ac85777c946efbb1b86f86e55256" width="1372" height="1404" data-path="images/71ac52e-email_confirmation.png" />
</Frame>
<Warning>
If the **Enable custom 'Email confirmation' email** is not checked, the users will receive a default QuickBlox email.
</Warning>
## Configure user settings
You can set the following settings for your users:
### Email confirmation
The functionality enables application users to confirm their emails. Make sure to enable the email confirmation. To enable the email confirmation, proceed as follows:
1. Go to the **Dashboard => *YOUR\_APP* => Users => Settings => User registration confirmation** and check the box.
2. Click the **Save** button.
<Frame>
<img src="https://mintcdn.com/quickblox/e8BObhqG0WJty0gE/images/5139796-user_registration.png?fit=max&auto=format&n=e8BObhqG0WJty0gE&q=85&s=a97c46f0f17f4a55305304cf5cd7eb84" alt="user registration.png" width="1512" height="322" data-path="images/5139796-user_registration.png" />
</Frame>
<Warning>
If a user doesn't confirm the email, the emails won't be sent to this user. As a result, password reset functionality won't work.
</Warning>
### New contact joined from address book notifications
There is a way to get a push notification when some contact from your address book has been registered in the app. You can enable this feature at QuickBlox Dashboard as follows:
1. Follow the **Dashboard => *YOUR\_APP* => Users => Settings** direction
2. Enable push notifications for new contacts.
3. Click the **Save** button.
<Frame>
<img src="https://mintcdn.com/quickblox/Ue7oFsbTxPKULNVC/images/e7429c4-new_contact_joined.png?fit=max&auto=format&n=Ue7oFsbTxPKULNVC&q=85&s=35c02ccc2b51115d7cdef92b53584193" alt="new contact joined.png" width="1544" height="764" data-path="images/e7429c4-new_contact_joined.png" />
</Frame>