> ## Documentation Index
> Fetch the complete documentation index at: https://docs.quickblox.com/llms.txt
> Use this file to discover all available pages before exploring further.
# Authentication
> QuickBlox API can be accessed either with **session** token or with **API key**.
An **API key** is exclusively designed for server API requests and not work with SDK implementations. It is intended for direct server-to-server communication and might cause errors or unexpected behavior if used within an SDK environment.
To access QuickBlox API you need to authenticate your application with QuickBlox server. A token-based authentication should be used to provide secure access to QuickBlox API. The token-based authentication works by ensuring that each request to the server contains a token that is verified by the server for authenticity. When the authenticity is verified, the server responds to the request.
### API key
An **API key** is designed for server-to-server communication and should not be shared with or used by end-users directly. It serves as a secure credential to authenticate and authorize requests made to the server API.
**Key Features:**
* The API key is permanent and does not have an expiration date.
* It grants full permissions to perform any action within the server API.
**Obtaining an API Key**
To obtain an API key, please follow the instructions [Create API key](/docs/application#create-api-key)
**API Key Usage**
1. To authenticate requests using the API key, include it in the request headers as follows the example:
```bash cURL theme={null}
curl -X GET \
-H 'Authorization: ApiKey {API_KEY}' \
https://api.quickblox.com/users
```
Replace `{API_KEY}` with the actual API key value.
2. Request Execution on Behalf of a User
To execute a request on behalf of a specific user, include the "On-Behalf-Of" header in your request. This allows the server to identify the user on whose behalf the request is being made.
Example Request Header:
```bash cURL theme={null}
curl -X GET
-H 'Authorization: ApiKey {API_KEY}' \
-H 'On-Behalf-Of: {USER_ID}' \
https://api.quickblox.com/users
```
Replace `{USER_ID}` with the unique identifier of the QuickBlox user.
**Security Considerations**
To maintain the security and integrity of the API key, follow these best practices:
* Keep the API key confidential and do not share it with unauthorized individuals.
* Transmit the API key securely over HTTPS.
* Regularly review and audit the server-side access and permissions associated with the API key. If an API key is compromised or suspected of being compromised, replace the API key immediately for further action.
### Application vs User session token
A **token** is a piece of data identifying a user or application and providing temporary access to QuickBlox Server API. The **token** is valid only within the **session** it was generated. The **session** gets expired in 2 hours after the last request to the Server API.
A session **token** is obtained via **Create Session** request having `/session.json` endpoint. Once a **token** is received, it becomes a part of each request and is placed within its header.
There are two types of tokens: **application** session token and **user** session token. The **application** session token is limited to read-only permissions preventing changes to application data while the **user** session token is not restricted in permissions and allows for making edits to application data.
| Session Token Type | Description |
| ------------------------- | ------------------------------------------------------------------------------------------------------------------------------------------------------------------------------------------------------------------------------------------------------------------------------------------------------ |
| Application session token | This kind of access token is needed to read the app data. Has only READ access to resources. The expiration time after the last Server API request is 2 hours. |
| User session token | The user token is the most commonly used type of token. This kind of access token is needed any time the app calls a Server API to read, modify or write a specific user's data on their behalf. Has READ/WRITE access to resources. The expiration time after the last Server API request is 2 hours. |
If you perform a query with an **expired token**, you receive the error `Required session does not exist`. In this case, you have to recreate a session token.
Want to change session **expiration time**? This option is available for [Enterprise Plan](https://quickblox.com/pricing/) only. [Contact the sales team](https://quickblox.com/enterprise/#get).
#### Signature generation
Use a signature mechanism to verify the contents of the [Create Session](/reference/create-session) request on the QuickBlox server. The signature is generated using the HMAC-SHA cryptographic hashing algorithm. Then it is sent in the session creation request to verify the end-user. The inputs to a hashing algorithm include:
* A normalized string. The string is formed using the `parameter=value` pairs that should be sorted alphabetically by their text value and separated by the `&` character. Use the parameters of the create session request to form the string.
* An authorization secret. The secret is known as a cryptographic key and is used to compute the HMAC.
* A hashing algorithm. The cryptographic hash function.
### For Basic, Startup, Growth plan, and HIPAA Cloud users
The SHA1 hash algorithm is used to generate a signature.
### For Basic, Startup, Growth plan, and HIPAA Cloud users
* **By default**, the SHA1 hash algorithm is used to generate a signature.
* [Contact our sales team](https://quickblox.com/enterprise/) if you need to change SHA1 to SHA256.
**Signature generation examples**
A signature generation request body is different for each authentication option. See the signature generation examples below:
```text Application session theme={null}
REQUEST PARAMETERS:
application_id
auth_key
nonce
timestamp
NORMALIZED STRING:
application_id=716730&auth_key=bbfeCwWtz8dqF4F&nonce=33432×tamp=1572434294
AUTHORIZATION SECRET(SECRET KEY):
YYXAU8BEYBfv0Fn
RESULTING SIGNATURE:
be6e49d06389a59d8846edf04789bcd7ada23eb8
```
```text User session (with login/password) theme={null}
REQUEST PARAMETERS:
application_id
auth_key
nonce
timestamp
user[login]
user[password]
NORMALIZED STRING:
application_id=716730&auth_key=bbfeCwWtz8dqF4F&nonce=33431×tamp=1572434594&user[login]=amigo30&user[password]=amigo30pass
AUTHORIZATION SECRET(SECRET KEY):
YYXAU8BEYBfv0Fn
RESULTING SIGNATURE:
99dc8e0a81afc0ff19b509c229c0256d7fe13220
```
```text User session (with Facebook) theme={null}
REQUEST PARAMETERS:
application_id
auth_key
keys[token]
nonce
provider
timestamp
NORMALIZED STRING:
application_id=716730&auth_key=bbfeCwWtz8dqF4F&keys[token]=AM46dxjhisdffgry26282352fdusdfusdfgsdf&nonce=33432&provider=facebook×tamp=1572434694
AUTHORIZATION SECRET(SECRET KEY):
YYXAU8BEYBfv0Fn
RESULTING SIGNATURE:
a54e6693b04f9edf6b42c903923f8e204e5316e6
```
```text User session (with Firebase) theme={null}
REQUEST PARAMETERS:
application_id
auth_key
firebase_phone[access_token]
firebase_phone[project_id]
nonce
timestamp
NORMALIZED STRING:
application_id=86716&auth_key=XHudVt3ktSV3mpK&firebase_phone[access_token]=eyJhbGciOiJSUzI1NiIsImtpZCI6Ijc3MTBiMDE3ZmQ5YjcxMWUwMDljNmMzNmIwNzNiOGE2N2NiNjgyMTEiLCJ0eXAiOiJKV1QifQ.eyJpc3MiOiJodHRwczovL3NlY3VyZXRva2VuLmdvb2dsZS5jb20vcXVldWUtZGVtby1jbGllbnQiLCJhdWQiOiJxdWV1ZS1kZW1vLWNsaWVudCIsImF1dGhfdGltZSI6MTYyNjQzMjg5OSwidXNlcl9pZCI6InFhZnNjMHpnOHNVSktvdFJkb1J1eUx1UXdiRjMiLCJzdWIiOiJxYWZzYzB6ZzhzVUpLb3RSZG9SdXlMdVF3YkYzIiwiaWF0IjoxNjI2NDMyOTAwLCJleHAiOjE2MjY0MzY1MDAsInBob25lX251bWJlciI6IiszODA5Mzc2MzcyNTMiLCJmaXJlYmFzZSI6eyJpZGVudGl0aWVzIjp7InBob25lIjpbIiszODA5Mzc2MzcyNTMiXX0sInNpZ25faW5fcHJvdmlkZXIiOiJwaG9uZSJ9fQ.ORDJTSGTicsvAeJ-eUQcDvt5Jv-y1c3HteOlzLApTZZ2C-nJZOB4RFpvoviIQwH53PFANB5iXTHBw1a5XBKROeRYEyu8YLg6RsH0wt5f5_hzGsUisgeFleDrz9i3V7NqkITqz2ADcJrWzwF-YDj5TbzCTlHmgeciiuViVbLqyFSKfyYrvFjM7x1IvJYUNVD3XGIq33128eaqHRuWfiaW5PC9ZdvfdOF5UhNpBx330TfM1FV9gNBQxd3cmxCE-bD1kvHQWLk6z8XKTNWZag718_Gf7MVmhqk-bC_KtwQ7IGVMRjPgCdNbA8H1btIcofD2iUVtzTew4et7leR6ujCAcA&firebase_phone[project_id]=56783&nonce=9823&provider=firebase_phone×tamp=1626433392
AUTHORIZATION SECRET(SECRET KEY):
dMFLtwFt4fX567U
RESULTING SIGNATURE:
3fc62b95b4689e5b619bc6f4adfa267f68bc06fc
```
The request body parameters should be sorted **alphabetically** by their text value and separated with the `&` symbol.
**Signature generation with third-party tool**
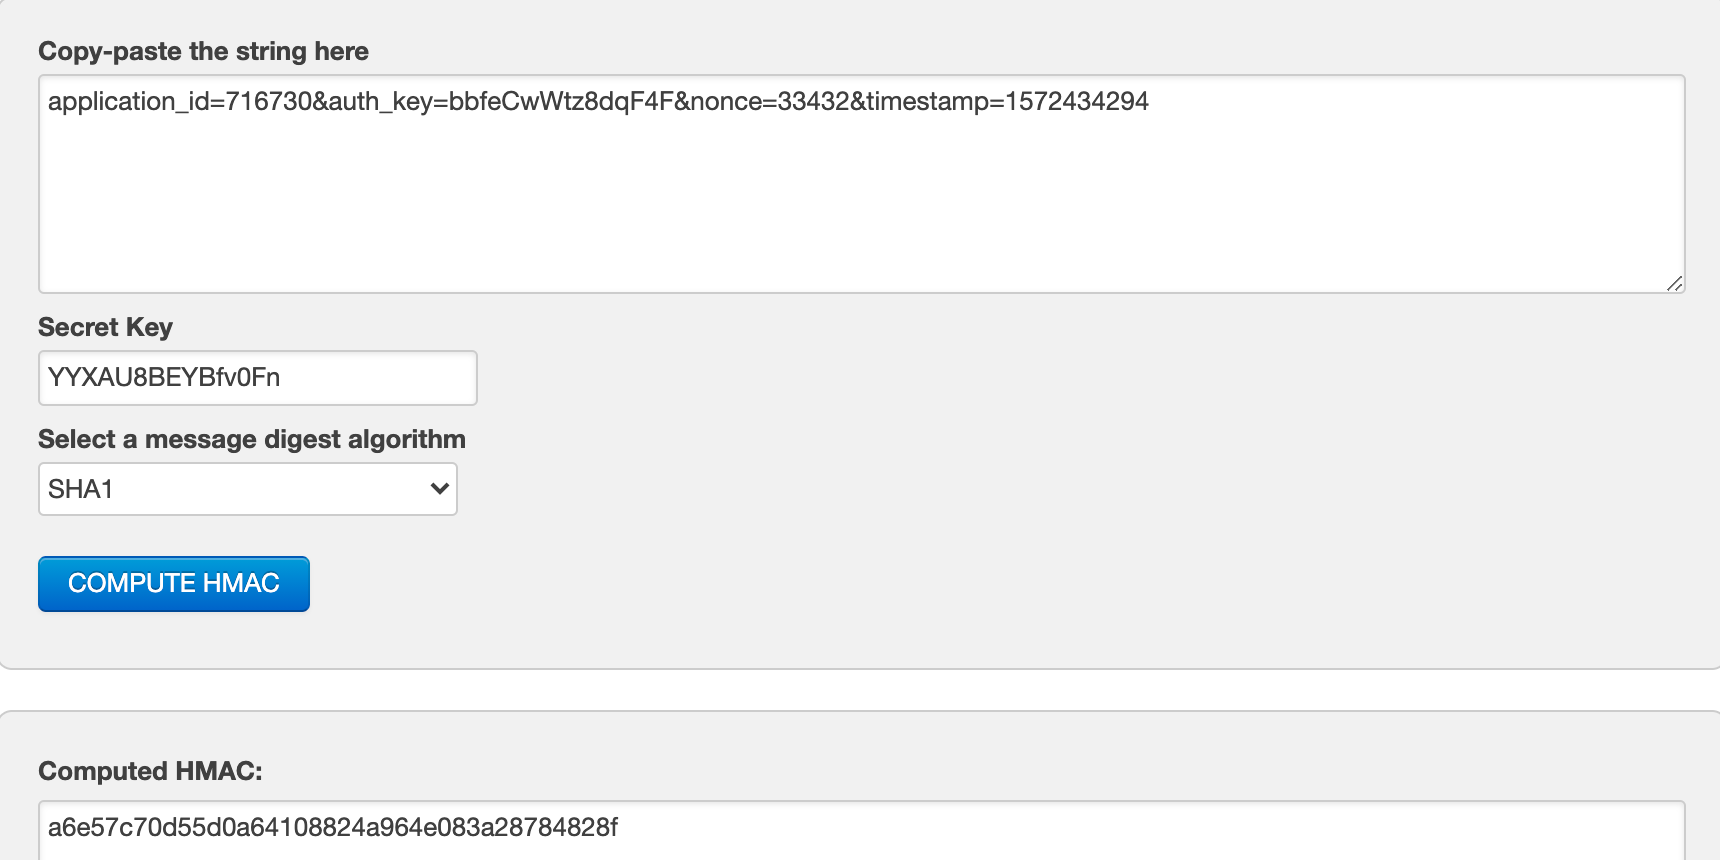
You can test signature generation algorithm with the HMAC-SHA generator. Thus, to generate the signature, proceed as follows:
1. Open the HMAC-SHA generator. For example, you can use [this one](https://www.freeformatter.com/hmac-generator.html).
2. Compose a normalized string from `parameter=value` pairs. For example: application\_id=716730\&auth\_key=bbfeCwWtz8dqF4F\&nonce=33432×tamp=1572434294
3. Enter the authorization secret(secret key).
4. Choose SHA1 hashing algorithm.
5. Generate the signature. Your screen should look similar to the screenshot below: