> ## Documentation Index
> Fetch the complete documentation index at: https://docs.quickblox.com/llms.txt
> Use this file to discover all available pages before exploring further.
# Push Notifications
> Learn how to send push notifications to users when they are offline.
Firebase is shutting down FCM legacy API on **June 20, 2024**. Migrate to FCM HTTP v1 API before this date in order to keep Android Push Notifications working. Follow steps in our [migration guide](https://quickblox.com/blog/firebase-cloud-messaging-fcm-migration-guide/).
In case of any issues please reach us out via [our Help Center](https://help.quickblox.com/conversation/new).
Push Notifications provide a way to deliver some information to a user while they are not using your app actively. The following use cases can be covered by push notifications:
* **Offline messages.** Send a chat message when a recipient is offline. In this case, a push notification will be sent automatically if the user is offline.
* **Offline calls.** Make a video/audio call with offline opponents. In this case, a push notification will be sent manually.
* **Requests to contact list.** Send requests to add a user to the contact list. In this case, a push notification will be sent manually).
* **User tags.** Send notifications to specific user groups defined by tags.
Visit [Key Concepts](/docs/key-concepts) page to learn the most important QuickBlox concepts.
## Before you begin
1. Register a [QuickBlox account](https://admin.quickblox.com/signin). This is a matter of a few minutes and you will be able to use this account to build your apps.
2. Configure QuickBlox SDK for your app. Check out [Setup](/sdks/android-setup) page for more details.
3. Create a user session to be able to use QuickBlox functionality. See [Authentication](/sdks/android-authentication) page to learn how to do it.
HTTP v1 API it's recommended solution.
### 1. Generate a new service account key
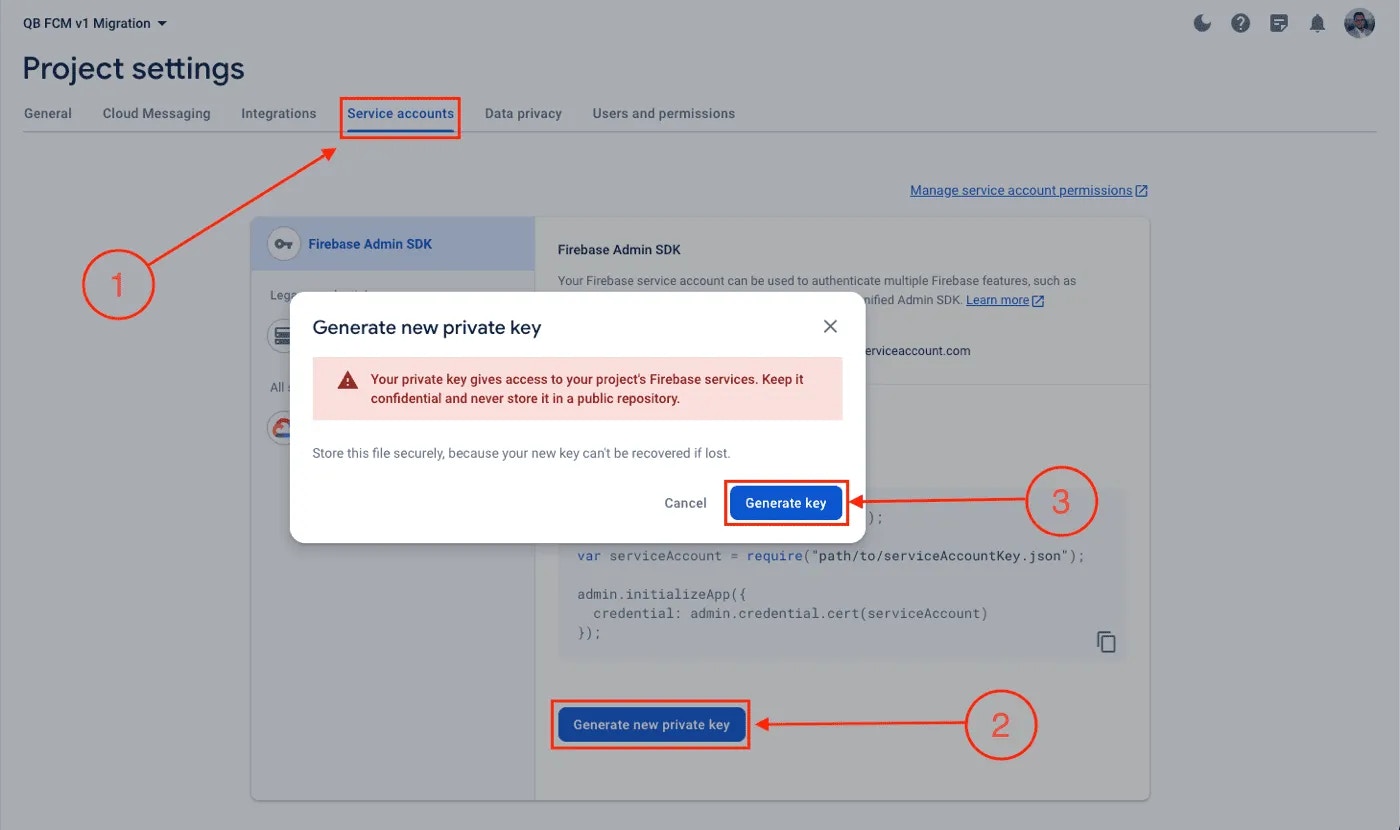 To generate a new service account key, you need to:
1. Open the Firebase console and select your project.
2. Go to Project settings > Service Accounts.
3. Click on Generate new private key and confirm by clicking Generate key.
4. Securely store the JSON file containing the private key that will be downloaded
### 2. Navigate to the push notifications section on QuickBlox dashboard
To generate a new service account key, you need to:
1. Open the Firebase console and select your project.
2. Go to Project settings > Service Accounts.
3. Click on Generate new private key and confirm by clicking Generate key.
4. Securely store the JSON file containing the private key that will be downloaded
### 2. Navigate to the push notifications section on QuickBlox dashboard
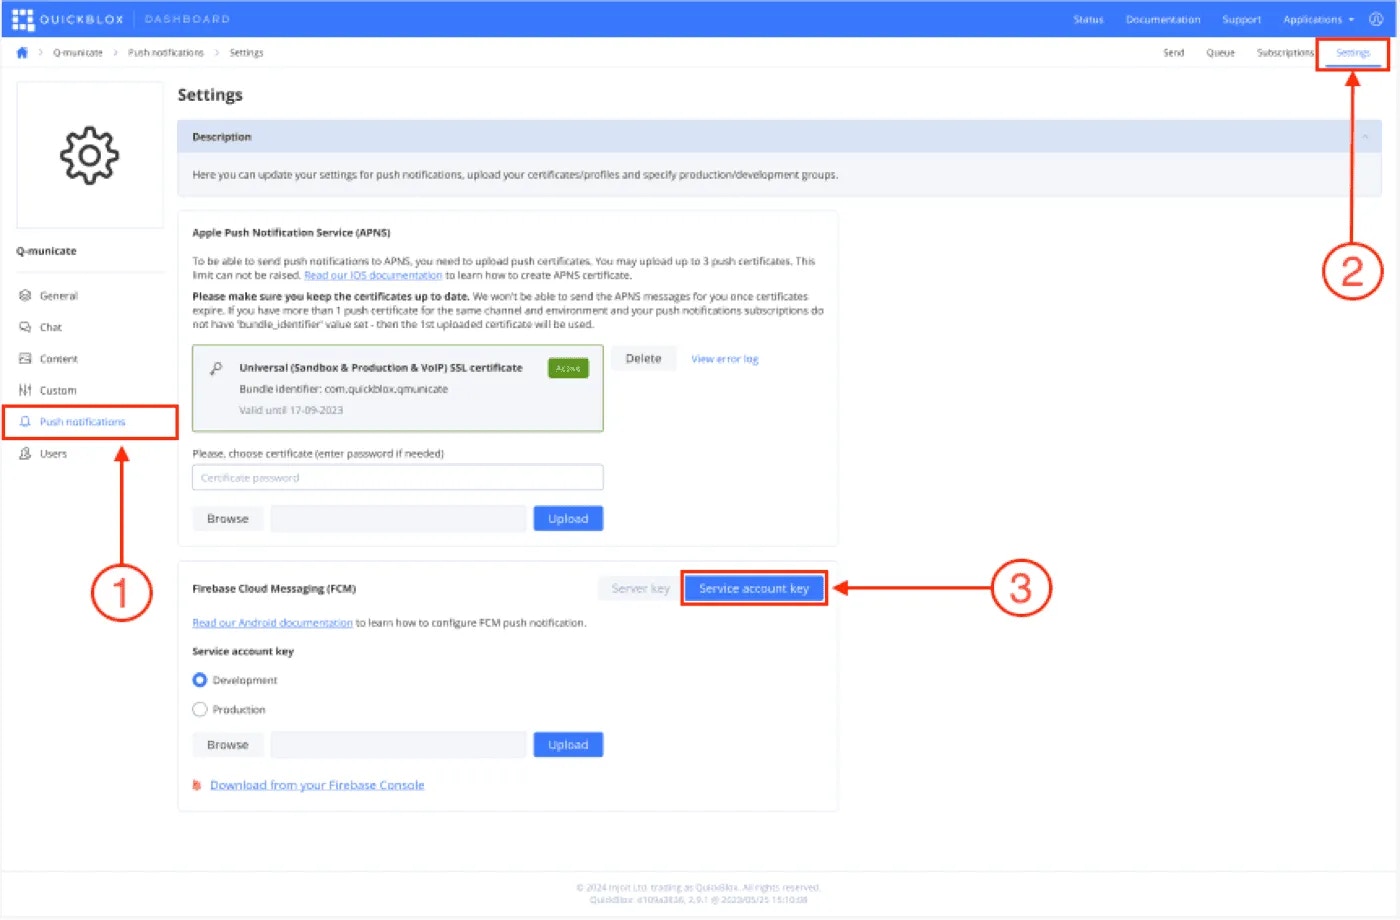 To navigate to the push notifications section:
1. Head over to QuickBlox dashboard, and choose your application.
2. Select the push notifications tab and navigate to the settings page.
3. Select the Service account key tab
Note: we will remove the Server key tab when it will be discontinued by FCM, you will by default only have the service account key section on the dashboard.
### 3. Upload the service account key on QuickBlox dashboard
To navigate to the push notifications section:
1. Head over to QuickBlox dashboard, and choose your application.
2. Select the push notifications tab and navigate to the settings page.
3. Select the Service account key tab
Note: we will remove the Server key tab when it will be discontinued by FCM, you will by default only have the service account key section on the dashboard.
### 3. Upload the service account key on QuickBlox dashboard
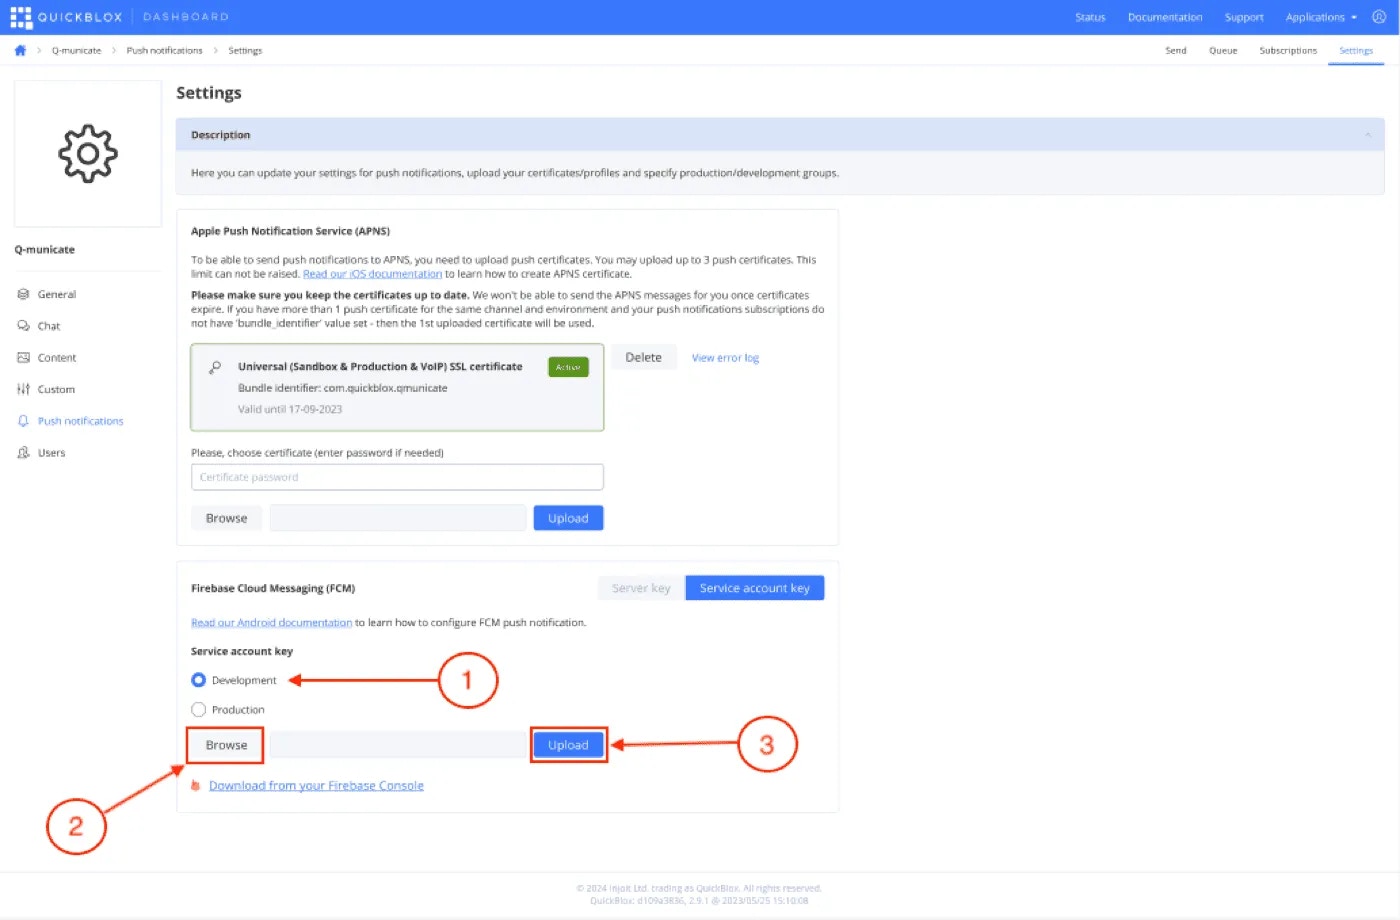 To upload your service account key:
1. Choose the environment for your service account key. (Development/Production)
2. Click on the browse button and select the JSON file containing the key that was downloaded in step-1.
3. Hit the upload button.
Note: When setting up your environment, it’s important to distinguish between development and production modes. If you’ve uploaded a development certificate, it will only function for subscriptions created in the development environment, and likewise for production. This separation ensures seamless testing and deployment of push notifications across different environments.
API (Legacy) it's deprecated, not recommended
To enable **Cloud Messaging API (legacy)** instead of **Firebase Cloud Messaging API (HTTP V1)**, please log in to your Firebase account, afterward select your Application and do the following:
1. Click on the Settings icon.
2. Select **Project Settings** from the drop-down list.
To upload your service account key:
1. Choose the environment for your service account key. (Development/Production)
2. Click on the browse button and select the JSON file containing the key that was downloaded in step-1.
3. Hit the upload button.
Note: When setting up your environment, it’s important to distinguish between development and production modes. If you’ve uploaded a development certificate, it will only function for subscriptions created in the development environment, and likewise for production. This separation ensures seamless testing and deployment of push notifications across different environments.
API (Legacy) it's deprecated, not recommended
To enable **Cloud Messaging API (legacy)** instead of **Firebase Cloud Messaging API (HTTP V1)**, please log in to your Firebase account, afterward select your Application and do the following:
1. Click on the Settings icon.
2. Select **Project Settings** from the drop-down list.
 3. In section **Project Settings** select **Cloud Messaging** tab.
4. Click on the three-dots (kebab) menu to the right of **Cloud Messaging API (Legacy)** and choose the **Manage API in Google Cloud Console** option. You will be redirected to **Google Cloud Console**.
3. In section **Project Settings** select **Cloud Messaging** tab.
4. Click on the three-dots (kebab) menu to the right of **Cloud Messaging API (Legacy)** and choose the **Manage API in Google Cloud Console** option. You will be redirected to **Google Cloud Console**.
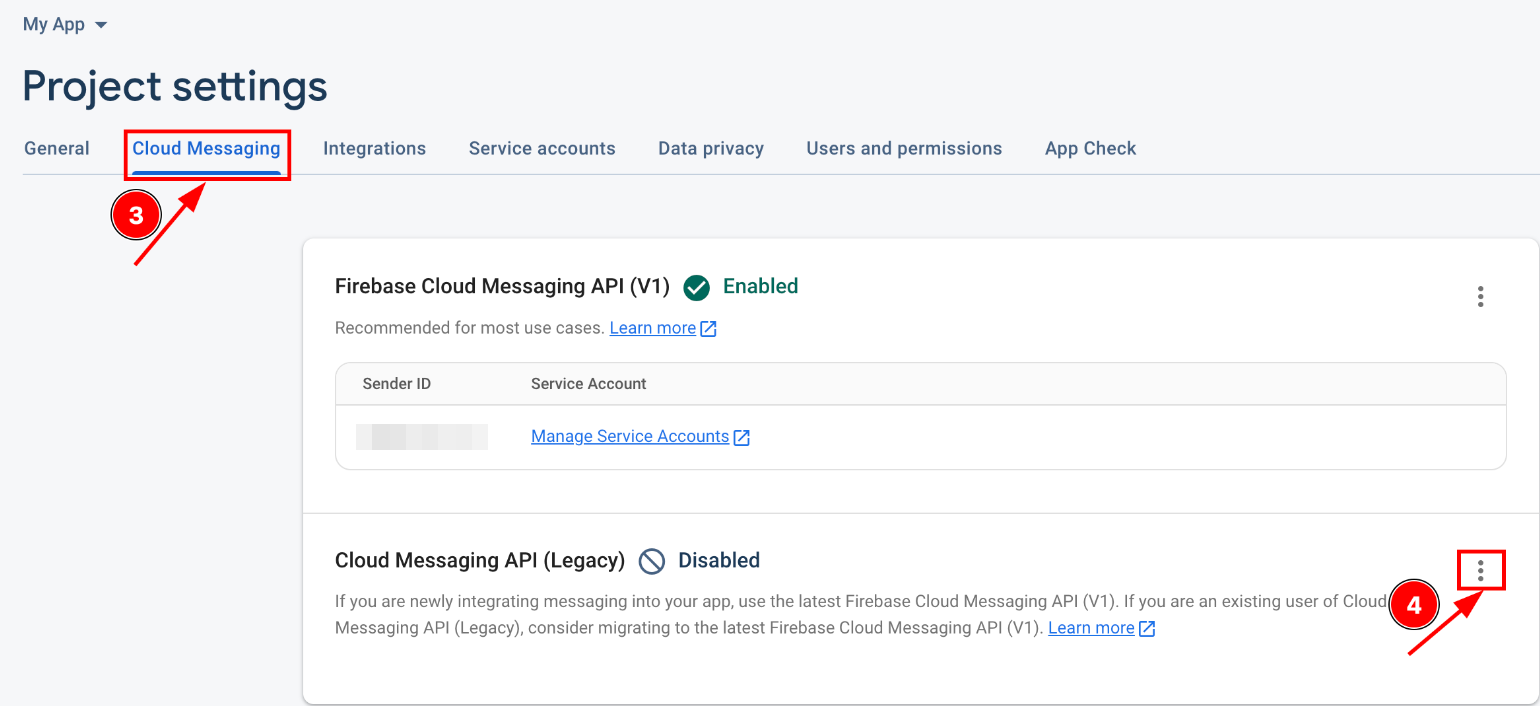 5. Click the **Enable** buttons in the **Cloud Messaging** section.
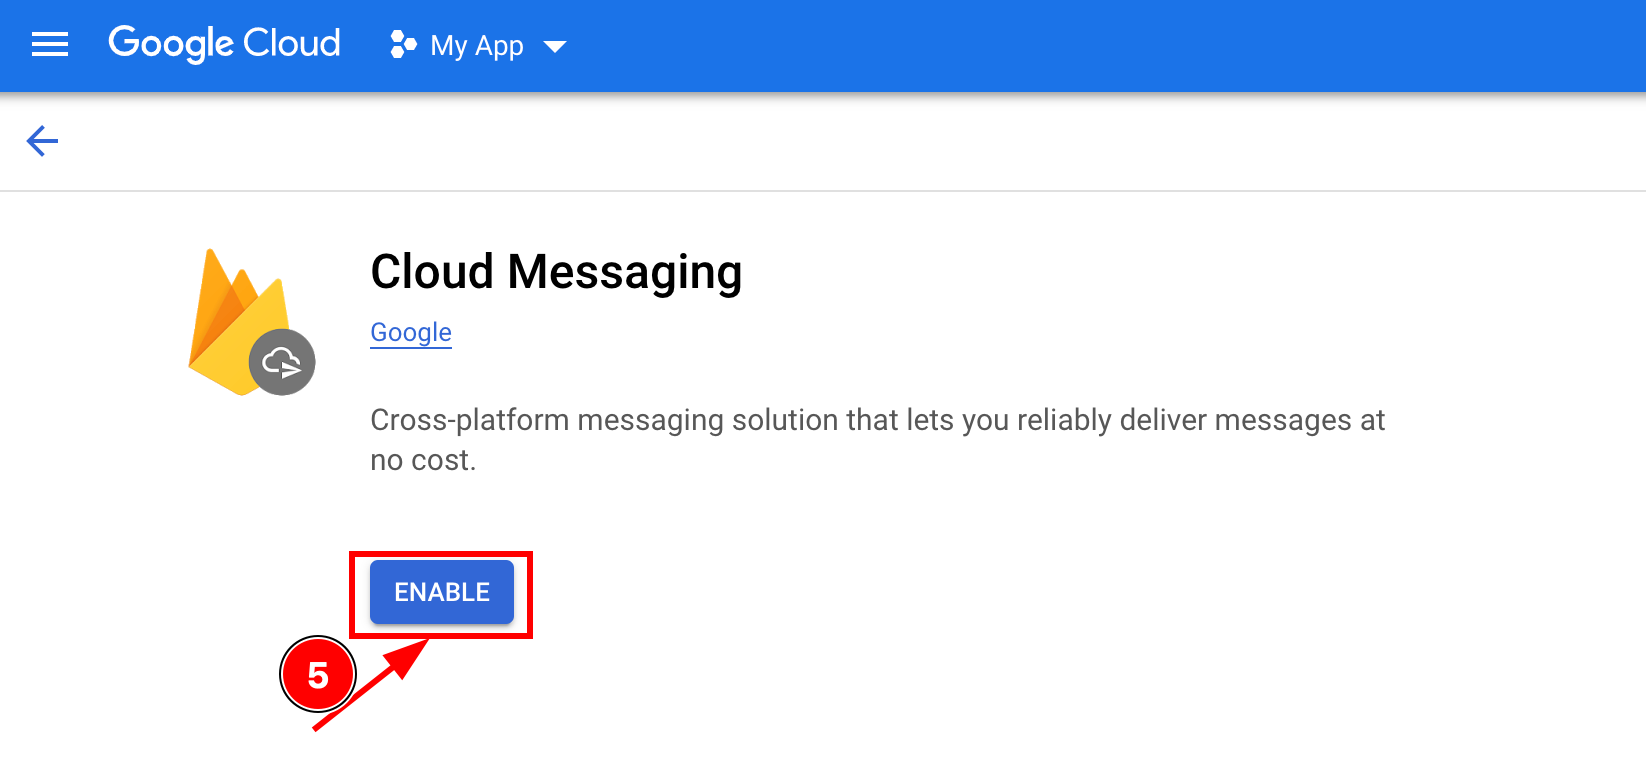 6. Refresh the **Cloud Messaging** page and a server key will appear.
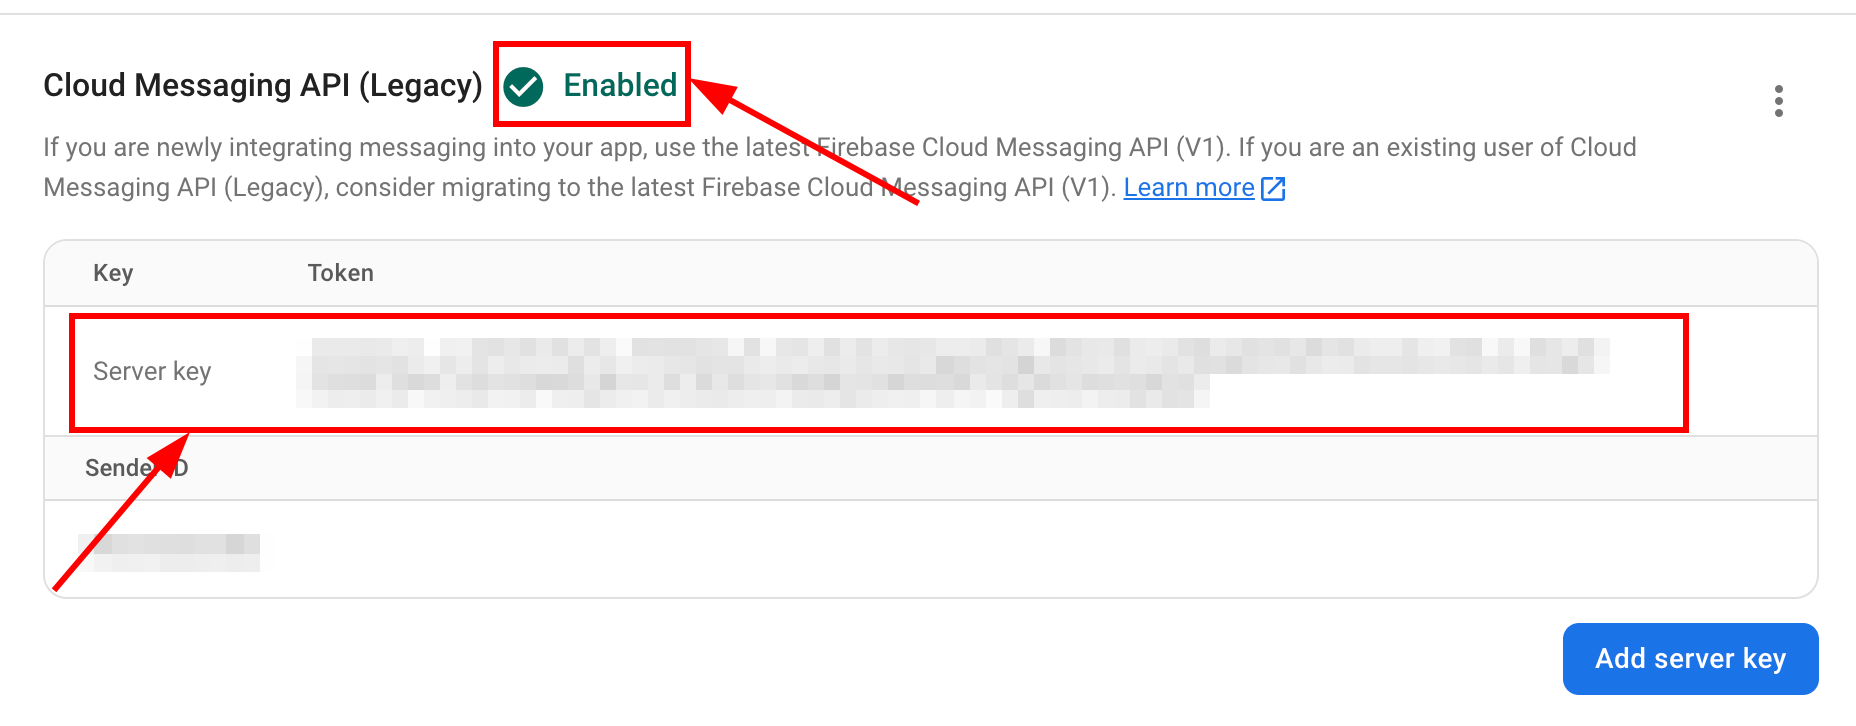 ## Configure Firebase project and API key
To start working with push notifications functionality, you need to configure it. At first, you should create a Firebase account if you haven't it. Then you should configure your [Firebase project](https://console.firebase.google.com/) and obtain the **API key**.
1. To find your **FCM server key**, go to your **Firebase console => Project Settings => Cloud Messaging**.
## Configure Firebase project and API key
To start working with push notifications functionality, you need to configure it. At first, you should create a Firebase account if you haven't it. Then you should configure your [Firebase project](https://console.firebase.google.com/) and obtain the **API key**.
1. To find your **FCM server key**, go to your **Firebase console => Project Settings => Cloud Messaging**.

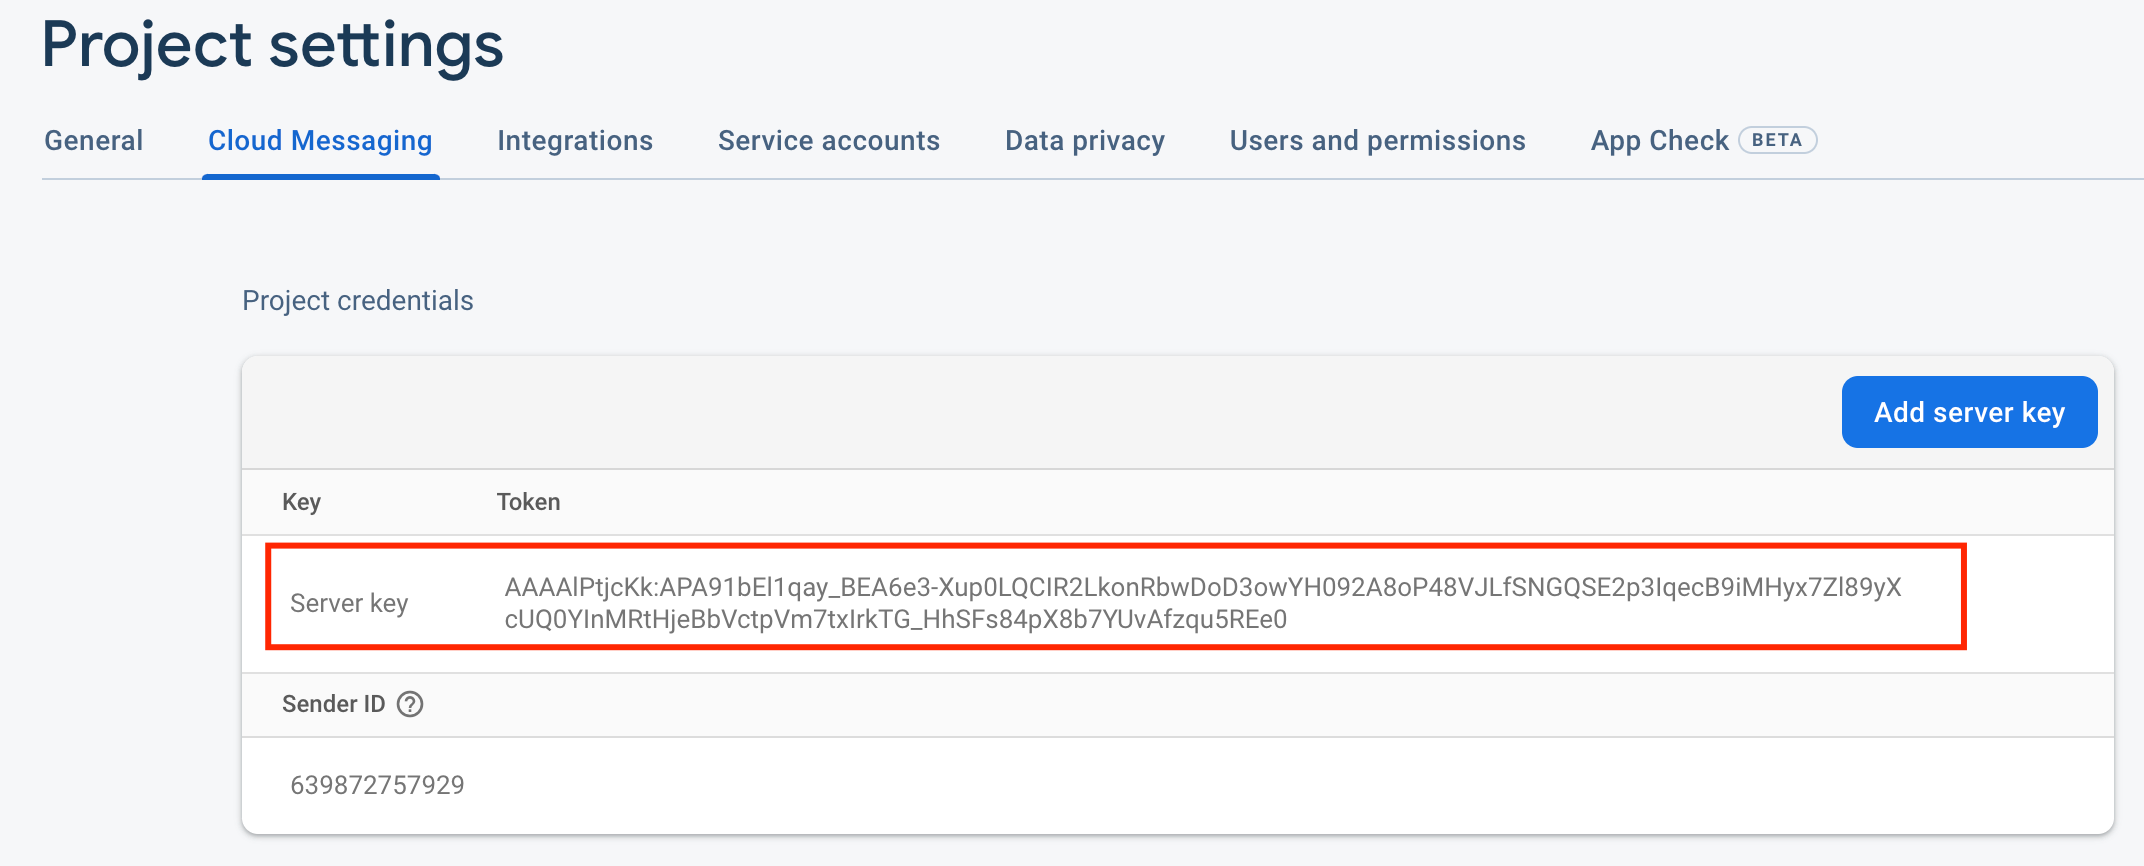 2. Copy the **server key** to your **Dashboard => *YOUR\_APP* => Push Notifications => Settings**, select the environment for which you are adding the key and click the **Save key**. Use the same server key for development and production zones. You can use both these environments up to you.
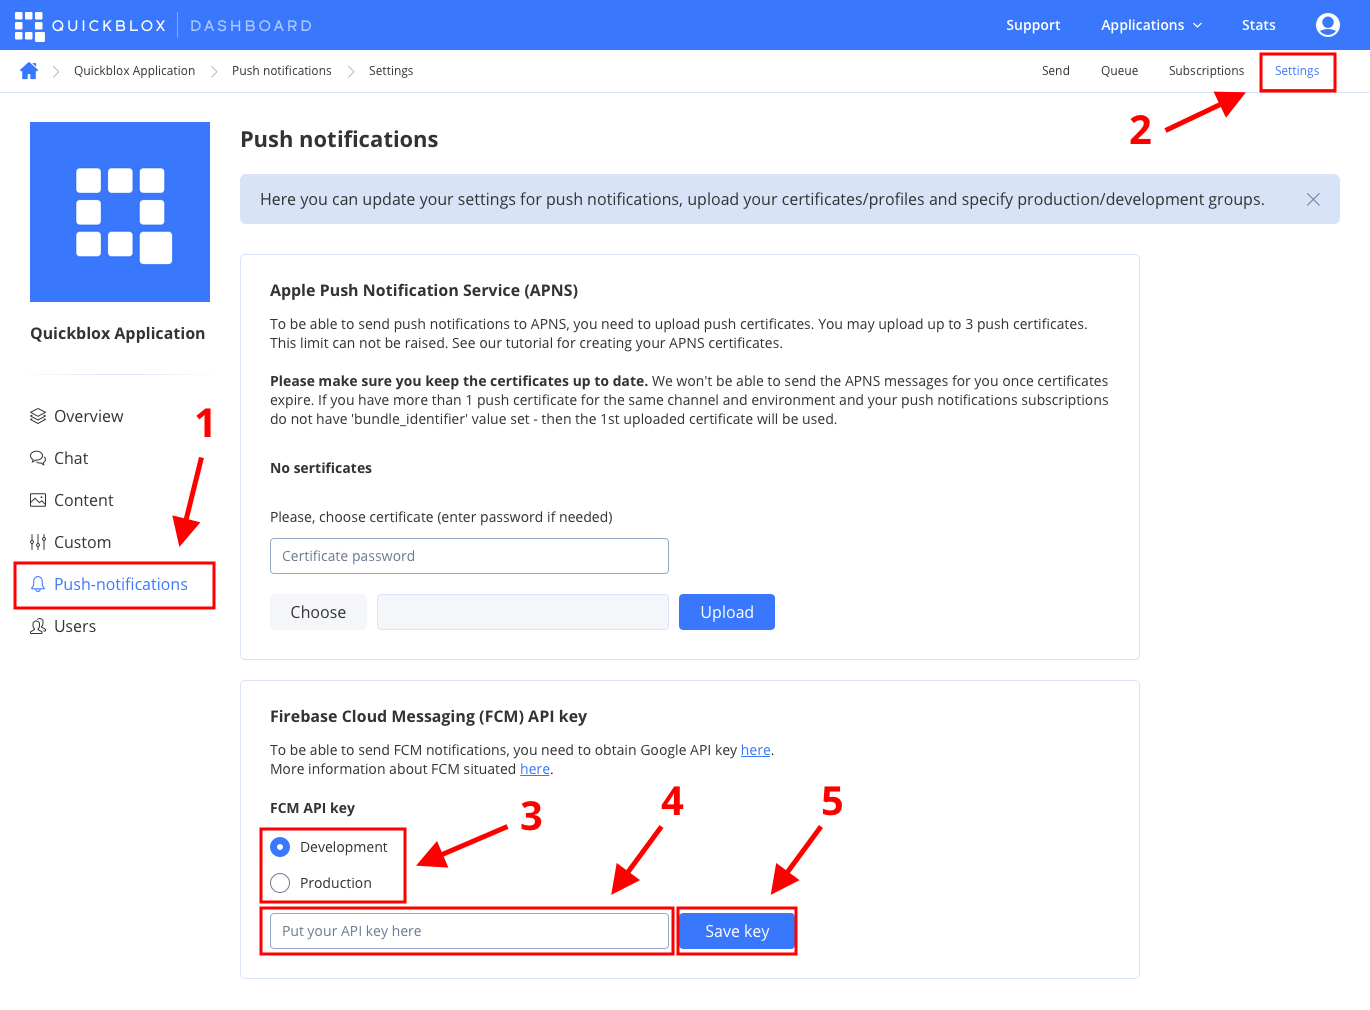 ## Add Firebase to your Project
1. As part of enabling Firebase services in your Android application, you need to add the **google-services dependency** to your **project-level** `build.gradle` file.
```Groovy Groovy theme={null}
buildscript {
// ...
dependencies {
// ...
classpath 'com.google.gms:google-services:4.3.10'
}
}
```
2. Add FCM dependency to your **app level** `build.gradle` file.
```Groovy Groovy theme={null}
implementation "com.google.firebase:firebase-core:20.0.0"
```
3. Include a **gms plugin** to your **app level** `build.gradle` file.
```Groovy Groovy theme={null}
apply plugin: 'com.google.gms.google-services'
```
4. Download the `google-services.json` file from your Firebase Project dashboard and put it into your app folder in your Android project.
5. Copy the **sender ID** value following **Firebase console => Project Settings => Cloud Messaging**.
## Add Firebase to your Project
1. As part of enabling Firebase services in your Android application, you need to add the **google-services dependency** to your **project-level** `build.gradle` file.
```Groovy Groovy theme={null}
buildscript {
// ...
dependencies {
// ...
classpath 'com.google.gms:google-services:4.3.10'
}
}
```
2. Add FCM dependency to your **app level** `build.gradle` file.
```Groovy Groovy theme={null}
implementation "com.google.firebase:firebase-core:20.0.0"
```
3. Include a **gms plugin** to your **app level** `build.gradle` file.
```Groovy Groovy theme={null}
apply plugin: 'com.google.gms.google-services'
```
4. Download the `google-services.json` file from your Firebase Project dashboard and put it into your app folder in your Android project.
5. Copy the **sender ID** value following **Firebase console => Project Settings => Cloud Messaging**.

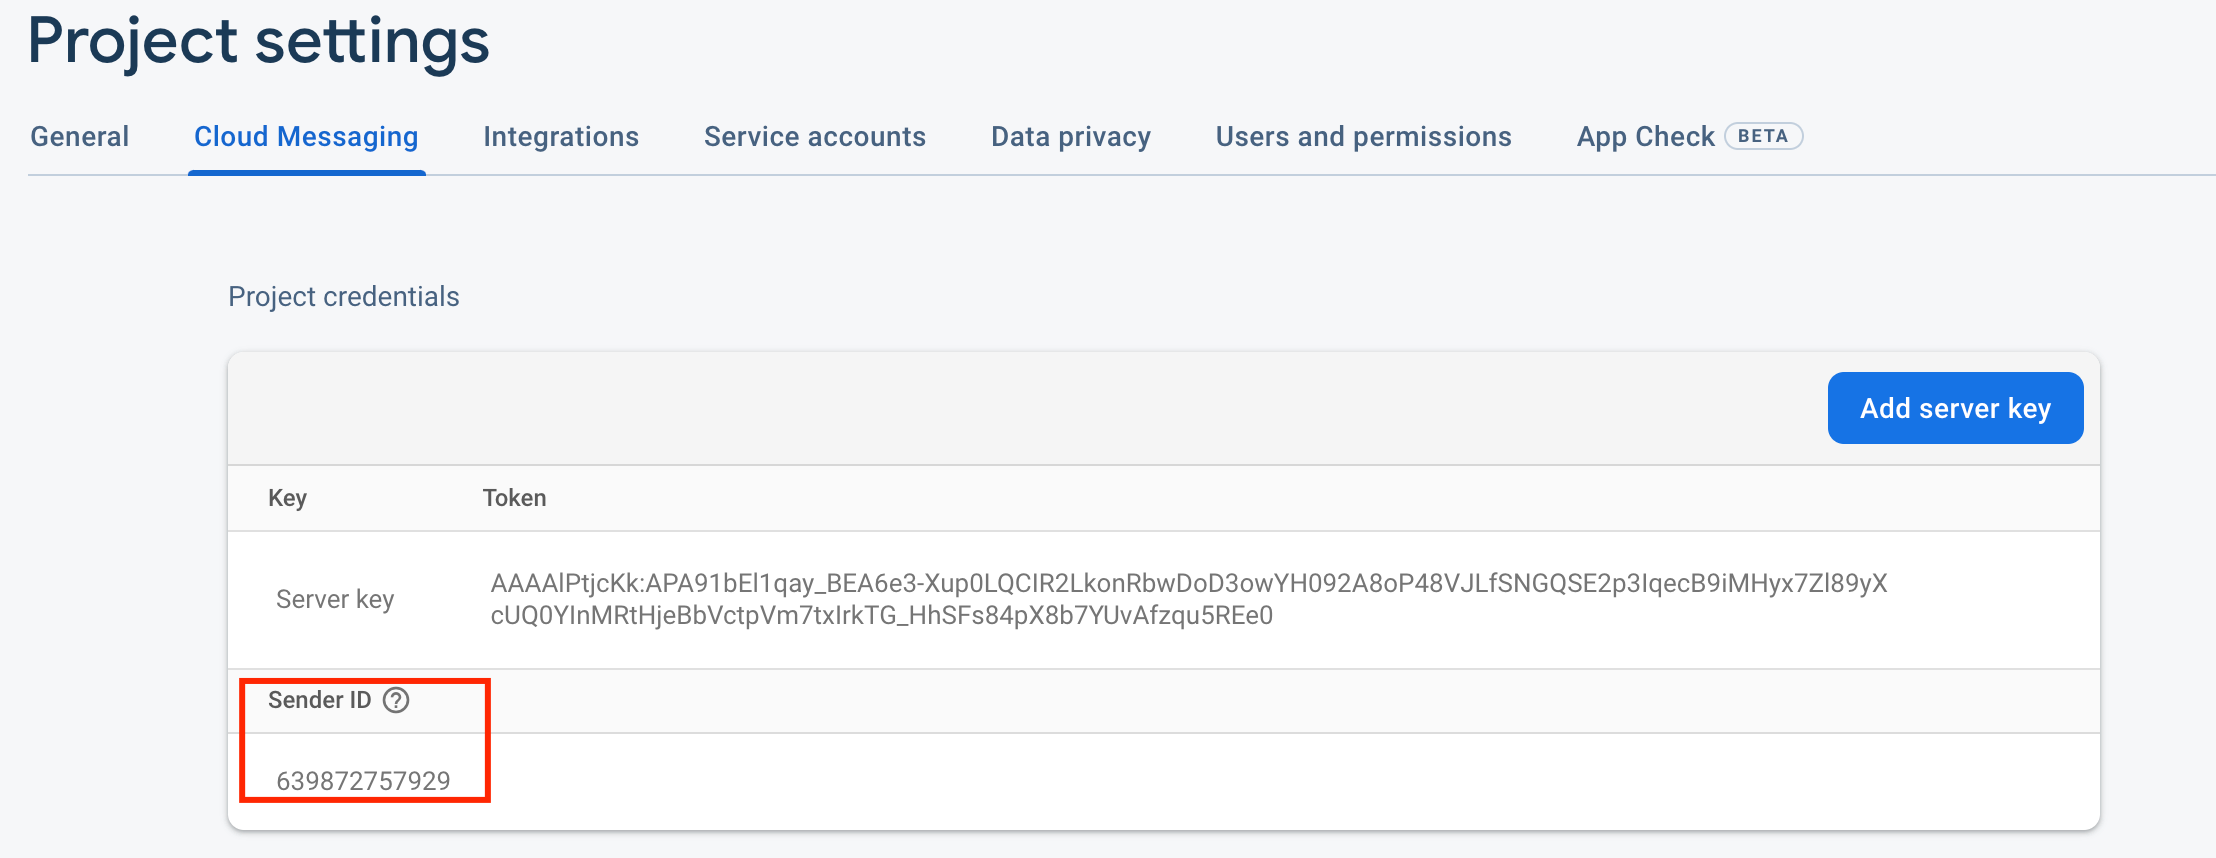 6. Edit your app **AndroidManifest** file and add your Firebase **sender ID** as well as notification type and environment to integrate automatic push subscription.
```XML XML theme={null}
```
* `com.quickblox.messages.TYPE` - can be `GCM` or `FCM`.
* `com.quickblox.messages.SENDER_ID` - your sender ID from google console (for example, 639872757929).
* `com.quickblox.messages.QB_ENVIRONMENT` - can be `DEVELOPMENT` or `PRODUCTION`.
7. Then you need to setup `QBFcmPushListenerService` and `QBFcmPushInstanceIDService` in AndroidManifest.
```XML XML theme={null}
```
## Automatic push subscription
QuickBlox Android SDK provides automatic push subscription management. It means that you do not need to bother how to get FCM device token, create push subscription, and what to do with the received data. Thus, you can reduce your code and make it cleaner.
A single user can have up to **10** subscriptions on different devices.
### Enable/Disable push subscription
Here you can use a global setting to enable or disable delivery of push notifications. Set this parameter only once.
```Java theme={null}
QBSettings.getInstance().setEnablePushNotification(false);
// by default is true
boolean isEnabled = QBSettings.getInstance().isEnablePushNotification();
```
```Kotlin theme={null}
QBSettings.getInstance().isEnablePushNotification = true
// By Default is TRUE
boolean isEnabled = QBSettings.getInstance().isEnablePushNotification
```
### Track subscription status
To be aware of what is happening with your push subscription, whether you're subscribed successfully or not, you can use the `QBSubscribeListener`. Just add `QBSubscribeListener` right after the `QBSettings.getInstance().init()` code.
```Java theme={null}
QBPushManager.getInstance().addListener(new QBPushManager.QBSubscribeListener() {
@Override
public void onSubscriptionCreated() {
}
@Override
public void onSubscriptionError(Exception exception, int resultCode) {
if (resultCode >= 0) {
// might be Google play service exception
}
}
@Override
public void onSubscriptionDeleted(boolean delete) {
}
});
```
```Kotlin theme={null}
QBPushManager.getInstance().addListener(object : QBPushManager.QBSubscribeListener {
override fun onSubscriptionCreated() {
}
override fun onSubscriptionError(exception: Exception?, resultCode: Int?) {
if (resultCode >= 0) {
// might be Google play service exception
}
}
override fun onSubscriptionDeleted(deleted: Boolean?) {
}
})
```
## Manual push subscription
If you do not want to use the automatic push subscription feature, then do the following:
1. Set `SubscribePushStrategy.NEVER` as the main strategy.
```Java theme={null}
// default SubscribePushStrategy.ALWAYS
QBSettings.getInstance().setSubscribePushStrategy(SubscribePushStrategy.NEVER)
```
```Kotlin theme={null}
// default SubscribePushStrategy.ALWAYS
QBSettings.getInstance().subscribePushStrategy = SubscribePushStrategy.NEVER
```
In this case, you need to subscribe and unsubscribe manually using the following methods:
```Java theme={null}
SubscribeService.subscribeToPushes(context, false);
SubscribeService.unSubscribeFromPushes(context);
```
```Kotlin theme={null}
SubscribeService.subscribeToPushes(context, false)
SubscribeService.unSubscribeFromPushes(context)
```
2. And then in your class extended from `QBFcmPushListenerService` you need to handle when the token is refreshed:
```Java theme={null}
@Override
public void onNewToken(String token) {
boolean tokenRefreshed = true;
SubscribeService.subscribeToPushes(context, tokenRefreshed);
}
```
```Kotlin theme={null}
override fun onNewToken(token: String?) {
val tokenRefreshed = true
SubscribeService.subscribeToPushes(context, tokenRefreshed)
}
```
3. Add your class extended from `QBFcmPushListenerService` to the Manifest file.
```XML XML theme={null}
```
The `token` is a device registration token generated by the APNs or GCM/FCM. The token can be unregistered by the APNs or GCM/FCM anytime. In this case, the device should be registered again and obtain a new token. When a new token is obtained, a new subscription should be created.
## Send push notifications
You can manually initiate sending of push notifications to a user/users on any event in your application. To send a push notification, you should use `QBEvent`, fill its fields with push notification parameters (payload) and set push recipients.
```Java theme={null}
StringifyArrayList userIds = new StringifyArrayList<>();
for (QBUser user : userList) {
userIds.add(user.getId());
}
QBEvent event = new QBEvent();
event.setUserIds(userIDs);
event.setEnvironment(QBEnvironment.DEVELOPMENT);
event.setNotificationType(QBNotificationType.PUSH);
event.setPushType(QBPushType.GCM);
HashMap customData = new HashMap<>();
customData.put("data.message", "Hello QuickBlox");
customData.put("data.type", "First QuickBlox Push");
event.setMessage(customData);
QBPushNotifications.createEvents(event).performAsync(new QBEntityCallback() {
@Override
public void onSuccess(QBEvent event, Bundle bundle) {
}
@Override
public void onError(QBResponseException exception) {
}
});
```
```Kotlin theme={null}
val userIds = StringifyArrayList()
for (user in userList) {
userIds.add(user.id)
}
val event = QBEvent()
event.userIds = userIDs
event.environment = QBEnvironment.DEVELOPMENT
event.notificationType = QBNotificationType.PUSH
event.pushType = QBPushType.GCM
val customData = HashMap()
customData["data.message"] = "Hello QuickBlox"
customData["data.type"] = "First QuickBlox Push"
event.setMessage(customData)
QBPushNotifications.createEvent(event).performAsync(object : QBEntityCallback {
override fun onSuccess(event: QBEvent?, bundle: Bundle?) {
}
override fun onError(exception: QBResponseException?) {
}
})
```
You can send only FCM data messages to the Android app. QuickBlox doesn't support FCM notification messages.
To process FCM data messages on your app when the app is in the background, you need to handle them. If not handled, they will not pop on the screen even if the app has received such push notification. See [FCM documentation](https://firebase.google.com/docs/cloud-messaging/concept-options#notifications%5Fand%5Fdata%5Fmessages) to learn more about data messages.
You can send APNs VoIP notifications to the iOS app. However, if the iOS app is not subscribed to APNs VoIP notifications or the APNs VoIP certificate has expired, the regular APNs will be delivered instead of APNs VoIP.
## Receive push notifications
To receive push notifications, you should register the `BroadcastReceiver`.
```Java theme={null}
BroadcastReceiver pushBroadcastReceiver = new BroadcastReceiver() {
@Override
public void onReceive(Context context, Intent intent) {
String message = intent.getStringExtra("message");
String from = intent.getStringExtra("from");
}
};
LocalBroadcastManager.getInstance(this).registerReceiver(pushBroadcastReceiver, new IntentFilter("new-push-event"));
```
```Kotlin theme={null}
val pushBroadcastReceiver = object : BroadcastReceiver() {
override fun onReceive(context: Context, intent: Intent) {
val message = intent.getStringExtra("message")
val from = intent.getStringExtra("from")
}
}
LocalBroadcastManager.getInstance(this).registerReceiver(pushBroadcastReceiver, IntentFilter("new-push-event"))
```
Or use the `onMessageReceived()` in your class that extends `QBFcmPushListenerService`.
```Java theme={null}
@Override
public void onMessageReceived(RemoteMessage remoteMessage) {
String from = remoteMessage.getFrom();
Map data = remoteMessage.getData();
}
```
```Kotlin theme={null}
override fun onMessageReceived(remoteMessage: RemoteMessage?) {
val from = remoteMessage?.from
val data = remoteMessage?.data
}
```
## Troubleshooting
#### Push notifications are not received on Android devices
**Cause 1**: incorrect FCM server key is set in the Dashboard.
**Tip**: check if you put a correct FCM server key into the **FCM API key** field in the **Dashboard => *YOUR\_APP* => Push Notifications => Settings**. See how to obtain the FCM server key and where to set it [here](/sdks/android-push-notifications#configure-firebase-project-and-api-key).
It is possible that you are using the FCM sender ID instead of the FCM server key in the Dashboard. Try to send the message from a Firebase console directly. If a message has appeared, a problem is in the FCM server key. If the FCM server key is incorrect, then there will be the following error: `error 401 (Unauthorized, check your App auth_key)`. This means that the QuickBlox server wasn't able to authorize on the Firebase server.
**Cause 2**: incorrect FCM sender ID in the `google-services.json` file.
**Tip**: check if you added a correct `google-services.json` file to your project.
**Cause 3**: the push is sent to the production zone while the device is subscribed to the development zone or vice versa.
**Tip**: check if you put the same FCM server key into the **FCM API key** field in the **Dashboard => *YOUR\_APP* => Push Notifications => Settings** for development and production to reduce the risk of error.
#### A subscription is removed after a push is sent and the push isn't delivered
**Cause**: a device registration token is invalid.
The device registration token is represented as `token` within the system. See [this section](/sdks/android-push-notifications#manual-push-subscription) to learn how to subscribe a device to push notifications.
**Tip**: check if the device registration is correct. The device registration token can be invalid due to a number of reasons:
1. Some other data is set instead of a correct device registration token. For example, a Firebase project ID, Firebase user token, etc.
2. The client app unregistered itself from GCM/FCM. This can happen if the user uninstalls the application or, on iOS, if the APNs Feedback Service reported the APNs token as invalid.
3. The registration token expired. For example, Google might decide to refresh registration tokens or the APNs token may have expired for iOS devices.
4. The client app was updated, but the new version is not configured to receive messages.
For all these cases, remove the invalid device registration token and stop using it to send messages. Then, obtain a new token and make sure to create a new subscription with a valid token.
6. Edit your app **AndroidManifest** file and add your Firebase **sender ID** as well as notification type and environment to integrate automatic push subscription.
```XML XML theme={null}
```
* `com.quickblox.messages.TYPE` - can be `GCM` or `FCM`.
* `com.quickblox.messages.SENDER_ID` - your sender ID from google console (for example, 639872757929).
* `com.quickblox.messages.QB_ENVIRONMENT` - can be `DEVELOPMENT` or `PRODUCTION`.
7. Then you need to setup `QBFcmPushListenerService` and `QBFcmPushInstanceIDService` in AndroidManifest.
```XML XML theme={null}
```
## Automatic push subscription
QuickBlox Android SDK provides automatic push subscription management. It means that you do not need to bother how to get FCM device token, create push subscription, and what to do with the received data. Thus, you can reduce your code and make it cleaner.
A single user can have up to **10** subscriptions on different devices.
### Enable/Disable push subscription
Here you can use a global setting to enable or disable delivery of push notifications. Set this parameter only once.
```Java theme={null}
QBSettings.getInstance().setEnablePushNotification(false);
// by default is true
boolean isEnabled = QBSettings.getInstance().isEnablePushNotification();
```
```Kotlin theme={null}
QBSettings.getInstance().isEnablePushNotification = true
// By Default is TRUE
boolean isEnabled = QBSettings.getInstance().isEnablePushNotification
```
### Track subscription status
To be aware of what is happening with your push subscription, whether you're subscribed successfully or not, you can use the `QBSubscribeListener`. Just add `QBSubscribeListener` right after the `QBSettings.getInstance().init()` code.
```Java theme={null}
QBPushManager.getInstance().addListener(new QBPushManager.QBSubscribeListener() {
@Override
public void onSubscriptionCreated() {
}
@Override
public void onSubscriptionError(Exception exception, int resultCode) {
if (resultCode >= 0) {
// might be Google play service exception
}
}
@Override
public void onSubscriptionDeleted(boolean delete) {
}
});
```
```Kotlin theme={null}
QBPushManager.getInstance().addListener(object : QBPushManager.QBSubscribeListener {
override fun onSubscriptionCreated() {
}
override fun onSubscriptionError(exception: Exception?, resultCode: Int?) {
if (resultCode >= 0) {
// might be Google play service exception
}
}
override fun onSubscriptionDeleted(deleted: Boolean?) {
}
})
```
## Manual push subscription
If you do not want to use the automatic push subscription feature, then do the following:
1. Set `SubscribePushStrategy.NEVER` as the main strategy.
```Java theme={null}
// default SubscribePushStrategy.ALWAYS
QBSettings.getInstance().setSubscribePushStrategy(SubscribePushStrategy.NEVER)
```
```Kotlin theme={null}
// default SubscribePushStrategy.ALWAYS
QBSettings.getInstance().subscribePushStrategy = SubscribePushStrategy.NEVER
```
In this case, you need to subscribe and unsubscribe manually using the following methods:
```Java theme={null}
SubscribeService.subscribeToPushes(context, false);
SubscribeService.unSubscribeFromPushes(context);
```
```Kotlin theme={null}
SubscribeService.subscribeToPushes(context, false)
SubscribeService.unSubscribeFromPushes(context)
```
2. And then in your class extended from `QBFcmPushListenerService` you need to handle when the token is refreshed:
```Java theme={null}
@Override
public void onNewToken(String token) {
boolean tokenRefreshed = true;
SubscribeService.subscribeToPushes(context, tokenRefreshed);
}
```
```Kotlin theme={null}
override fun onNewToken(token: String?) {
val tokenRefreshed = true
SubscribeService.subscribeToPushes(context, tokenRefreshed)
}
```
3. Add your class extended from `QBFcmPushListenerService` to the Manifest file.
```XML XML theme={null}
```
The `token` is a device registration token generated by the APNs or GCM/FCM. The token can be unregistered by the APNs or GCM/FCM anytime. In this case, the device should be registered again and obtain a new token. When a new token is obtained, a new subscription should be created.
## Send push notifications
You can manually initiate sending of push notifications to a user/users on any event in your application. To send a push notification, you should use `QBEvent`, fill its fields with push notification parameters (payload) and set push recipients.
```Java theme={null}
StringifyArrayList userIds = new StringifyArrayList<>();
for (QBUser user : userList) {
userIds.add(user.getId());
}
QBEvent event = new QBEvent();
event.setUserIds(userIDs);
event.setEnvironment(QBEnvironment.DEVELOPMENT);
event.setNotificationType(QBNotificationType.PUSH);
event.setPushType(QBPushType.GCM);
HashMap customData = new HashMap<>();
customData.put("data.message", "Hello QuickBlox");
customData.put("data.type", "First QuickBlox Push");
event.setMessage(customData);
QBPushNotifications.createEvents(event).performAsync(new QBEntityCallback() {
@Override
public void onSuccess(QBEvent event, Bundle bundle) {
}
@Override
public void onError(QBResponseException exception) {
}
});
```
```Kotlin theme={null}
val userIds = StringifyArrayList()
for (user in userList) {
userIds.add(user.id)
}
val event = QBEvent()
event.userIds = userIDs
event.environment = QBEnvironment.DEVELOPMENT
event.notificationType = QBNotificationType.PUSH
event.pushType = QBPushType.GCM
val customData = HashMap()
customData["data.message"] = "Hello QuickBlox"
customData["data.type"] = "First QuickBlox Push"
event.setMessage(customData)
QBPushNotifications.createEvent(event).performAsync(object : QBEntityCallback {
override fun onSuccess(event: QBEvent?, bundle: Bundle?) {
}
override fun onError(exception: QBResponseException?) {
}
})
```
You can send only FCM data messages to the Android app. QuickBlox doesn't support FCM notification messages.
To process FCM data messages on your app when the app is in the background, you need to handle them. If not handled, they will not pop on the screen even if the app has received such push notification. See [FCM documentation](https://firebase.google.com/docs/cloud-messaging/concept-options#notifications%5Fand%5Fdata%5Fmessages) to learn more about data messages.
You can send APNs VoIP notifications to the iOS app. However, if the iOS app is not subscribed to APNs VoIP notifications or the APNs VoIP certificate has expired, the regular APNs will be delivered instead of APNs VoIP.
## Receive push notifications
To receive push notifications, you should register the `BroadcastReceiver`.
```Java theme={null}
BroadcastReceiver pushBroadcastReceiver = new BroadcastReceiver() {
@Override
public void onReceive(Context context, Intent intent) {
String message = intent.getStringExtra("message");
String from = intent.getStringExtra("from");
}
};
LocalBroadcastManager.getInstance(this).registerReceiver(pushBroadcastReceiver, new IntentFilter("new-push-event"));
```
```Kotlin theme={null}
val pushBroadcastReceiver = object : BroadcastReceiver() {
override fun onReceive(context: Context, intent: Intent) {
val message = intent.getStringExtra("message")
val from = intent.getStringExtra("from")
}
}
LocalBroadcastManager.getInstance(this).registerReceiver(pushBroadcastReceiver, IntentFilter("new-push-event"))
```
Or use the `onMessageReceived()` in your class that extends `QBFcmPushListenerService`.
```Java theme={null}
@Override
public void onMessageReceived(RemoteMessage remoteMessage) {
String from = remoteMessage.getFrom();
Map data = remoteMessage.getData();
}
```
```Kotlin theme={null}
override fun onMessageReceived(remoteMessage: RemoteMessage?) {
val from = remoteMessage?.from
val data = remoteMessage?.data
}
```
## Troubleshooting
#### Push notifications are not received on Android devices
**Cause 1**: incorrect FCM server key is set in the Dashboard.
**Tip**: check if you put a correct FCM server key into the **FCM API key** field in the **Dashboard => *YOUR\_APP* => Push Notifications => Settings**. See how to obtain the FCM server key and where to set it [here](/sdks/android-push-notifications#configure-firebase-project-and-api-key).
It is possible that you are using the FCM sender ID instead of the FCM server key in the Dashboard. Try to send the message from a Firebase console directly. If a message has appeared, a problem is in the FCM server key. If the FCM server key is incorrect, then there will be the following error: `error 401 (Unauthorized, check your App auth_key)`. This means that the QuickBlox server wasn't able to authorize on the Firebase server.
**Cause 2**: incorrect FCM sender ID in the `google-services.json` file.
**Tip**: check if you added a correct `google-services.json` file to your project.
**Cause 3**: the push is sent to the production zone while the device is subscribed to the development zone or vice versa.
**Tip**: check if you put the same FCM server key into the **FCM API key** field in the **Dashboard => *YOUR\_APP* => Push Notifications => Settings** for development and production to reduce the risk of error.
#### A subscription is removed after a push is sent and the push isn't delivered
**Cause**: a device registration token is invalid.
The device registration token is represented as `token` within the system. See [this section](/sdks/android-push-notifications#manual-push-subscription) to learn how to subscribe a device to push notifications.
**Tip**: check if the device registration is correct. The device registration token can be invalid due to a number of reasons:
1. Some other data is set instead of a correct device registration token. For example, a Firebase project ID, Firebase user token, etc.
2. The client app unregistered itself from GCM/FCM. This can happen if the user uninstalls the application or, on iOS, if the APNs Feedback Service reported the APNs token as invalid.
3. The registration token expired. For example, Google might decide to refresh registration tokens or the APNs token may have expired for iOS devices.
4. The client app was updated, but the new version is not configured to receive messages.
For all these cases, remove the invalid device registration token and stop using it to send messages. Then, obtain a new token and make sure to create a new subscription with a valid token.