> ## Documentation Index
> Fetch the complete documentation index at: https://docs.quickblox.com/llms.txt
> Use this file to discover all available pages before exploring further.
# Push Notifications
> Learn how to send push notifications to users when they are offline.
Push Notifications provide a way to deliver some information to a user while they are not using your app actively. The following use cases can be covered by push notifications:
* **Offline messages.** Send a chat message when a recipient is offline. In this case, a push notification will be sent automatically if the user is offline.
* **Offline calls.** Make a video/audio call with offline opponents. In this case, a push notification will be sent manually.
* **Requests to contact list.** Send requests to add a user to the contact list. In this case, a push notification will be sent manually).
* **User tags.** Send notifications to specific user groups defined by tags.
Visit [Key Concepts](/docs/key-concepts) page to learn the most important QuickBlox concepts.
## Before you begin
1. Register a [QuickBlox account](https://admin.quickblox.com/signin). This is a matter of a few minutes and you will be able to use this account to build your apps.
2. Configure QuickBlox SDK for your app. Check out [Setup](/sdks/flutter-setup) page for more details.
3. Create a user session to be able to use QuickBlox functionality. See [Authentication](/sdks/flutter-authentication) page to learn how to do it.
## Configuration
### iOS
**Step 1**. Create APNs certificate and upload it to the Dashboard.
Each iOS application that uses Apple Push Notifications must have an APNs certificate. Upload the APNs certificate to QuickBlox **Dashboard => Push Notifications => Settings => Apple Push Notification Service (APNs)**. To learn how to create APNs certificates and upload them to Dashboard, refer to the [guide](/sdks/ios-push-notifications#create-apns-certificate).
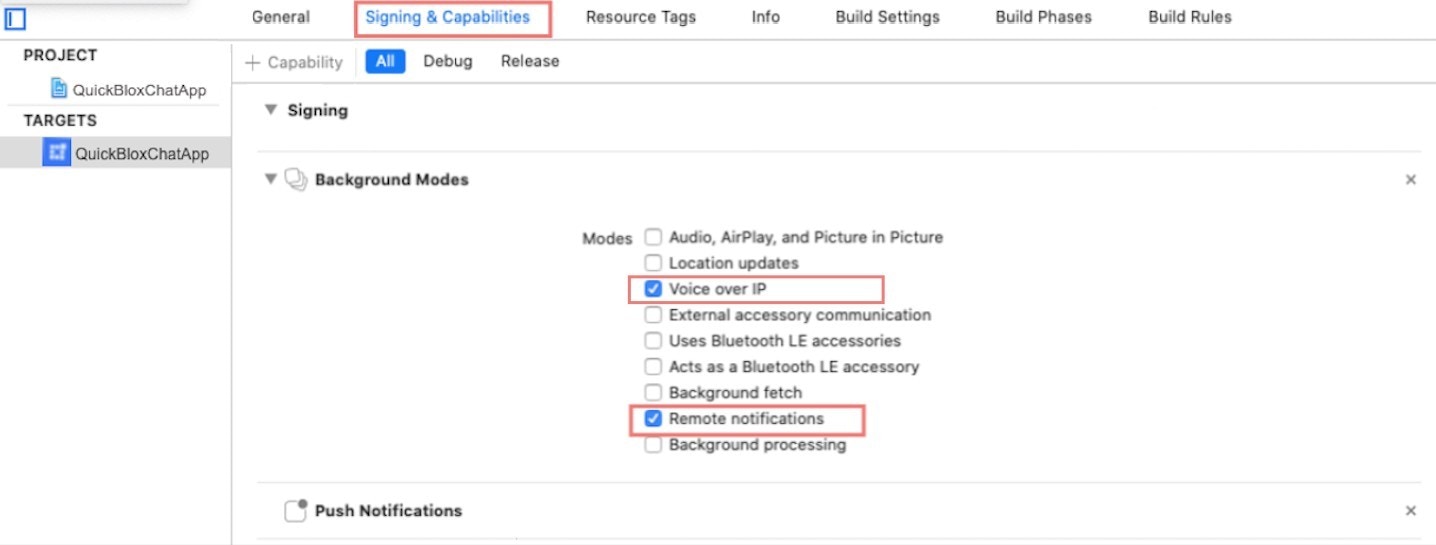
**Step 2**. Open your project in Xcode and enable Push Notifications capabilities.
1. Open Xcode and choose your project file.
2. Choose the **Signing & Capabilities** tab.
3. Add a **Push Notifications** and **Background Modes** capabilities. To see these sections, you should be logged in to Xcode with your Apple ID that is enrolled in the Apple developer program.
4. Turn on a **Push Notifications** capability.
5. Turn on a **Background modes** capability. This section requires you to add specific app permissions.
6. Select a **Remote notifications** checkbox if you want to receive push notifications when the app goes to background mode.
7. Select a **Voice over IP** checkbox if you want your app to receive incoming Voice-over-IP (VoIP) push notifications and use them to display the system call interface to the user when the app is in the background mode.
 ### Android
**Step 1**. Configure Firebase project and get **API key** and **Sender ID**.
First, you should create a Firebase account if you haven't it. Then you should configure your [Firebase project](https://console.firebase.google.com/).
Register a [QuickBlox account](https://admin.quickblox.com/signin). This is a matter of a few minutes and you will be able to use this account to build your apps.
Configure QuickBlox SDK for your app. Check out [Setup ](/sdks/flutter-setup)page for more details.
Create a user session to be able to use QuickBlox functionality. See [Authentication](/sdks/flutter-authentication) page to learn how to do it.
**Step 2**. Generate a new service account key.
### Android
**Step 1**. Configure Firebase project and get **API key** and **Sender ID**.
First, you should create a Firebase account if you haven't it. Then you should configure your [Firebase project](https://console.firebase.google.com/).
Register a [QuickBlox account](https://admin.quickblox.com/signin). This is a matter of a few minutes and you will be able to use this account to build your apps.
Configure QuickBlox SDK for your app. Check out [Setup ](/sdks/flutter-setup)page for more details.
Create a user session to be able to use QuickBlox functionality. See [Authentication](/sdks/flutter-authentication) page to learn how to do it.
**Step 2**. Generate a new service account key.
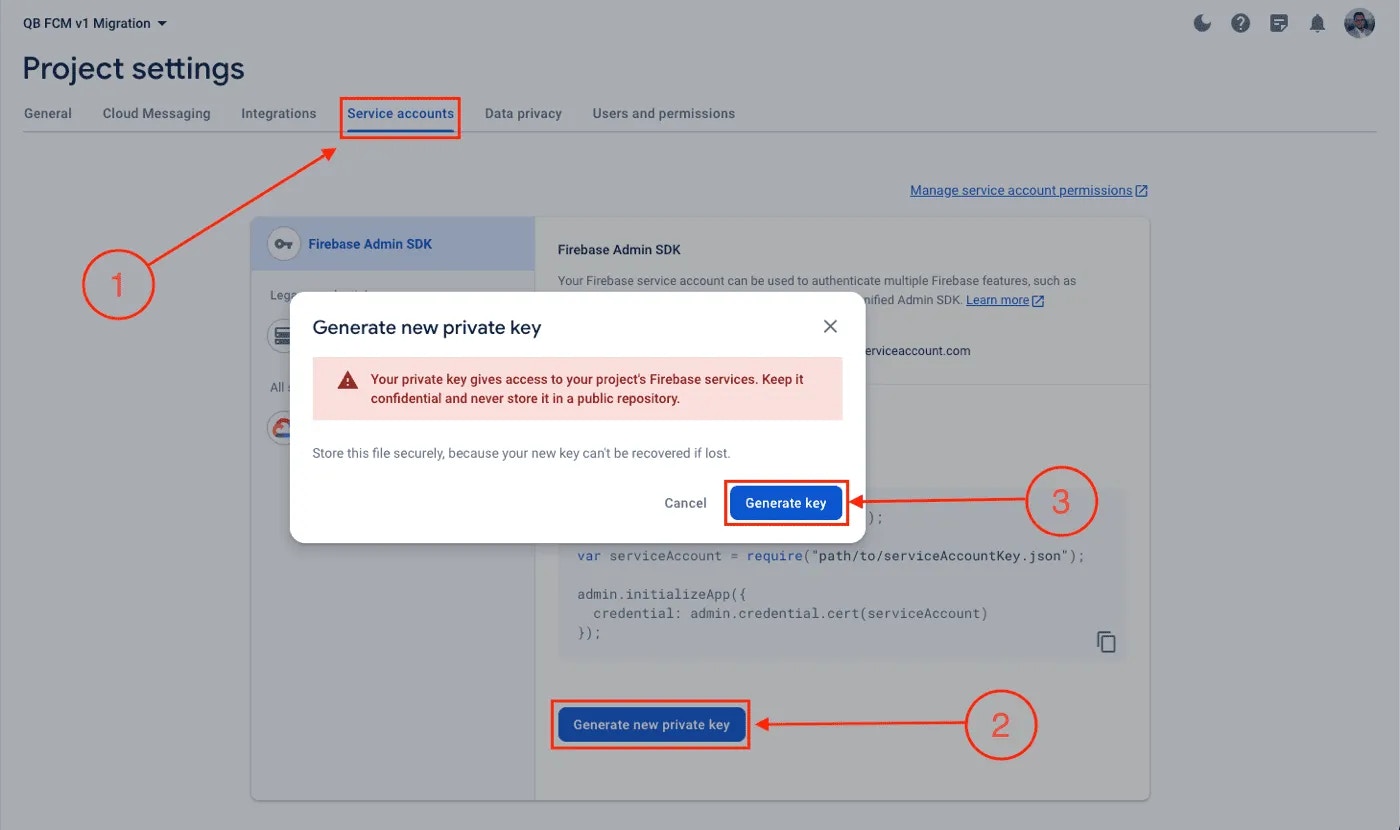 To generate a new service account key, you need to:
1. Open the Firebase console and select your project.
2. Go to Project settings > Service Accounts.
3. Click on Generate new private key and confirm by clicking Generate key.
4. Securely store the JSON file containing the private key that will be downloaded
**Step 3**. Navigate to the push notifications section on QuickBlox dashboard
To generate a new service account key, you need to:
1. Open the Firebase console and select your project.
2. Go to Project settings > Service Accounts.
3. Click on Generate new private key and confirm by clicking Generate key.
4. Securely store the JSON file containing the private key that will be downloaded
**Step 3**. Navigate to the push notifications section on QuickBlox dashboard
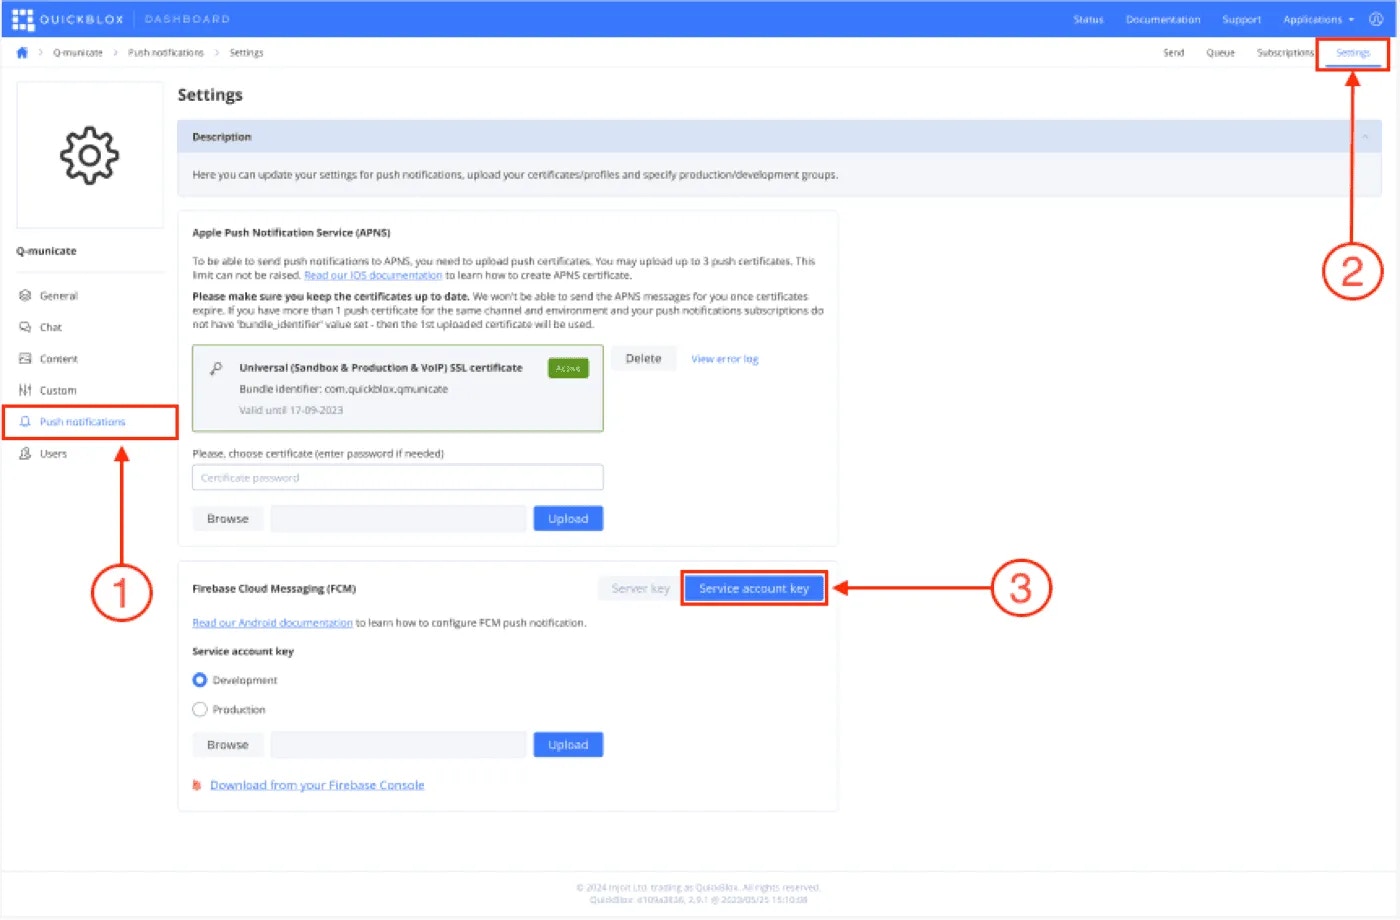 To navigate to the push notifications section:
1. Head over to QuickBlox dashboard, and choose your application.
2. Select the push notifications tab and navigate to the settings page.
3. Select the Service account key tab
We will remove the Server key tab when it will be discontinued by FCM, you will by default only have the service account key section on the dashboard.
**Step 4**. Upload the service account key on QuickBlox dashboard
To navigate to the push notifications section:
1. Head over to QuickBlox dashboard, and choose your application.
2. Select the push notifications tab and navigate to the settings page.
3. Select the Service account key tab
We will remove the Server key tab when it will be discontinued by FCM, you will by default only have the service account key section on the dashboard.
**Step 4**. Upload the service account key on QuickBlox dashboard
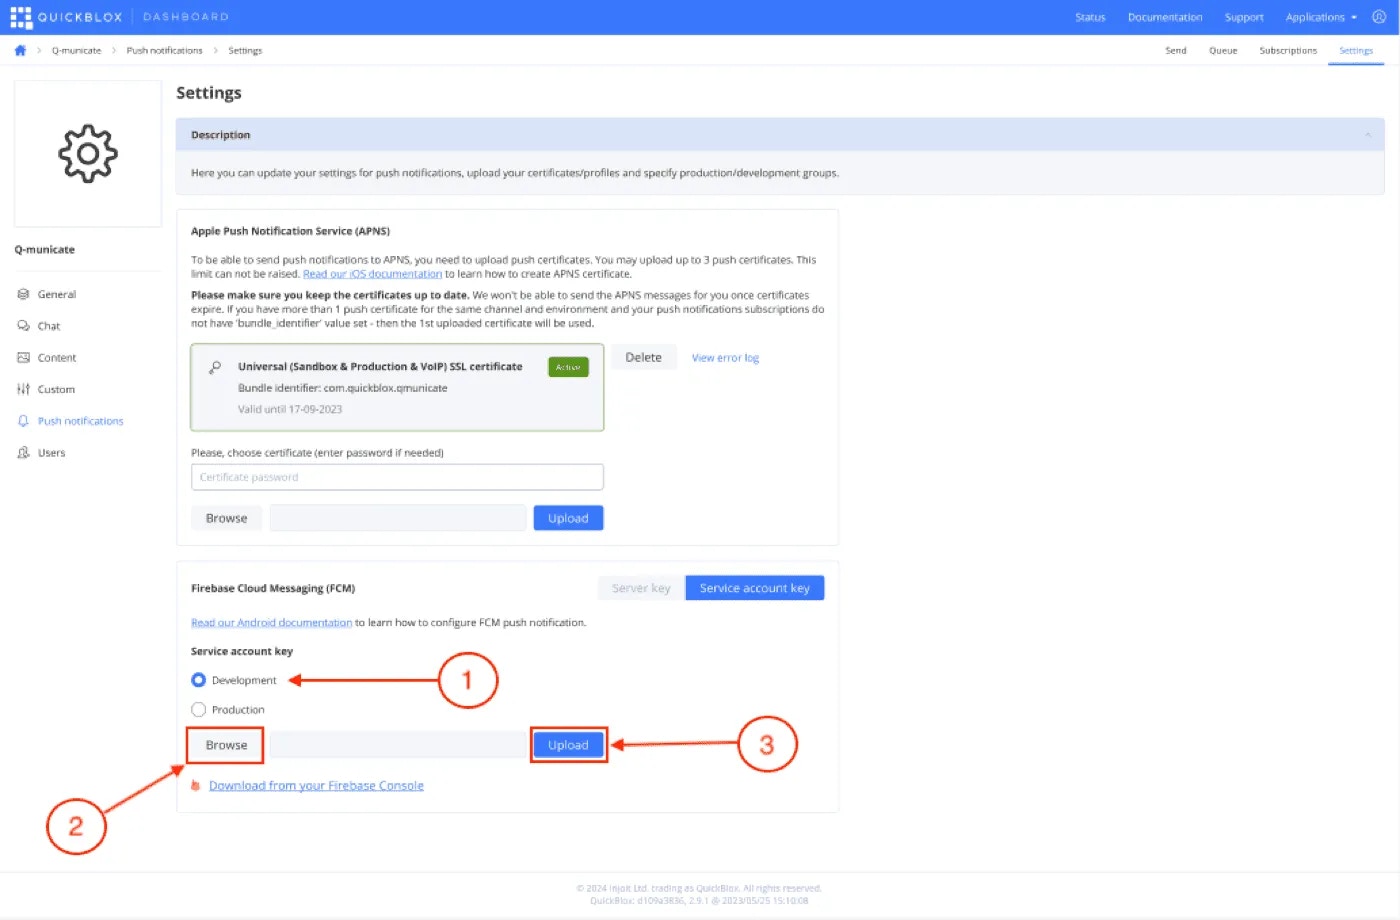 To upload your service account key:
1. Choose the environment for your service account key. (Development/Production)
2. Click on the **Browse** button and select the JSON file containing the key that was downloaded in **Step 2**.
3. Hit the **Upload** button.
When setting up your environment, it’s important to distinguish between development and production modes. If you’ve uploaded a development certificate, it will only function for subscriptions created in the development environment, and likewise for production. This separation ensures seamless testing and deployment of push notifications across different environments.
**Step 5**. Add Firebase to your Project.
1. As part of enabling Firebase services in your Android application, you need to add the **google-services dependency** to your **project-level** `build.gradle` file.
```groovy groovy theme={null}
buildscript {
// ...
dependencies {
// ...
classpath 'com.google.gms:google-services:4.4.2'
}
}
```
2. Add FCM dependency to your **app level** `build.gradle` file.
```groovy groovy theme={null}
implementation(platform("com.google.firebase:firebase-bom:33.4.0"))
```
3. Include a **gms plugin** to your **app level** `build.gradle` file.
```groovy groovy theme={null}
apply plugin: 'com.google.gms.google-services'
```
4. Download the `google-services.json` file from your Firebase Project dashboard and put it into your **app** folder in your Android project.
You can also refer to the official Firebase documentation for more detailed guidance: [Add a Firebase configuration file](https://firebase.google.com/docs/android/setup#add-config-file).
## Subscribe to push notifications
We recommended using the library firebase\_messaging (link: [https://pub.dev/packages/firebase\_messaging](https://pub.dev/packages/firebase%5Fmessaging)) to receive/send the push notifications.
Subscribe for push notifications. Create a push subscription using the code below.
```Dart Dart theme={null}
//Push Channels
//QBPushChannelNames.GCM;
//QBPushChannelNames.APNS;
//QBPushChannelNames.APNS_VOIP;
//QBPushChannelNames.EMAIL;
String channelName = "";
String? token = "";
try {
if (Platform.isAndroid) {
token = await FirebaseMessaging.instance.getToken();
channelName = QBPushChannelNames.GCM;
} else if (Platform.isIOS) {
token = await FirebaseMessaging.instance.getAPNSToken();
channelName = QBPushChannelNames.APNS;
}
await QB.subscriptions.create(token!,channelName);
} on PlatformException catch (e) {
// Some error occurred, look at the exception message for more detai
}
```
A single user can have up to **10** subscriptions on different devices.
The `deviceToken` is a device registration token generated by the APNs or GCM/FCM. The token can be unregistered by the APNs or GCM/FCM anytime. In this case, the device should be registered again and obtain a new token. When a new token is obtained, a new subscription should be created.
## Send push notifications
We recommended using the library firebase\_messaging (link: [https://pub.dev/packages/firebase\_messaging](https://pub.dev/packages/firebase%5Fmessaging)) to receive/send the push notifications.
You can manually initiate sending push notifications to user/users on any event in your application. To do so, you need to form push notification parameters (payload) and set the push recipients.
```Dart Dart theme={null}
//Event Types
//QBNotificationEventTypes.FIXED_DATE;
//QBNotificationEventTypes.PERIOD_DATE;
//QBNotificationEventTypes.ONE_SHOT;
//Notification Event Types
//QBNotificationTypes.PUSH;
//QBNotificationTypes.EMAIL;
//Notification Push Types
//QBNotificationPushTypes.APNS
//QBNotificationPushTypes.APNS_VOIP
//QBNotificationPushTypes.GCM
//QBNotificationPushTypes.MPNS
String eventType = QBNotificationEventTypes.ONE_SHOT;
String notificationEventType = QBNotificationTypes.PUSH;
int pushType = QBNotificationPushTypes.APNS_VOIP;
int senderId = 329873;
Map payload = new Map();
payload["message"] = "test";
try {
List
You can send only FCM data messages to the Android app. QuickBlox doesn't support FCM notification messages.
To process FCM data messages on your app when the app is in the background, you need to handle them. If not handled, they will not pop on the screen even if the app has received such push notification. See [FCM documentation](https://firebase.google.com/docs/cloud-messaging/concept-options#notifications%5Fand%5Fdata%5Fmessages) to learn more about data messages.
How to set up the FCM console and plug into QuickBlox dash board please see [How to enable Cloud Messaging API (Legacy)](/sdks/android-push-notifications#how-to-enable-cloud-messaging-api-legacy) or [HTTP v1 API](/sdks/android-push-notifications#http-v1-api)
You can send APNs VoIP notifications to the iOS app. However, if the iOS app is not subscribed to APNs VoIP notifications or the APNs VoIP certificate has expired, the regular APNs will be delivered instead of APNs VoIP.
## Recieve push notifications
To receive the push notifications, we recommend using [this library](https://pub.dev/packages/firebase%5Fmessaging). To show notifications on the screen, we recommended using [this library](https://pub.dev/packages/flutter%5Flocal%5Fnotifications).
```Dart Dart theme={null}
FirebaseMessaging.onMessage.listen((message) {
AndroidNotificationChannel channel = const AndroidNotificationChannel("channel_id", "some_title", "some_description",
importance: Importance.high);
AndroidNotificationDetails details = AndroidNotificationDetails(channel.id, channel.name, channel.description,
icon: "launch_background");
FlutterLocalNotificationsPlugin plugin = FlutterLocalNotificationsPlugin();
int id = message.hashCode;
String title = "some message title";
String body = message.data["message"];
plugin.show(id, title, body, NotificationDetails(android: details));
});
```
Make sure that the application has a correct icon file for notification.
## Unsubscribe from push notifications
To delete a subscription, use the following code snippet.
```Dart Dart theme={null}
int id = 929988234923;
try {
await QB.subscriptions.remove(id);
} on PlatformException catch (e) {
// Some error occurred, look at the exception message for more details
}
```
## Troubleshooting
#### A subscription is removed after a push is sent and the push isn't delivered
**Cause**: a device registration token is invalid.
The device registration token is represented as `deviceToken` within the system and is set in the `subscription`. See [this section](/sdks/flutter-push-notifications#subscribe-to-push-subscriptions) to learn how to subscribe a device to push notifications.
**Tip**: check if the device registration is correct. The device registration token can be invalid due to a number of reasons:
1. Some other data is set instead of a correct device registration token. For example, a Firebase project ID, Firebase user token, etc.
2. The client app unregistered itself from GCM/FCM. This can happen if the user uninstalls the application or, on iOS, if the APNs Feedback Service reported the APNs token as invalid.
3. The registration token expired. For example, Google might decide to refresh registration tokens or the APNs token may have expired for iOS devices.
4. The client app was updated, but the new version is not configured to receive messages.
For all these cases, remove the invalid device registration token and stop using it to send messages. Then, obtain a new token and make sure to create a new subscription with a valid token.
To upload your service account key:
1. Choose the environment for your service account key. (Development/Production)
2. Click on the **Browse** button and select the JSON file containing the key that was downloaded in **Step 2**.
3. Hit the **Upload** button.
When setting up your environment, it’s important to distinguish between development and production modes. If you’ve uploaded a development certificate, it will only function for subscriptions created in the development environment, and likewise for production. This separation ensures seamless testing and deployment of push notifications across different environments.
**Step 5**. Add Firebase to your Project.
1. As part of enabling Firebase services in your Android application, you need to add the **google-services dependency** to your **project-level** `build.gradle` file.
```groovy groovy theme={null}
buildscript {
// ...
dependencies {
// ...
classpath 'com.google.gms:google-services:4.4.2'
}
}
```
2. Add FCM dependency to your **app level** `build.gradle` file.
```groovy groovy theme={null}
implementation(platform("com.google.firebase:firebase-bom:33.4.0"))
```
3. Include a **gms plugin** to your **app level** `build.gradle` file.
```groovy groovy theme={null}
apply plugin: 'com.google.gms.google-services'
```
4. Download the `google-services.json` file from your Firebase Project dashboard and put it into your **app** folder in your Android project.
You can also refer to the official Firebase documentation for more detailed guidance: [Add a Firebase configuration file](https://firebase.google.com/docs/android/setup#add-config-file).
## Subscribe to push notifications
We recommended using the library firebase\_messaging (link: [https://pub.dev/packages/firebase\_messaging](https://pub.dev/packages/firebase%5Fmessaging)) to receive/send the push notifications.
Subscribe for push notifications. Create a push subscription using the code below.
```Dart Dart theme={null}
//Push Channels
//QBPushChannelNames.GCM;
//QBPushChannelNames.APNS;
//QBPushChannelNames.APNS_VOIP;
//QBPushChannelNames.EMAIL;
String channelName = "";
String? token = "";
try {
if (Platform.isAndroid) {
token = await FirebaseMessaging.instance.getToken();
channelName = QBPushChannelNames.GCM;
} else if (Platform.isIOS) {
token = await FirebaseMessaging.instance.getAPNSToken();
channelName = QBPushChannelNames.APNS;
}
await QB.subscriptions.create(token!,channelName);
} on PlatformException catch (e) {
// Some error occurred, look at the exception message for more detai
}
```
A single user can have up to **10** subscriptions on different devices.
The `deviceToken` is a device registration token generated by the APNs or GCM/FCM. The token can be unregistered by the APNs or GCM/FCM anytime. In this case, the device should be registered again and obtain a new token. When a new token is obtained, a new subscription should be created.
## Send push notifications
We recommended using the library firebase\_messaging (link: [https://pub.dev/packages/firebase\_messaging](https://pub.dev/packages/firebase%5Fmessaging)) to receive/send the push notifications.
You can manually initiate sending push notifications to user/users on any event in your application. To do so, you need to form push notification parameters (payload) and set the push recipients.
```Dart Dart theme={null}
//Event Types
//QBNotificationEventTypes.FIXED_DATE;
//QBNotificationEventTypes.PERIOD_DATE;
//QBNotificationEventTypes.ONE_SHOT;
//Notification Event Types
//QBNotificationTypes.PUSH;
//QBNotificationTypes.EMAIL;
//Notification Push Types
//QBNotificationPushTypes.APNS
//QBNotificationPushTypes.APNS_VOIP
//QBNotificationPushTypes.GCM
//QBNotificationPushTypes.MPNS
String eventType = QBNotificationEventTypes.ONE_SHOT;
String notificationEventType = QBNotificationTypes.PUSH;
int pushType = QBNotificationPushTypes.APNS_VOIP;
int senderId = 329873;
Map payload = new Map();
payload["message"] = "test";
try {
List
You can send only FCM data messages to the Android app. QuickBlox doesn't support FCM notification messages.
To process FCM data messages on your app when the app is in the background, you need to handle them. If not handled, they will not pop on the screen even if the app has received such push notification. See [FCM documentation](https://firebase.google.com/docs/cloud-messaging/concept-options#notifications%5Fand%5Fdata%5Fmessages) to learn more about data messages.
How to set up the FCM console and plug into QuickBlox dash board please see [How to enable Cloud Messaging API (Legacy)](/sdks/android-push-notifications#how-to-enable-cloud-messaging-api-legacy) or [HTTP v1 API](/sdks/android-push-notifications#http-v1-api)
You can send APNs VoIP notifications to the iOS app. However, if the iOS app is not subscribed to APNs VoIP notifications or the APNs VoIP certificate has expired, the regular APNs will be delivered instead of APNs VoIP.
## Recieve push notifications
To receive the push notifications, we recommend using [this library](https://pub.dev/packages/firebase%5Fmessaging). To show notifications on the screen, we recommended using [this library](https://pub.dev/packages/flutter%5Flocal%5Fnotifications).
```Dart Dart theme={null}
FirebaseMessaging.onMessage.listen((message) {
AndroidNotificationChannel channel = const AndroidNotificationChannel("channel_id", "some_title", "some_description",
importance: Importance.high);
AndroidNotificationDetails details = AndroidNotificationDetails(channel.id, channel.name, channel.description,
icon: "launch_background");
FlutterLocalNotificationsPlugin plugin = FlutterLocalNotificationsPlugin();
int id = message.hashCode;
String title = "some message title";
String body = message.data["message"];
plugin.show(id, title, body, NotificationDetails(android: details));
});
```
Make sure that the application has a correct icon file for notification.
## Unsubscribe from push notifications
To delete a subscription, use the following code snippet.
```Dart Dart theme={null}
int id = 929988234923;
try {
await QB.subscriptions.remove(id);
} on PlatformException catch (e) {
// Some error occurred, look at the exception message for more details
}
```
## Troubleshooting
#### A subscription is removed after a push is sent and the push isn't delivered
**Cause**: a device registration token is invalid.
The device registration token is represented as `deviceToken` within the system and is set in the `subscription`. See [this section](/sdks/flutter-push-notifications#subscribe-to-push-subscriptions) to learn how to subscribe a device to push notifications.
**Tip**: check if the device registration is correct. The device registration token can be invalid due to a number of reasons:
1. Some other data is set instead of a correct device registration token. For example, a Firebase project ID, Firebase user token, etc.
2. The client app unregistered itself from GCM/FCM. This can happen if the user uninstalls the application or, on iOS, if the APNs Feedback Service reported the APNs token as invalid.
3. The registration token expired. For example, Google might decide to refresh registration tokens or the APNs token may have expired for iOS devices.
4. The client app was updated, but the new version is not configured to receive messages.
For all these cases, remove the invalid device registration token and stop using it to send messages. Then, obtain a new token and make sure to create a new subscription with a valid token.