> ## Documentation Index
> Fetch the complete documentation index at: https://docs.quickblox.com/llms.txt
> Use this file to discover all available pages before exploring further.
# Setup
> Learn how to add and configure QuickBlox SDK for your app.
Follow the instructions below to ensure that QuickBlox SDK runs smoothly with your app.
Visit [Key Concepts](/docs/key-concepts) page to learn the most important QuickBlox concepts.
## Get application credentials
QuickBlox application includes everything that brings messaging right into your application - chat, video calling, users, push notifications, etc. To create a QuickBlox application, follow the steps below:
1. Register a new account following [this link](https://admin.quickblox.com/signup). Type in your email and password to sign in. You can also sign in with your Google or GitHub accounts.
2. Create the app clicking **New app** button.
3. Configure the app. Type in the information about your organization into corresponding fields and click **Add** button.
4. Go to **Dashboard => *YOUR\_APP* => Overview** section and copy your **Application ID**, **Authorization Key**, **Authorization Secret**, and **Account Key** .
## Requirements
The minimum requirements for QuickBlox Flutter SDK are:
* iOS 13.0
* Android (minimum version 5.0, API 21)
* Flutter (minimum version 2.12.0)
## Install QuickBlox SDK into your app
To manage project dependencies [Flutter](https://flutter.dev/docs/get-started/install) should be installed.
To connect QuickBlox to your app just add it into your project dependencies in **pubspec.yaml** file located in the **root project directory => dependencies** section.
```YAML YAML theme={null}
dependencies:
flutter:
sdk: flutter
# The following adds the QuickBlox SDK to your application.
quickblox_sdk: 0.18.0
```
## Add permissions
### For Android
Starting from **0.18.0**, the SDK **no longer manages permissions** required for calling functionality on Android.
This change provides developers with more control over their app's permission handling.
If your app uses calling features, please make sure to **manually declare** the required permissions in your app’s `AndroidManifest.xml` file.
Additionally, if your app requires access to the camera, microphone, internet, or storage, you may need to include related permissions in the manifest as well.
Kindly ensure you're modifying the main `AndroidManifest.xml` file located at the application level — not a test or variant manifest.
```XML XML theme={null}
```
Your app requires adding some specific permissions to access the camera, microphone, internet, and storage permissions.
To configure chat functionality, add permissions below:
```XML XML theme={null}
```
To configure video chat functionality, add permissions below:
```XML XML theme={null}
```
Note that mentioning the camera and microphone permissions in the manifest isn't always enough. You need to request camera and microphone permissions additionally at runtime.
### For iOS
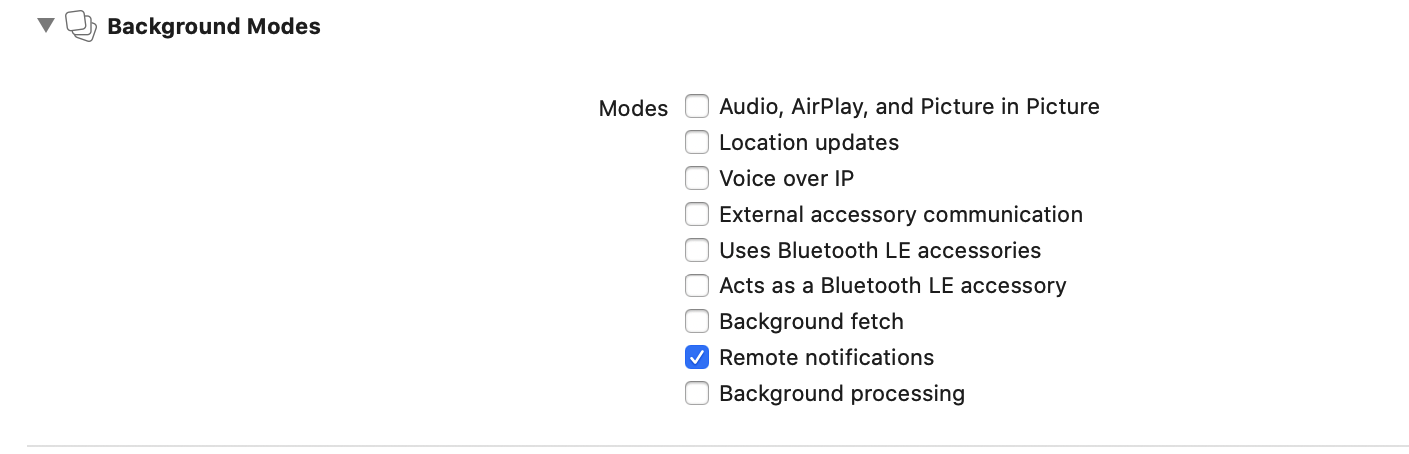
You can use our SDK in the background mode as well. If you want to receive push notifications when the app goes to background mode, this requires you to add specific app permissions. Under the app build settings, open the **Capabilities** tab and turn on **Remote notifications** checkbox only.
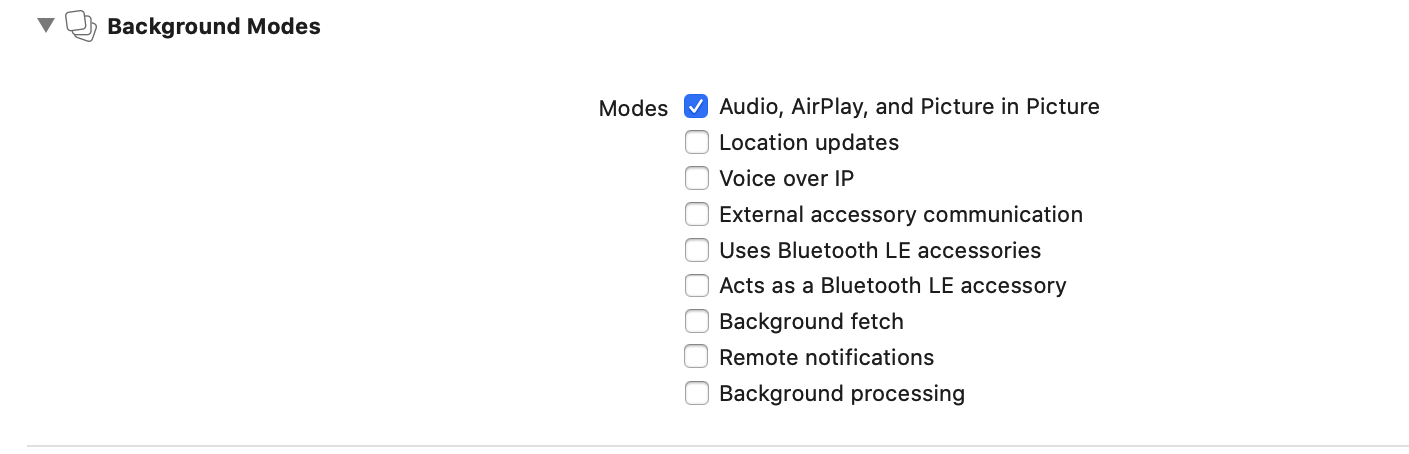
 If you want to use video calling functionality in the background mode, set the **Audio, AirPlay, and Picture in Picture** checkboxes.
 ## Initialize QuickBlox SDK
Initialize the framework with your application credentials. Pass **Application ID**, **Authorization Key**, **Authorization Secret**, and **Account Key** to the `init()` method.
```Dart Dart theme={null}
String appId = 76730;
String authKey = "XydaWcf8OO9xhGT";
String authSecret = "iiohfdija792hjt";
String accountKey = "7yvNe17TnjNUqDoPwfqp";
void init() async {
try {
await QB.settings.init(appId, authKey, authSecret, accountKey);
} on PlatformException catch (e) {
// Some error occurred, look at the exception message for more details
}
}
```
**Security**
It's not recommended to keep your **authKey** and **authSecret** inside an application in production mode, instead of this, the best approach will be to store them on your backend.
| Argument | Required | Description |
| ---------- | -------- | ------------------------------------------------------------------------- |
| appId | yes | Application identifier. |
| authKey | yes | Authorization key. |
| authSecret | yes | Authorization secret. |
| accountKey | yes | Required to get actual apiEndpoint and chatEndpoint for the right server. |
## Initialize QuickBlox SDK without Authorization Key and Secret
You may don't want to store authKey and authSecret inside an application for security reasons. In such case, you can initialize QuickBlox SDK with applicationId and accountKey only, and store your authKey and authSecret on your backend. But, if so, the implementation of [authentication with QuickBlox](https://docs.quickblox.com/reference/authentication) should be also moved to your backend.
```Dart Dart theme={null}
String appId = 76730;
String accountKey = "7yvNe17TnjNUqDoPwfqp";
void init() async {
try {
await QB.settings.initWithAppId(appId, accountKey: accountKey);
} on PlatformException catch (e) {
// some error occurred, look at the exception message for more details
}
}
```
| Argument | Required | Description |
| ---------- | -------- | ------------------------------------------------------------------------- |
| appId | yes | Application identifier. |
| accountKey | no | Required to get actual apiEndpoint and chatEndpoint for the right server. |
Then using your backend you can authorize a user in the QuickBlox system, send back the user session token, and set it to the QuickBlox SDK using startSessionWithToken() method. You can find out more about this in the [Set existing session](/sdks/flutter-authentication#set-existing-session) section.
## Point SDK to enterprise server
To point QuickBlox SDK to the QuickBlox enterprise server, you should pass `apiEndpoint` and `chatEndpoint` to the `init()` method.
```Dart Dart theme={null}
String appId = 76730;
String authKey = "XydaWcf8OO9xhGT";
String authSecret = "iiohfdija792hjt";
String accountKey = "7yvNe17TnjNUqDoPwfqp";
String apiEndpoint = "api.endpoint.com";
String chatEndpoint = "chat.enpoint.com";
void init() async {
try {
await QB.settings.init(appId, authKey, authSecret, accountKey, apiEndpoint: apiEndpoint, chatEndpoint: chatEndpoint);
} on PlatformException catch (e) {
// Some error occurred, look at the exception message for more details
}
}
```
| Argument | Required | Description |
| ------------ | -------- | ----------------------- |
| appId | yes | Application identifier. |
| authKey | yes | Authorization key. |
| authSecret | yes | Authorization secret. |
| apiEndpoint | no | API endpoint. |
| chatEndpoint | no | Chat endpoint. |
[Contact our sales team](https://quickblox.com/enterprise/#get) to get **API endpoint** and **chat endpoint**.
## Enable auto-reconnect to Chat
QuickBlox Chat runs over XMPP protocol. To receive messages in a real time mode, the application should be connected to the Chat over XMPP protocol. To enable auto-reconnect to Chat, call `enableAutoReconnect()` method and pass `true` to it.
```Dart Dart theme={null}
void enableAutoReconnect() async {
try {
await QB.settings.enableAutoReconnect(true);
} on PlatformException catch (e) {
// Some error occurred, look at the exception message for more details
}
}
```
Thus, if XMPP connection is lost and autoreconnect functionality is enabled, the app connects to Chat automatically. You can disable autoreconnection to Chat by passing `enable` parameter as `false` to `enableAutoReconnect()` method.
```Dart Dart theme={null}
void enableAutoReconnect() async {
try {
await QB.settings.enableAutoReconnect(false);
} on PlatformException catch (e) {
// Some error occurred, look at the exception message for more details
}
}
```
**By default**, this parameter is enabled. Set autoreconnection before calling the `login()` method so it could be applied in a current chat.
## Enable logging
Logging functionality allows you to keep track of all events and activities while running your app. As a result, you can monitor the operation of the SDK and improve the debug efficiency. There are 3 logging use cases:
* **Server API** logging is used to monitor Server API calls.
* **Chat** logging is used to monitor chat issues.
* **WebRTC** logging is used to gather issues with video.
1. Go over [this section](/sdks/ios-setup#enable-logging) to learn how to enable logging for your iOS app.
2. Go over [this section](/sdks/android-setup#enable-logging) to learn how to enable logging for your Android app.
Enable XMPP logging
```Dart Dart theme={null}
void enableCarbons() async {
try {
await QB.settings.enableXMPPLogging();
} on PlatformException catch (e) {
// Some error occurred, look at the exception message for more details
}
}
```
Disable XMPP logging
```Dart Dart theme={null}
void enableCarbons() async {
try {
await QB.settings.disableXMPPLogging();
} on PlatformException catch (e) {
// Some error occurred, look at the exception message for more details
}
}
```
Enable Server API logging
```Dart Dart theme={null}
void enableCarbons() async {
try {
await QB.settings.enableLogging();
} on PlatformException catch (e) {
// Some error occurred, look at the exception message for more details
}
}
```
Disable Server API logging
```Dart Dart theme={null}
void enableCarbons() async {
try {
await QB.settings.disableLogging();
} on PlatformException catch (e) {
// Some error occurred, look at the exception message for more details
}
}
```
## Message carbons
Message carbons functionality allows for multi-device support. Thus, all user messages get copied to all their devices so they could keep up with the current state of the conversation. For example, a User A has phone running conversations and desktop running conversations. User B has desktop running conversations. When User B sends a message to User A, the message shows on both the desktop and phone of User A.
**Enable message carbons**
```Dart Dart theme={null}
void enableCarbons() async {
try {
await QB.settings.enableCarbons();
} on PlatformException catch (e) {
// Some error occurred, look at the exception message for more details
}
}
```
**Disable message carbons**
```Dart Dart theme={null}
void disableCarbons() async {
try {
await QB.settings.disableCarbons();
} on PlatformException catch (e) {
// Some error occurred, look at the exception message for more details
}
}
```
**By default**, this parameter is turned off. Keep it enabled if you want to receive messages on all devices of the particular user (when a user is logged in on several devices).
## Stream management
Stream management has two important features **Stanza Acknowledgements** and **Stream Resumption**:
* **Stanza Acknowledgements** is the ability to know if a stanza or series of stanzas has been received by one's peer. In other words, a reply is requested on every sent message. If the reply is received, the message is considered as delivered.
* **Stream Resumption** is the ability to quickly resume a stream that has been terminated. Once a connection is re-established, Stream Resumption is executed. By matching the sequence numbers assigned to each Stanza Acknowledgement a server and client can verify which messages are missing and request to resend missing messages.
Call `initStreamManagement()` method and pass `autoReconnect` and `messageTimeout` parameters to it to enable stream management.
```Dart Dart theme={null}
bool autoReconnect = true;
int messageTimeout = 3;
void initStreamManagement() async {
try {
await QB.settings.initStreamManagement(messageTimeout, autoReconnect: autoReconnect);
} on PlatformException catch (e) {
// Some error occurred, look at the exception message for more details
}
}
```
| Argument | Required | Description |
| -------------- | -------- | ------------------------------------------------------------------------------------------------------------------------------- |
| messageTimeout | yes | Preferred resumption time (in seconds). If this parameter is greater than 0, then it is applied, otherwise it is not applied. |
| autoReconnect | no | Set this parameter to apply Stream resumption. Set it as true to use Stream resumption for new connections. Default: **false**. |
You should enable Stream Management before you do the `login()` because the Stream Management is initialized while Chat login is performed.
The Stream Management defines an extension for active management of a stream between a client and server, including features for stanza acknowledgments.
## Initialize QuickBlox SDK
Initialize the framework with your application credentials. Pass **Application ID**, **Authorization Key**, **Authorization Secret**, and **Account Key** to the `init()` method.
```Dart Dart theme={null}
String appId = 76730;
String authKey = "XydaWcf8OO9xhGT";
String authSecret = "iiohfdija792hjt";
String accountKey = "7yvNe17TnjNUqDoPwfqp";
void init() async {
try {
await QB.settings.init(appId, authKey, authSecret, accountKey);
} on PlatformException catch (e) {
// Some error occurred, look at the exception message for more details
}
}
```
**Security**
It's not recommended to keep your **authKey** and **authSecret** inside an application in production mode, instead of this, the best approach will be to store them on your backend.
| Argument | Required | Description |
| ---------- | -------- | ------------------------------------------------------------------------- |
| appId | yes | Application identifier. |
| authKey | yes | Authorization key. |
| authSecret | yes | Authorization secret. |
| accountKey | yes | Required to get actual apiEndpoint and chatEndpoint for the right server. |
## Initialize QuickBlox SDK without Authorization Key and Secret
You may don't want to store authKey and authSecret inside an application for security reasons. In such case, you can initialize QuickBlox SDK with applicationId and accountKey only, and store your authKey and authSecret on your backend. But, if so, the implementation of [authentication with QuickBlox](https://docs.quickblox.com/reference/authentication) should be also moved to your backend.
```Dart Dart theme={null}
String appId = 76730;
String accountKey = "7yvNe17TnjNUqDoPwfqp";
void init() async {
try {
await QB.settings.initWithAppId(appId, accountKey: accountKey);
} on PlatformException catch (e) {
// some error occurred, look at the exception message for more details
}
}
```
| Argument | Required | Description |
| ---------- | -------- | ------------------------------------------------------------------------- |
| appId | yes | Application identifier. |
| accountKey | no | Required to get actual apiEndpoint and chatEndpoint for the right server. |
Then using your backend you can authorize a user in the QuickBlox system, send back the user session token, and set it to the QuickBlox SDK using startSessionWithToken() method. You can find out more about this in the [Set existing session](/sdks/flutter-authentication#set-existing-session) section.
## Point SDK to enterprise server
To point QuickBlox SDK to the QuickBlox enterprise server, you should pass `apiEndpoint` and `chatEndpoint` to the `init()` method.
```Dart Dart theme={null}
String appId = 76730;
String authKey = "XydaWcf8OO9xhGT";
String authSecret = "iiohfdija792hjt";
String accountKey = "7yvNe17TnjNUqDoPwfqp";
String apiEndpoint = "api.endpoint.com";
String chatEndpoint = "chat.enpoint.com";
void init() async {
try {
await QB.settings.init(appId, authKey, authSecret, accountKey, apiEndpoint: apiEndpoint, chatEndpoint: chatEndpoint);
} on PlatformException catch (e) {
// Some error occurred, look at the exception message for more details
}
}
```
| Argument | Required | Description |
| ------------ | -------- | ----------------------- |
| appId | yes | Application identifier. |
| authKey | yes | Authorization key. |
| authSecret | yes | Authorization secret. |
| apiEndpoint | no | API endpoint. |
| chatEndpoint | no | Chat endpoint. |
[Contact our sales team](https://quickblox.com/enterprise/#get) to get **API endpoint** and **chat endpoint**.
## Enable auto-reconnect to Chat
QuickBlox Chat runs over XMPP protocol. To receive messages in a real time mode, the application should be connected to the Chat over XMPP protocol. To enable auto-reconnect to Chat, call `enableAutoReconnect()` method and pass `true` to it.
```Dart Dart theme={null}
void enableAutoReconnect() async {
try {
await QB.settings.enableAutoReconnect(true);
} on PlatformException catch (e) {
// Some error occurred, look at the exception message for more details
}
}
```
Thus, if XMPP connection is lost and autoreconnect functionality is enabled, the app connects to Chat automatically. You can disable autoreconnection to Chat by passing `enable` parameter as `false` to `enableAutoReconnect()` method.
```Dart Dart theme={null}
void enableAutoReconnect() async {
try {
await QB.settings.enableAutoReconnect(false);
} on PlatformException catch (e) {
// Some error occurred, look at the exception message for more details
}
}
```
**By default**, this parameter is enabled. Set autoreconnection before calling the `login()` method so it could be applied in a current chat.
## Enable logging
Logging functionality allows you to keep track of all events and activities while running your app. As a result, you can monitor the operation of the SDK and improve the debug efficiency. There are 3 logging use cases:
* **Server API** logging is used to monitor Server API calls.
* **Chat** logging is used to monitor chat issues.
* **WebRTC** logging is used to gather issues with video.
1. Go over [this section](/sdks/ios-setup#enable-logging) to learn how to enable logging for your iOS app.
2. Go over [this section](/sdks/android-setup#enable-logging) to learn how to enable logging for your Android app.
Enable XMPP logging
```Dart Dart theme={null}
void enableCarbons() async {
try {
await QB.settings.enableXMPPLogging();
} on PlatformException catch (e) {
// Some error occurred, look at the exception message for more details
}
}
```
Disable XMPP logging
```Dart Dart theme={null}
void enableCarbons() async {
try {
await QB.settings.disableXMPPLogging();
} on PlatformException catch (e) {
// Some error occurred, look at the exception message for more details
}
}
```
Enable Server API logging
```Dart Dart theme={null}
void enableCarbons() async {
try {
await QB.settings.enableLogging();
} on PlatformException catch (e) {
// Some error occurred, look at the exception message for more details
}
}
```
Disable Server API logging
```Dart Dart theme={null}
void enableCarbons() async {
try {
await QB.settings.disableLogging();
} on PlatformException catch (e) {
// Some error occurred, look at the exception message for more details
}
}
```
## Message carbons
Message carbons functionality allows for multi-device support. Thus, all user messages get copied to all their devices so they could keep up with the current state of the conversation. For example, a User A has phone running conversations and desktop running conversations. User B has desktop running conversations. When User B sends a message to User A, the message shows on both the desktop and phone of User A.
**Enable message carbons**
```Dart Dart theme={null}
void enableCarbons() async {
try {
await QB.settings.enableCarbons();
} on PlatformException catch (e) {
// Some error occurred, look at the exception message for more details
}
}
```
**Disable message carbons**
```Dart Dart theme={null}
void disableCarbons() async {
try {
await QB.settings.disableCarbons();
} on PlatformException catch (e) {
// Some error occurred, look at the exception message for more details
}
}
```
**By default**, this parameter is turned off. Keep it enabled if you want to receive messages on all devices of the particular user (when a user is logged in on several devices).
## Stream management
Stream management has two important features **Stanza Acknowledgements** and **Stream Resumption**:
* **Stanza Acknowledgements** is the ability to know if a stanza or series of stanzas has been received by one's peer. In other words, a reply is requested on every sent message. If the reply is received, the message is considered as delivered.
* **Stream Resumption** is the ability to quickly resume a stream that has been terminated. Once a connection is re-established, Stream Resumption is executed. By matching the sequence numbers assigned to each Stanza Acknowledgement a server and client can verify which messages are missing and request to resend missing messages.
Call `initStreamManagement()` method and pass `autoReconnect` and `messageTimeout` parameters to it to enable stream management.
```Dart Dart theme={null}
bool autoReconnect = true;
int messageTimeout = 3;
void initStreamManagement() async {
try {
await QB.settings.initStreamManagement(messageTimeout, autoReconnect: autoReconnect);
} on PlatformException catch (e) {
// Some error occurred, look at the exception message for more details
}
}
```
| Argument | Required | Description |
| -------------- | -------- | ------------------------------------------------------------------------------------------------------------------------------- |
| messageTimeout | yes | Preferred resumption time (in seconds). If this parameter is greater than 0, then it is applied, otherwise it is not applied. |
| autoReconnect | no | Set this parameter to apply Stream resumption. Set it as true to use Stream resumption for new connections. Default: **false**. |
You should enable Stream Management before you do the `login()` because the Stream Management is initialized while Chat login is performed.
The Stream Management defines an extension for active management of a stream between a client and server, including features for stanza acknowledgments.