> ## Documentation Index
> Fetch the complete documentation index at: https://docs.quickblox.com/llms.txt
> Use this file to discover all available pages before exploring further.
# Address Book
> Learn how to store and sync the phone contact list with QuickBlox.
Address Book API provides an interface to work with the phone address book. Upload it to the server and retrieve already registered QuickBlox users from your address book.
Visit [Key Concepts](/docs/key-concepts) page to learn the most important QuickBlox concepts.
## Before you begin
1. Register a [QuickBlox account](https://admin.quickblox.com/signin). This is a matter of a few minutes and you will be able to use this account to build your apps.
2. Configure QuickBlox SDK for your app. Check out [Setup](/sdks/ios-setup) page for more details.
3. Create a user session to be able to use QuickBlox functionality. See [Authentication](/sdks/ios-authentication) page to learn how to do it.
## Upload address book
First of all, you need to upload your address book to the backend. It's a normal practice to do a full upload for the first time and then upload new contacts on future app logins.
```Swift theme={null}
let contact = QBAddressBookContact()
contact.name = "Apple service"
contact.phone = "1-800-275-2273"
let contactsArray = [contact]
let addressBook: NSOrderedSet = NSOrderedSet(array: contactsArray)
QBRequest.uploadAddressBook(withUdid: nil, addressBook: addressBook, force: false, successBlock: { (addressBookUpdates) in
// process response
}, errorBlock: { (response) in
// handle errors
debugPrint("[error: \(response.error?.error)")
})
```
```Objective-C theme={null}
QBAddressBookContact *contact = [QBAddressBookContact new];
contact.name = @"Apple service";
contact.phone = @"1-800-275-2273";
NSMutableOrderedSet* addressBook = [NSMutableOrderedSet orderedSet];
[addressBook addObject:contact];
[QBRequest uploadAddressBookWithUdid:nil addressBook:[addressBook copy] force:NO successBlock:^(QBAddressBookUpdates * _Nonnull updates) {
// process response
} errorBlock:^(QBResponse * _Nonnull response) {
// handle errors
NSLog(@"errors=%@", response.error.error);
}];
```
* You also can edit an existing contact by providing a new name for it.
* You also can upload more contacts, not just all in one request. They will be added to your address book on the backend. If you want to override the whole address book on the backend just provide the `force:true:` option.
* A device `UDID` is used in cases where a user has 2 or more devices and contacts sync is off. Otherwise, a user has a single global address book.
## Retrieve address book
You can retrieve your uploaded address book using the code snippet below.
```Swift theme={null}
QBRequest.addressBook(withUdid: nil, successBlock: { (addressBookContacts) in
// process response
}, errorBlock: { (response) in
// handle errors
debugPrint("[error: \(response.error?.error)")
})
```
```Objective-C theme={null}
[QBRequest addressBookWithUdid:nil successBlock:^(NSArray * _Nonnull contacts) {
// process response
} errorBlock:^(QBResponse * _Nonnull response) {
// handle errors
NSLog(@"errors=%@", response.error.error);
}];
```
## Update contacts
If you need to update the name or phone number in your address book contacts, you should use the code sample below.
```Swift theme={null}
let contactToUpdate = QBAddressBookContact()
contactToUpdate.phone = "380955868675" // Existing phone number
contactToUpdate.name = "QuickBlox in Ukraine" // Name to replace in the Server
let contactsArray = [contactToUpdate]
let contactsToUpdate: NSOrderedSet = NSOrderedSet(array: contactsArray)
QBRequest.uploadAddressBook(withUdid: nil, addressBook: contactsToUpdate, force: false, successBlock: { (addressBookUpdates) in
// process response
}, errorBlock: { (response) in
// handle errors
debugPrint("[error: \(response.error?.error)")
})
```
```Objective-C theme={null}
QBAddressBookContact *contactToUpdate = [QBAddressBookContact new];
contactToUpdate.name = @"QuickBlox in Ukraine"; // Name to replace in the Server
contactToUpdate.phone = @"380955868675"; // Existing phone number
NSMutableOrderedSet* contactsToUpdate = [NSMutableOrderedSet orderedSet];
[contactsToUpdate addObject:contactToUpdate];
[QBRequest uploadAddressBookWithUdid:nil addressBook:[contactsToUpdate copy] force:NO successBlock:^(QBAddressBookUpdates * _Nonnull updates) {
// process response
} errorBlock:^(QBResponse * _Nonnull response) {
// handle errors
NSLog(@"errors=%@", response.error.error);
}];
```
## Delete contacts
You can delete contacts by using the code snippet below.
```Swift theme={null}
let contactToDelete = QBAddressBookContact()
contactToDelete.phone = "380955868675" // Existing phone number
contactToDelete.destroy = true //To mark as Deleted
let contactsArray = [contactToDelete]
let contactsToDelete: NSOrderedSet = NSOrderedSet(array: contactsArray)
QBRequest.uploadAddressBook(withUdid: nil, addressBook: contactsToDelete, force: false, successBlock: { (addressBookUpdates) in
// process response
}, errorBlock: { (response) in
// handle errors
debugPrint("[error: \(response.error?.error)")
})
```
```Objective-C theme={null}
QBAddressBookContact *contactToDelete = [QBAddressBookContact new];
contactToDelete.phone = @"380955868675";
contactToDelete.destroy = YES; //To mark as Deleted
NSMutableOrderedSet* contactsToDelete = [NSMutableOrderedSet orderedSet];
[contactsToDelete addObject:contactToDelete];
[QBRequest uploadAddressBookWithUdid:nil addressBook:[contactsToDelete copy] force:NO successBlock:^(QBAddressBookUpdates * _Nonnull updates) {
// process response
} errorBlock:^(QBResponse * _Nonnull response) {
// handle errors
NSLog(@"errors=%@", response.error.error);
}];
```
## Retrieve registered users
Using this request you can easily retrieve the QuickBlox users - your address book contacts that are already registered in your app. Users are matched with address book contacts by phone number, so user and address book contact must have the same phone number to be included in response.
```Swift theme={null}
QBRequest.registeredUsersFromAddressBook(withUdid: "your udid", isCompact: false, successBlock: { (users) in
// process response
}, errorBlock: { (response) in
// handle errors
debugPrint("[error: \(response.error?.error)")
})
```
```Objective-C theme={null}
[QBRequest registeredUsersFromAddressBookWithUdid:@"your udid" isCompact:NO successBlock:^(NSArray *users) {
// process response
} errorBlock:^(QBResponse * _Nonnull response) {
// handle errors
NSLog(@"errors=%@", response.error.error);
}];
```
If the `isCompact ` parameter is `true`, the server will return **only** the `userId` and `phone` fields of the `QBUser` model. Otherwise, all fields of the `QBUser` model will be returned.
## Push notification on new contact joined
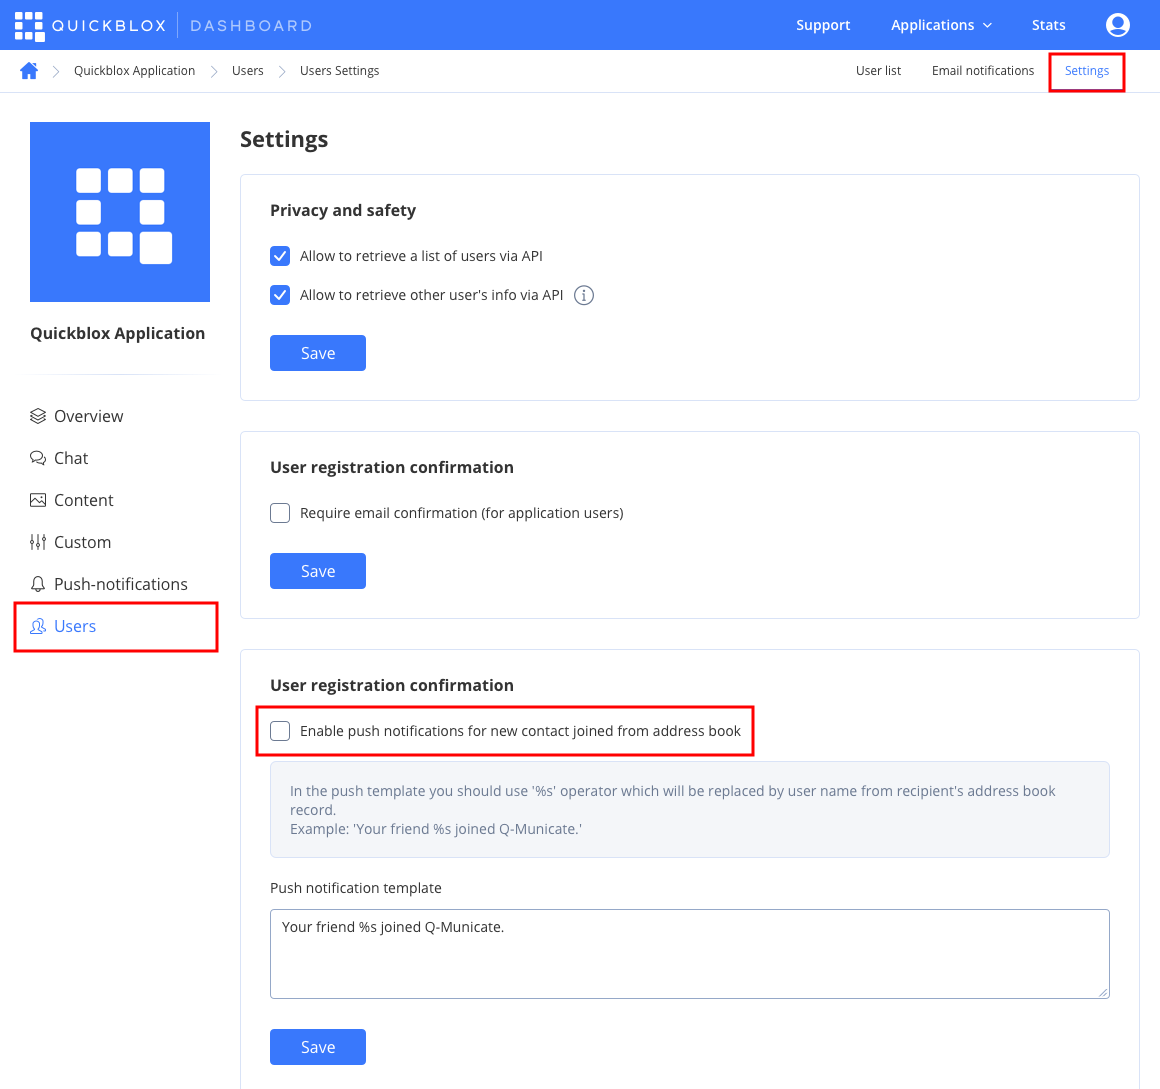
There is a way to get a push notification when some contact from your Address Book has been registered in the app. You can enable this feature at QuickBlox Dashboard. Just follow **Dashboard => *YOUR\_APP* => Users => Settings** direction and enable push notifications for new contacts.