> ## Documentation Index
> Fetch the complete documentation index at: https://docs.quickblox.com/llms.txt
> Use this file to discover all available pages before exploring further.
# Push Notifications
> Learn how to send push notifications to users when they are offline.
Push Notifications provide a way to deliver some information to a user while they are not using your app actively. The following use cases can be covered by push notifications:
* **Offline messages.** Send a chat message when a recipient is offline. In this case, a push notification will be sent automatically if the user is offline.
* **Offline calls.** Make a video/audio call with offline opponents. In this case, a push notification will be sent manually.
* **Requests to contact list.** Send requests to add a user to the contact list. In this case, a push notification will be sent manually).
* **User tags.** Send notifications to specific user groups defined by tags.
Visit [Key Concepts](/docs/key-concepts) page to learn the most important QuickBlox concepts.
## Before you begin
1. Register a [QuickBlox account](https://admin.quickblox.com/signin). This is a matter of a few minutes and you will be able to use this account to build your apps.
2. Configure QuickBlox SDK for your app. Check out [Setup](/sdks/ios-setup) page for more details.
3. Create a user session to be able to use QuickBlox functionality. See [Authentication](/sdks/ios-authentication) page to learn how to do it.
## Create APNs certificate
### Create App ID
Each iOS application that uses the APNs must have a unique application ID that uniquely identifies your app. The following steps describe how to create an Apple App ID for your application.
If you already have an App ID, you can skip these steps.
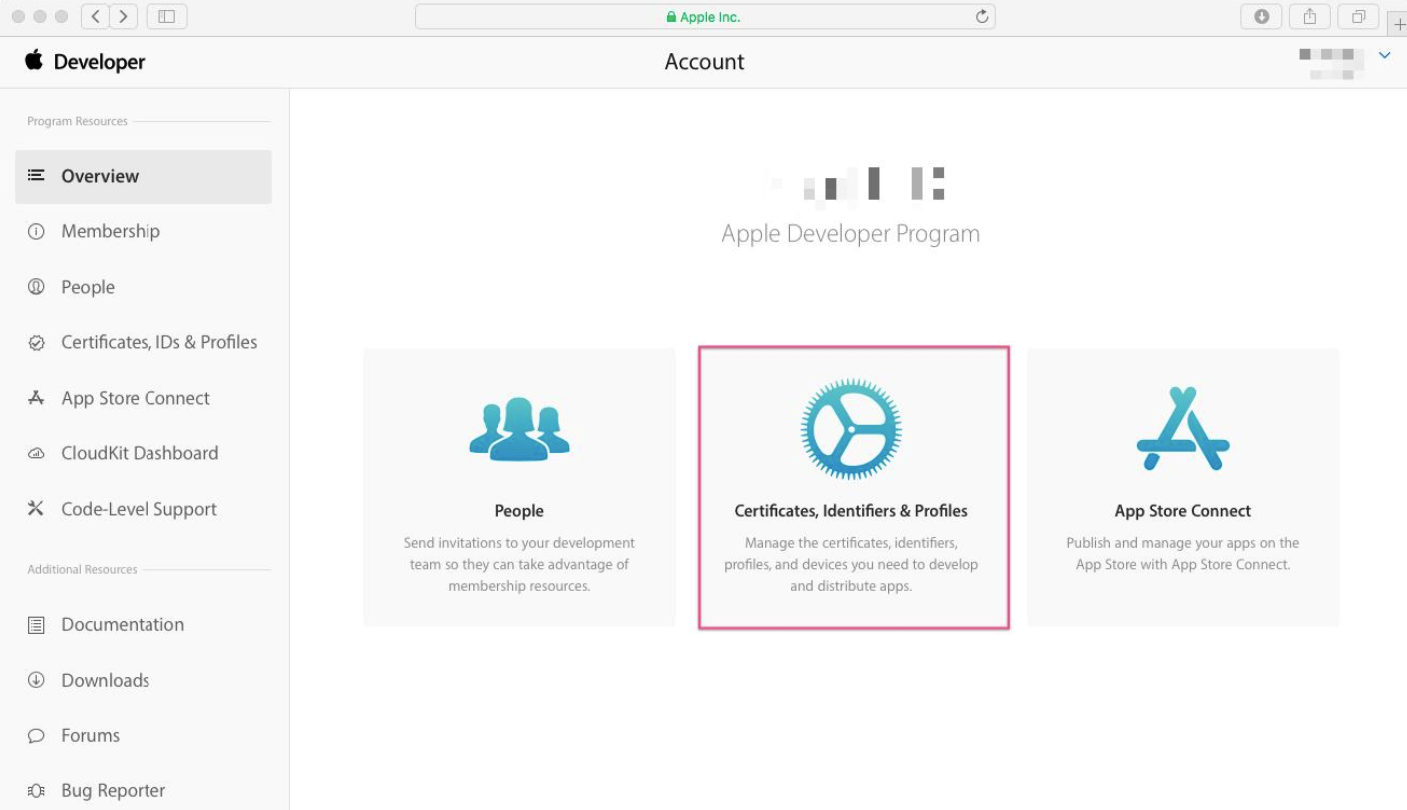
1. Once you have signed in to the [iPhone Developer Connection Portal](https://developer.apple.com/account/), click on **Certificates, IDs & Profiles.**
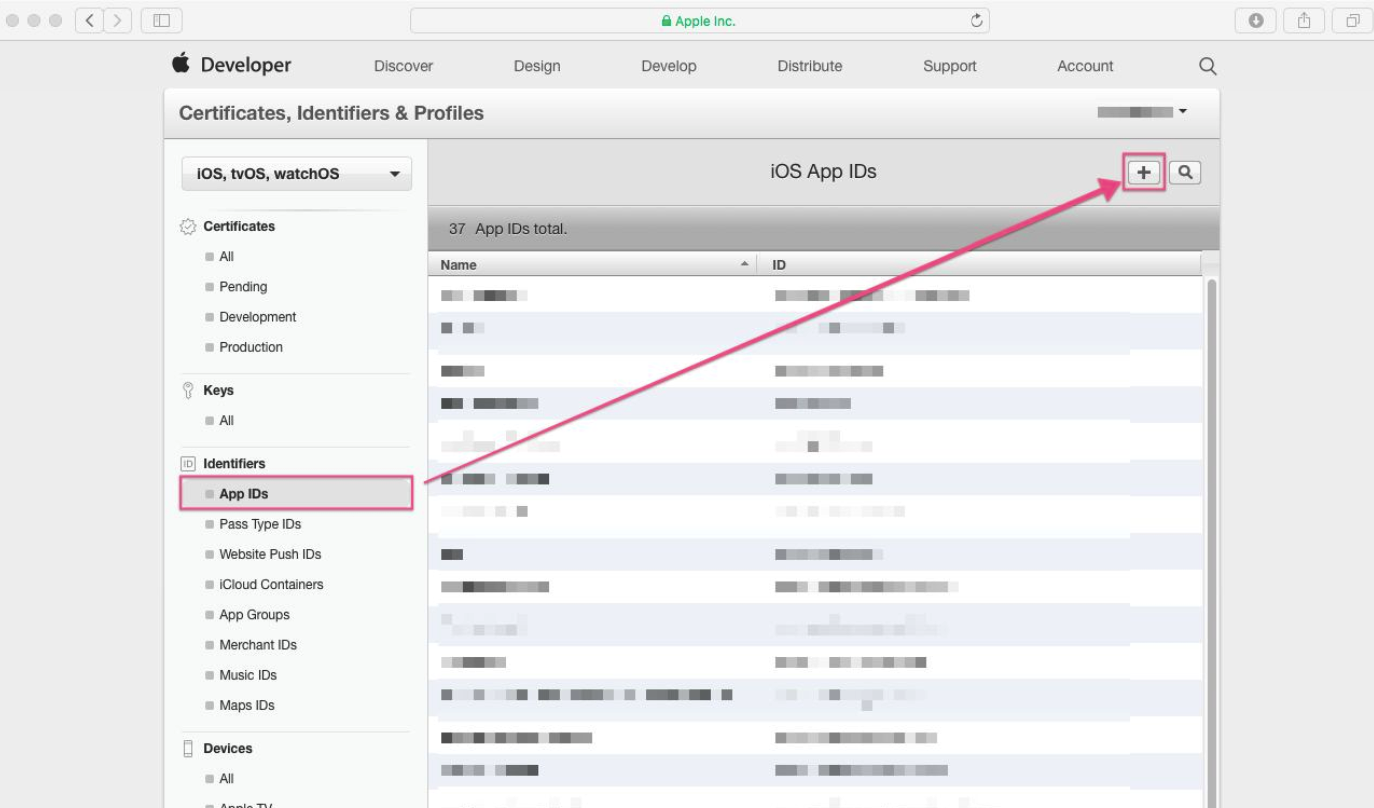
 2. On the next screen, select **Identifiers => App IDs** in the left sidebar and then click on the plus button in the top right corner.
 3. Enter your app name for the **App ID Description** section. In the **App ID Suffix** section, select the **Explicit App ID** option and enter **Bundle Identifier** in the corresponding field.
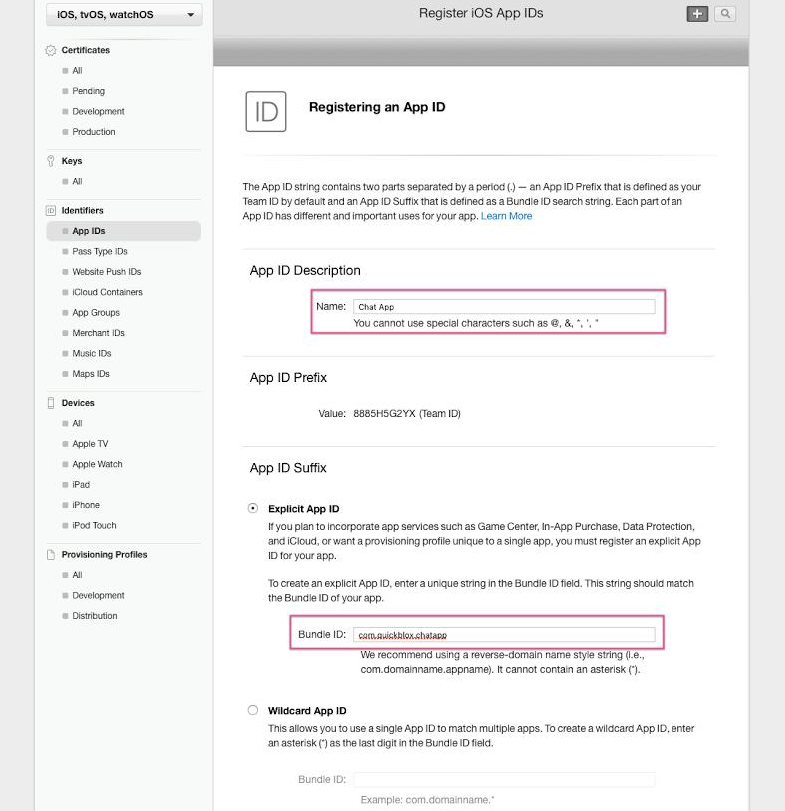 Ensure you have created an **App ID** without a wildcard. Make sure it doesn’t have an asterisk in it. **Wildcard IDs** cannot use the push notification service.
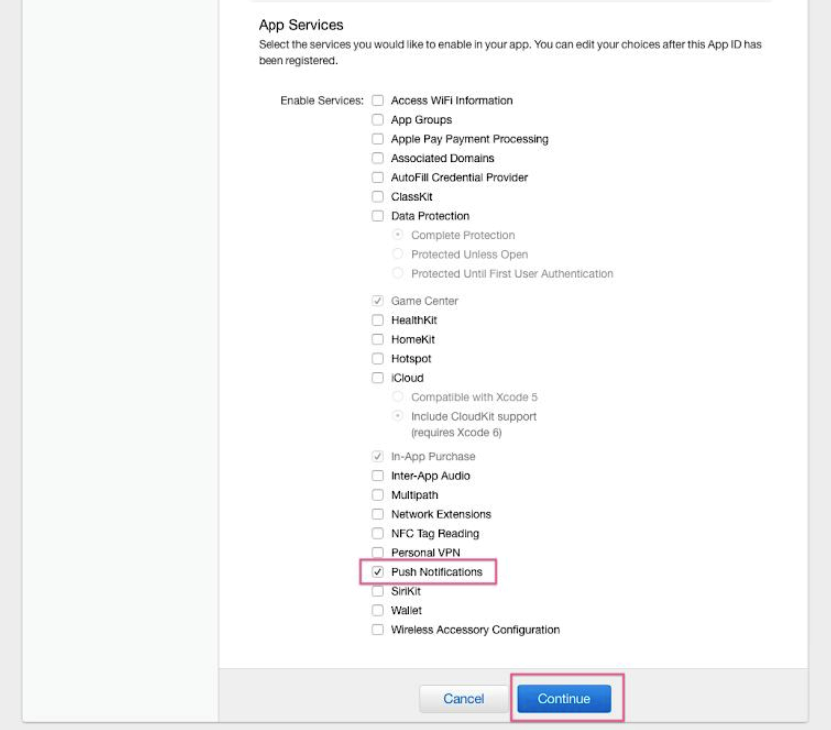
4. Locate **App services section** and check **Push Notifications** as the service you would like to add in your app.
5. Once you have entered all information, scroll down to the bottom of the page and select **Continue** button.
Ensure you have created an **App ID** without a wildcard. Make sure it doesn’t have an asterisk in it. **Wildcard IDs** cannot use the push notification service.
4. Locate **App services section** and check **Push Notifications** as the service you would like to add in your app.
5. Once you have entered all information, scroll down to the bottom of the page and select **Continue** button.
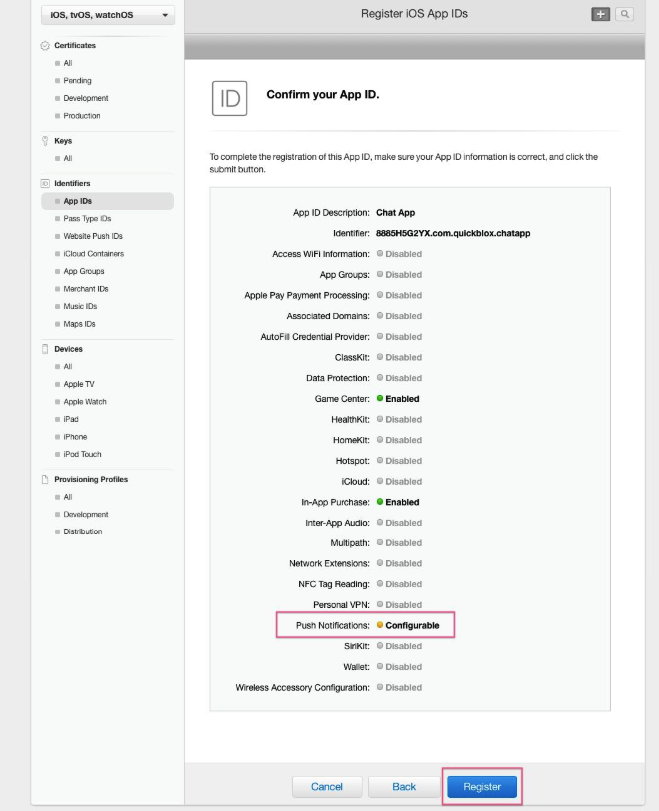
 6. You will now be presented with an overview of your new app ID. Click **Register** button to continue.
 ### Generate a Certificate Signing Request
You need to generate a certificate signing request file so that you can use it to request an APNs SSL certificate later on. Follow the instructions below to create one:
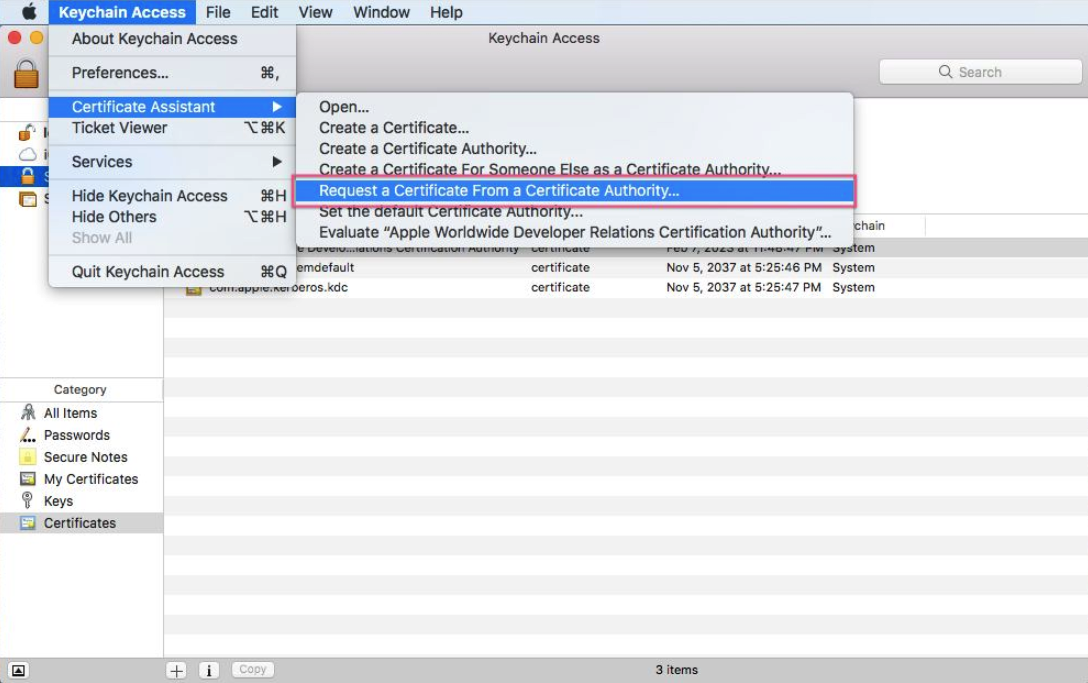
1. Launch the **Keychain Access** application in your macOS and select **Keychain Access => Certificate Assistant => Request a Certificate From a Certificate Authority**.
### Generate a Certificate Signing Request
You need to generate a certificate signing request file so that you can use it to request an APNs SSL certificate later on. Follow the instructions below to create one:
1. Launch the **Keychain Access** application in your macOS and select **Keychain Access => Certificate Assistant => Request a Certificate From a Certificate Authority**.
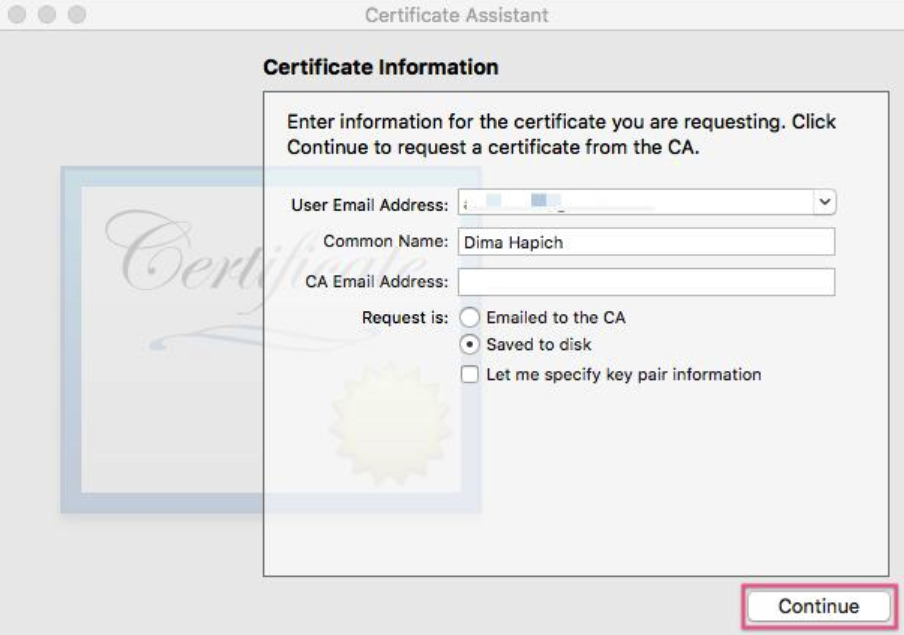
 2. Enter the required information and check the **Saved to disk** option. Click **Continue**.
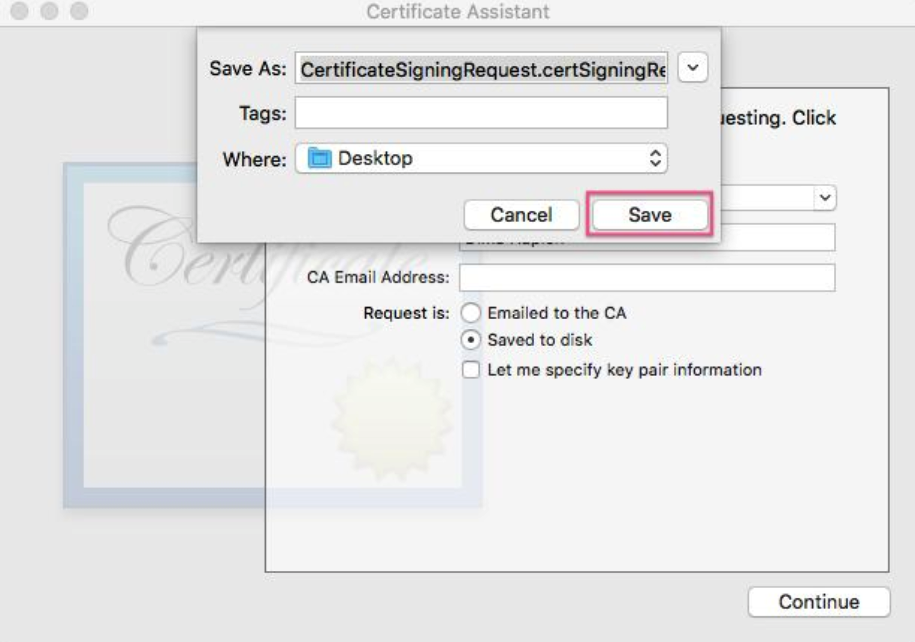
 3. Save the certificate request using the suggested name and click **Save**.
 ### Create universal APNs certificate
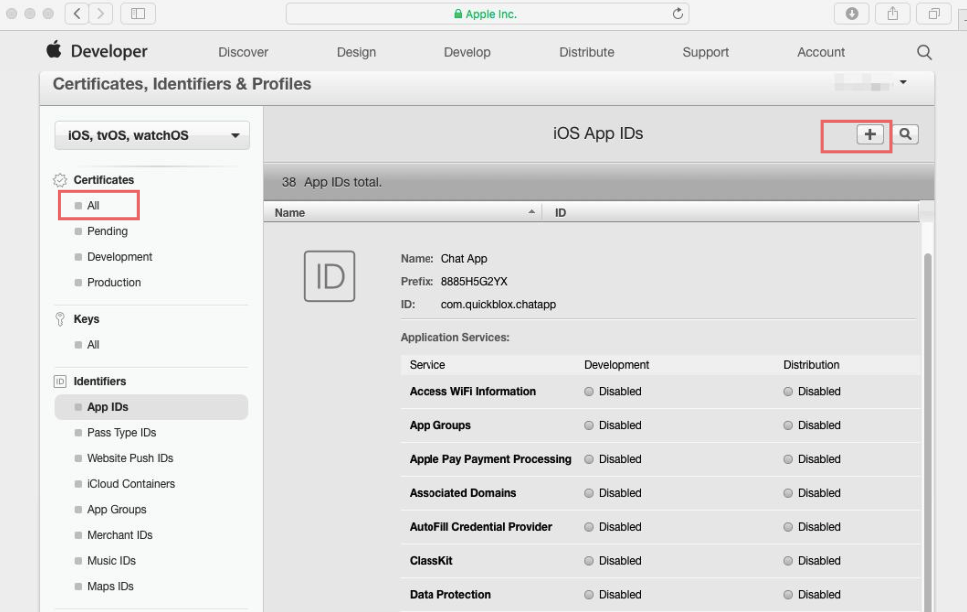
1. On the **Certificates, IDs & Profiles** screen locate **Certificates => All** section in the left sidebar and then click on the plus button in the top right corner of the screen.
### Create universal APNs certificate
1. On the **Certificates, IDs & Profiles** screen locate **Certificates => All** section in the left sidebar and then click on the plus button in the top right corner of the screen.
 2. The **Add iOS Certificate** screen will appear. Choose **Apple Push Notifications service SSL (Sandbox & Production)** option and click **Continue**:
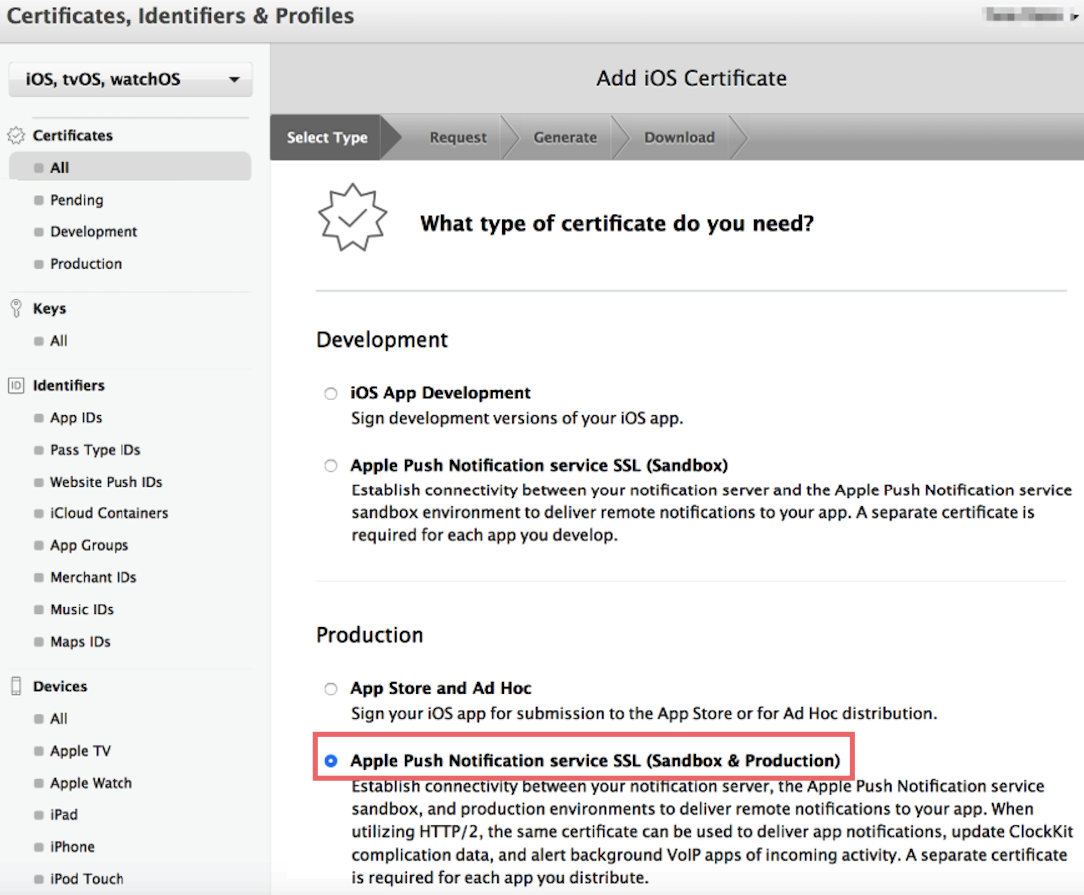 Here we will create a single **universal** push certificate that is good for both Development and Production environments.
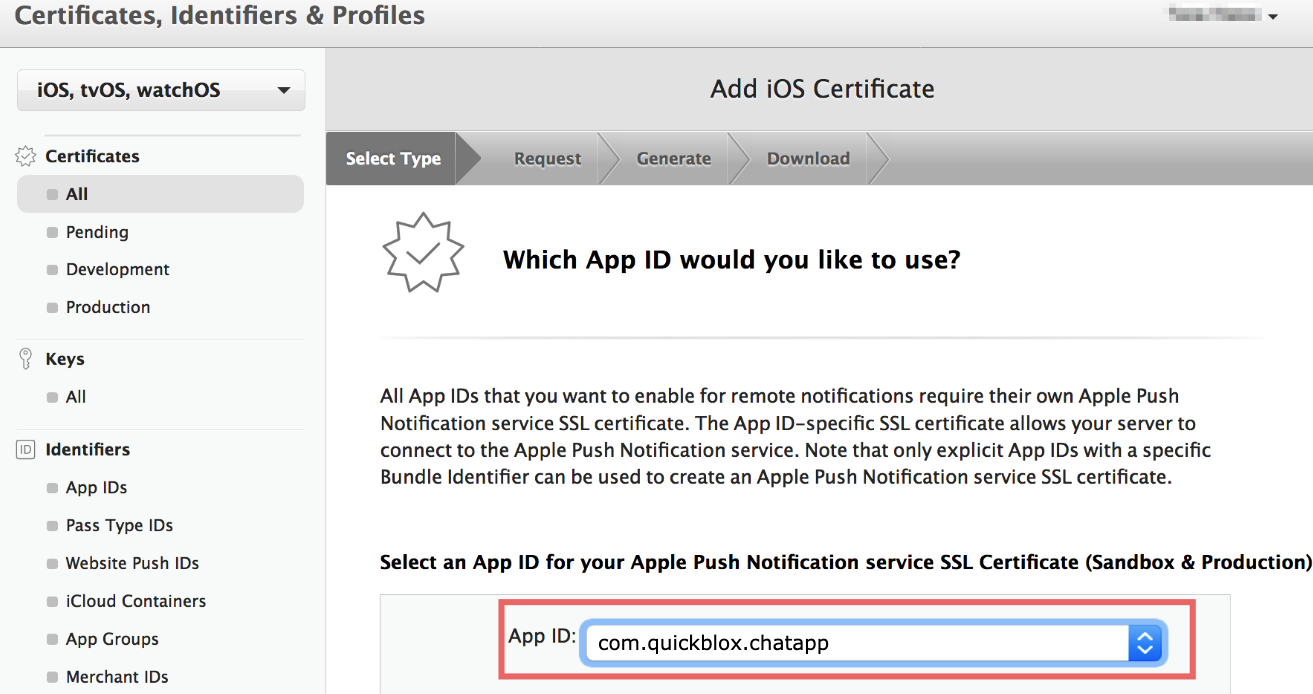
3. On the next screen choose an App ID you want to create a push certificate for. Then click **Continue**.
Here we will create a single **universal** push certificate that is good for both Development and Production environments.
3. On the next screen choose an App ID you want to create a push certificate for. Then click **Continue**.
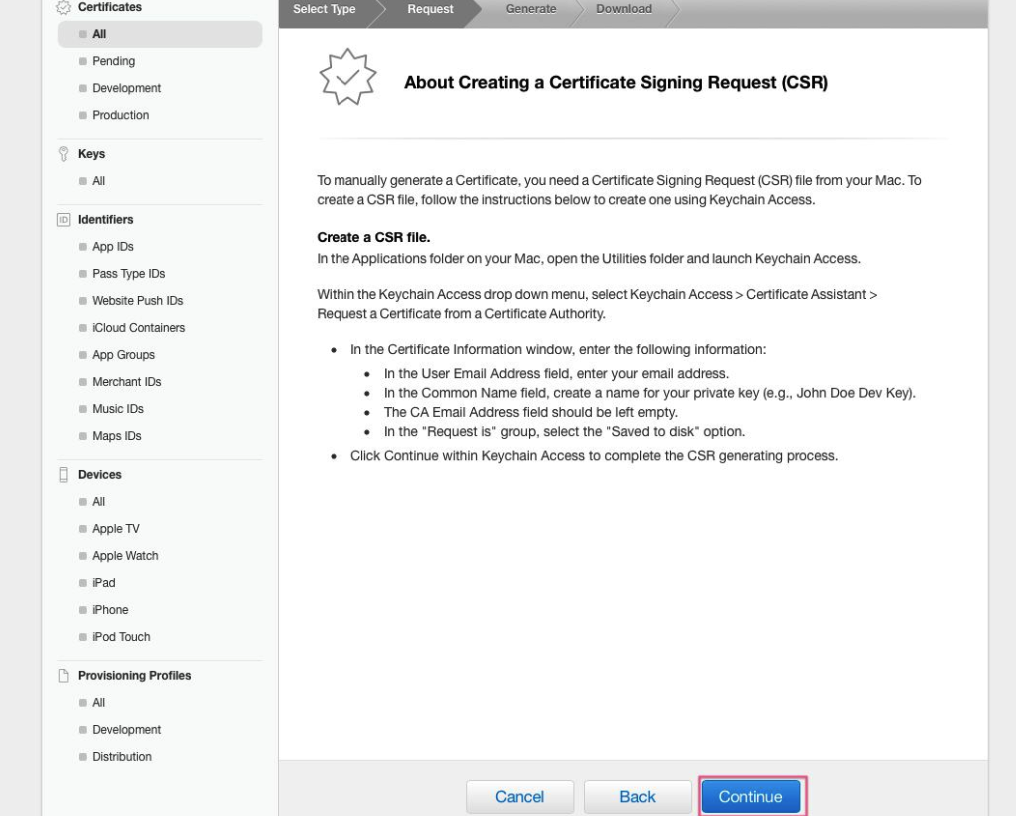
 4. Locate **About Creating a Certificate Signing Request (CSR)** and click **Continue**:
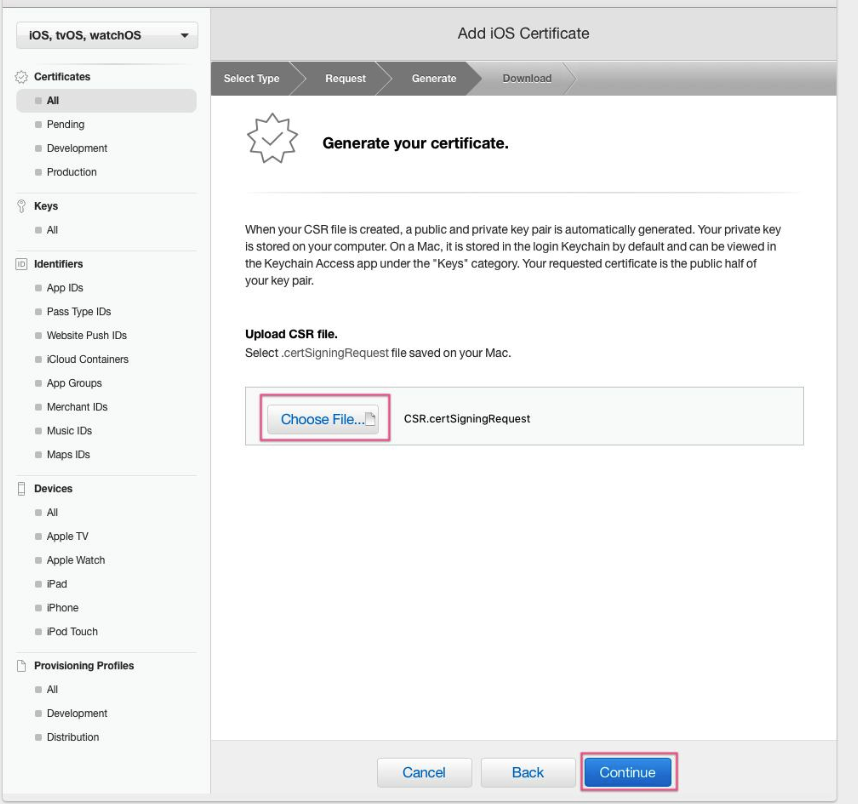
 5. Click **Choose File…** button to locate **Certificate Request File** that you have saved earlier. Click **Continue**.
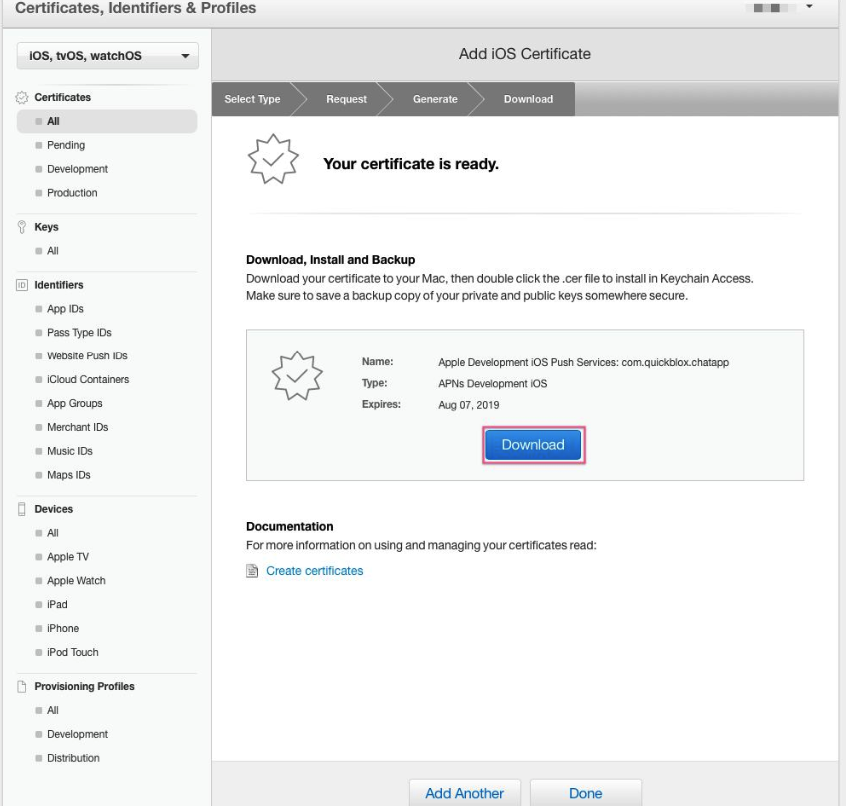
 6. Your APNs SSL Certificate will now be generated. Click **Download** and save it to your hard disk.
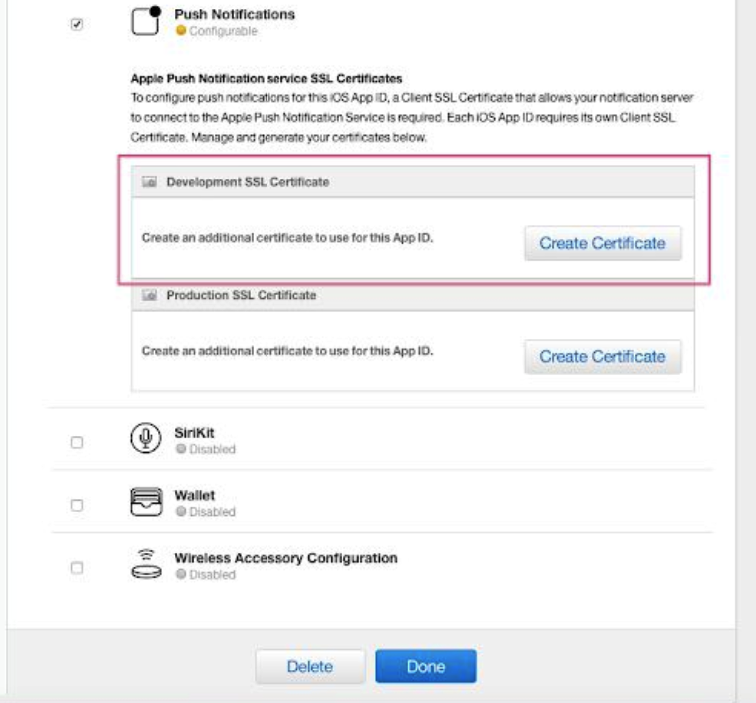
 You can also download your new certificate on App ID details page.
 ### Create p12 file
1. Once your certificate has been created, open the file with **Keychain Access** app on your computer. If you are asked which keychain to add the certificate to, select **login** option. SSL certificate will be used by provider(QuickBlox) application so that it can contact the APNs to send push notifications to your applications.
2. Still in **Keychain Access** app, select **Certificates** option in the bottom section of the left sidebar. You will now need to find the certificate you have created. It will have the name **Apple Push Services: \< Bundle ID >** and paired with a private key.
3. Right-click on this key and select **Export "Apple Push Services …"** option.
### Create p12 file
1. Once your certificate has been created, open the file with **Keychain Access** app on your computer. If you are asked which keychain to add the certificate to, select **login** option. SSL certificate will be used by provider(QuickBlox) application so that it can contact the APNs to send push notifications to your applications.
2. Still in **Keychain Access** app, select **Certificates** option in the bottom section of the left sidebar. You will now need to find the certificate you have created. It will have the name **Apple Push Services: \< Bundle ID >** and paired with a private key.
3. Right-click on this key and select **Export "Apple Push Services …"** option.
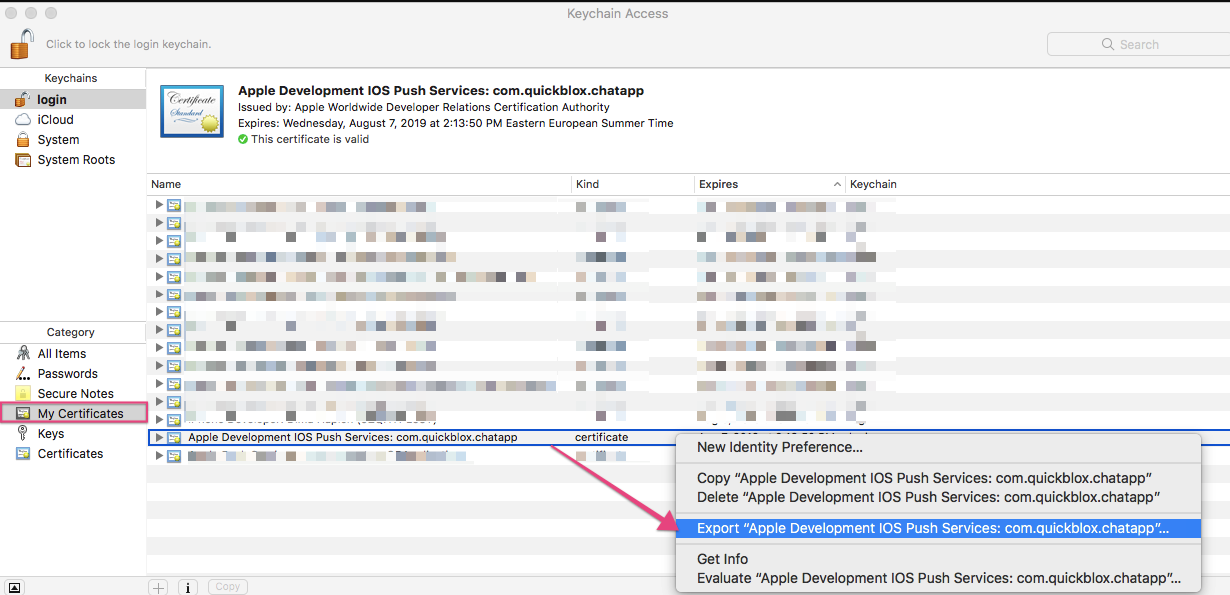 In the popup that appears, you can call the file whatever you want, but make sure that **File Format** is set to **Personal Information Exchange (.p12).**
When exporting the certificate, you can provide a password for the **p12** file.
That's all. Now you have a ready-to-go APNs certificate that can be used on both the Development and Production environments of your iOS app.
### Upload certificate to Dashboard
To upload the APNs certificate to QuickBlox Dashboard you need to do the following:
1. Open your QuickBlox [Dashboard](https://admin.quickblox.com/signin).
2. Go to **Push notifications** module section.
3. Switch to the **Settings** tab.
4. Locate **Apple Push Notifications Service (APNs)** section.
5. Upload the newly created APNs certificate.
In the popup that appears, you can call the file whatever you want, but make sure that **File Format** is set to **Personal Information Exchange (.p12).**
When exporting the certificate, you can provide a password for the **p12** file.
That's all. Now you have a ready-to-go APNs certificate that can be used on both the Development and Production environments of your iOS app.
### Upload certificate to Dashboard
To upload the APNs certificate to QuickBlox Dashboard you need to do the following:
1. Open your QuickBlox [Dashboard](https://admin.quickblox.com/signin).
2. Go to **Push notifications** module section.
3. Switch to the **Settings** tab.
4. Locate **Apple Push Notifications Service (APNs)** section.
5. Upload the newly created APNs certificate.
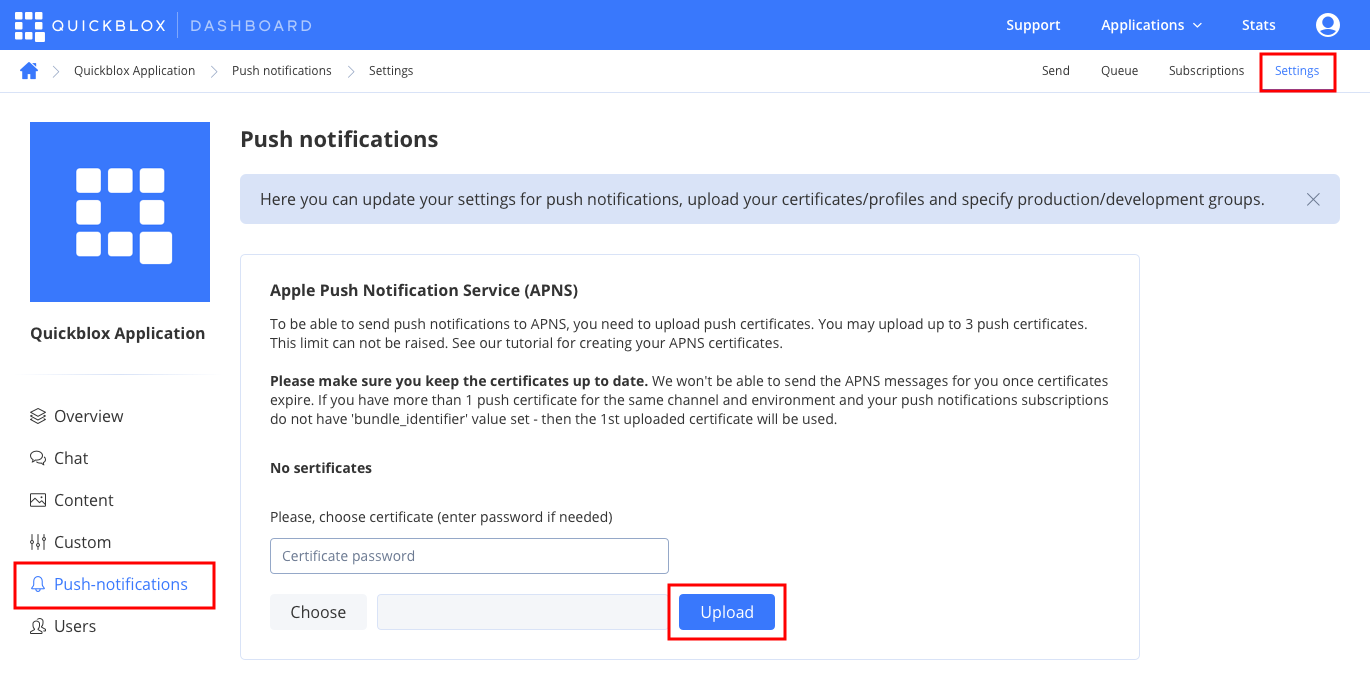 Choose the certificate and enter the password if needed. After this, you will be able to start using push notifications in your iOS application.
## Subscribe
To start receiving push notifications, you need to get the current device push token and subscribe with it on the backend as follows.
A single user can have up to **10** subscriptions on different devices.
```Swift theme={null}
class AppDelegate: UIResponder, UIApplicationDelegate {
func application(_ application: UIApplication, didFinishLaunchingWithOptions launchOptions: [UIApplicationLaunchOptionsKey: Any]?) -> Bool {
UIApplication.shared.registerForRemoteNotifications()
return true
}
...
//MARK: - UNUserNotification
func application(_ application: UIApplication, didRegisterForRemoteNotificationsWithDeviceToken deviceToken: Data) {
guard let identifierForVendor = UIDevice.current.identifierForVendor else {
return
}
let deviceIdentifier = identifierForVendor.uuidString
let subscription = QBMSubscription()
subscription.notificationChannel = .APNS
subscription.deviceUDID = deviceIdentifier
subscription.deviceToken = deviceToken
QBRequest.createSubscription(subscription, successBlock: { (response, objects) in
}, errorBlock: { (response) in
debugPrint("[AppDelegate] createSubscription error: \(String(describing: response.error))")
})
}
func application(_ application: UIApplication, didFailToRegisterForRemoteNotificationsWithError error: Error) {
debugPrint("Unable to register for remote notifications: \(error.localizedDescription)")
}
}
```
```Objective-C theme={null}
@implementation AppDelegate
- (BOOL)application:(UIApplication *)application didFinishLaunchingWithOptions:(NSDictionary *)launchOptions {
[[UIApplication sharedApplication] registerForRemoteNotifications];
return YES;
}
...
- (void)application:(UIApplication *)application didRegisterForRemoteNotificationsWithDeviceToken:(NSData *)deviceToken {
NSString *deviceIdentifier = [[[UIDevice currentDevice] identifierForVendor] UUIDString];
// subscribing for push notifications
QBMSubscription *subscription = [QBMSubscription subscription];
subscription.notificationChannel = QBMNotificationChannelAPNS;
subscription.deviceUDID = deviceIdentifier;
subscription.deviceToken = deviceToken;
[QBRequest createSubscription:subscription successBlock:nil errorBlock:nil];
}
- (void)application:(UIApplication *)application didFailToRegisterForRemoteNotificationsWithError:(NSError *)error {
NSLog(@"Failed to register for notifications:%@", error);
}
@end
```
You cannot test push notifications in the iOS simulator. You need a physical iOS device and an Apple developer account.
The `deviceToken` is a device registration token generated by the APNs or GCM/FCM. The token can be unregistered by the APNs or GCM/FCM anytime. In this case, the device should be registered again and obtain a new token. When a new token is obtained, a new subscription should be created.
## Subscribe for VoIP push notifications
Normally, the VoIP push notifications are used in applications with video/audio calling capabilities.
In the past, a VoIP app had to maintain a persistent network connection with a server to receive incoming calls and other data. This meant writing complex code that sent periodic messages back and forth between the app and server to keep a connection alive, even when the app was not in use. This technique resulted in frequent device wakes that wasted energy. It also meant that if a user quit the VoIP app, calls from the server could no longer be received. Instead of persistent connections, developers should use VoIP push notifications.
VoIP push notifications are different than regular APNs notifications mainly in how they are set up in the iOS app. iOS SDK provides the [PushKit API](https://developer.apple.com/library/archive/documentation/Performance/Conceptual/EnergyGuide-iOS/OptimizeVoIP.html) to implement VoIP push notifications.
```Swift theme={null}
import PushKit
@UIApplicationMain
class AppDelegate: UIResponder, UIApplicationDelegate, PKPushRegistryDelegate {
func application(_ application: UIApplication, didFinishLaunchingWithOptions launchOptions: [UIApplicationLaunchOptionsKey: Any]?) -> Bool {
self.voipRegistration()
return true
}
// Register for VoIP notifications
func voipRegistration() {
let mainQueue = dispatch_get_main_queue()
// Create a push registry object
let voipRegistry: PKPushRegistry = PKPushRegistry(mainQueue)
// Set the registry's delegate to self
voipRegistry.delegate = self
// Set the push type to VoIP
voipRegistry.desiredPushTypes = [PKPushTypeVoIP]
}
// MARK: - PKPushRegistryDelegate protocol
func pushRegistry(registry: PKPushRegistry!, didUpdatePushCredentials credentials: PKPushCredentials!, forType type: String!) {
// Register VoIP push token (a property of PKPushCredentials) with server
let deviceIdentifier: String = UIDevice.current.identifierForVendor!.uuidString
let subscription = QBMSubscription()
subscription.notificationChannel = .APNSVOIP
subscription.deviceUDID = deviceIdentifier
subscription.deviceToken = deviceToken
QBRequest.createSubscription(subscription, successBlock: { (response, objects) in
}, errorBlock: { (response) in
debugPrint("[AppDelegate] createSubscription error: \(String(describing: response.error))")
})
}
}
```
```Objective-C theme={null}
#import
@interface AppDelegate ()
@end
@implementation AppDelegate
- (BOOL)application:(UIApplication *)application didFinishLaunchingWithOptions:(NSDictionary *)launchOptions {
[self voipRegistration];
return YES;
}
// Register for VoIP notifications
- (void) voipRegistration {
dispatch_queue_t mainQueue = dispatch_get_main_queue()
// Create a push registry object
PKPushRegistry * voipRegistry = [[PKPushRegistry alloc] initWithQueue: mainQueue];
// Set the registry's delegate to self
voipRegistry.delegate = self;
// Set the push type to VoIP
voipRegistry.desiredPushTypes = [NSSet setWithObject:PKPushTypeVoIP];
}
// MARK: - PKPushRegistryDelegate protocol
- (void)pushRegistry:(PKPushRegistry *)registry didUpdatePushCredentials: (PKPushCredentials *)credentials forType:(NSString *)type {
// Register VoIP push token (a property of PKPushCredentials) with server
NSString *deviceIdentifier = [[[UIDevice currentDevice] identifierForVendor] UUIDString];
// subscribing for push notifications
QBMSubscription *subscription = [QBMSubscription subscription];
subscription.notificationChannel = QBMNotificationChannelAPNSVOIP;
subscription.deviceUDID = deviceIdentifier;
subscription.deviceToken = deviceToken;
[QBRequest createSubscription:subscription successBlock:nil errorBlock:nil];
}
@end
```
## Send APNs push notifications
You can manually initiate sending of push notifications to a user/users on any event in your application. To do so, you need to form push notification parameters (payload) and set push recipients.
```Swift theme={null}
let event = QBMEvent()
event.notificationType = .push
event.usersIDs = "20,21"
event.type = .oneShot
var pushParameters = [String : String]()
pushParameters["message"] = "Bitcoin trends"
pushParameters["ios_badge"] = "2"
pushParameters["ios_sound"] = "app_sound.wav"
// custom params
pushParameters["thread_likes"] = "24"
pushParameters["thread_id"] = "678923"
if let jsonData = try? JSONSerialization.data(withJSONObject: pushParameters, options: .prettyPrinted) {
let jsonString = String(bytes: jsonData, encoding: String.Encoding.utf8)
event.message = jsonString
}
QBRequest.createEvent(event, successBlock: {(response, events) in
}, errorBlock: {(response) in
})
```
```Objective-C theme={null}
QBMEvent *event = [QBMEvent event];
event.notificationType = QBMNotificationTypePush;
event.usersIDs = @"21,22";
event.type = QBMEventTypeOneShot;
NSMutableDictionary *pushParameters = [NSMutableDictionary dictionary];
pushParameters[@"message"] = @"Bitcoin trends";
pushParameters[@"ios_badge"] = @"2";
pushParameters[@"ios_sound"] = @"app_sound.wav";
// custom parameters
pushParameters[@"thread_likes"] = @"24";
pushParameters[@"thread_id"] = @"678923";
NSError *error = nil;
NSData *sendData = [NSJSONSerialization dataWithJSONObject:pushParameters options:NSJSONWritingPrettyPrinted error:&error];
NSString *jsonString = [[NSString alloc] initWithData:sendData encoding:NSUTF8StringEncoding];
event.message = jsonString;
[QBRequest createEvent:event successBlock:^(QBResponse * _Nonnull response, NSArray * _Nullable events) {
} errorBlock:^(QBResponse * _Nonnull response) {
}];
```
| Argument | Required | Description |
| -------- | -------- | -------------------------------- |
| event | Yes | A model for representing events. |
You can send only FCM data messages to the Android app. QuickBlox doesn't support FCM notification messages.
To process FCM data messages on your app when the app is in the background, you need to handle them. If not handled, they will not pop on the screen even if the app has received such push notification. See [FCM documentation](https://firebase.google.com/docs/cloud-messaging/concept-options#notifications%5Fand%5Fdata%5Fmessages) to learn more about data messages.
If the iOS app is not subscribed to APNs VoIP notifications or the APNs VoIP certificate has expired, the regular APNs will be delivered instead of APNs VoIP.
## Send VoIP push notifications
You can manually initiate sending of push notifications to a user/users on any event in your application. To do so, you need to form push notification parameters (payload) and set push recipients.
```Swift theme={null}
let event = QBMEvent()
event.notificationType = QBMNotificationType.push
event.usersIDs = "20,21"
event.type = QBMEventType.oneShot
let payload = [
"ios_voip": "1",
"VOIPCall": "1",
"sessionID": "767565gfh865486h548k6586h5868",
"opponentsIDs": "20,21"
]
let data = try? JSONSerialization.data(withJSONObject: payload, options: .prettyPrinted)
var message = ""
if let data = data {
message = String(data: data, encoding: .utf8) ?? ""
}
event.message = message
QBRequest.createEvent(event, successBlock: {(response, events) in
}, errorBlock: {(response) in
})
```
```Objective-C theme={null}
QBMEvent *event = [QBMEvent event];
event.notificationType = QBMNotificationTypePush;
event.usersIDs = @"21,22";
event.type = QBMEventTypeOneShot;
NSDictionary *payload = @{
@"ios_voip" : @"1",
@"VOIPCall" : @"1",
@"sessionID" : @"767565gfh865486h548k6586h5868",
@"opponentsIDs" : @"20,21"
};
NSData *data = [NSJSONSerialization dataWithJSONObject:payload options:NSJSONWritingPrettyPrinted error:nil];
NSString *message = [[NSString alloc] initWithData:data encoding:NSUTF8StringEncoding];
event.message = message;
[QBRequest createEvent:event successBlock:^(QBResponse * _Nonnull response, NSArray * _Nullable events) {
} errorBlock:^(QBResponse * _Nonnull response) {
}];
```
| Argument | Required | Description |
| -------- | -------- | -------------------------------- |
| event | Yes | A model for representing events. |
## Receive push notifications
To receive push notifications, use the code snippet below.
```Swift theme={null}
// MARK: - AppDelegate
func application(_ application: UIApplication, didReceiveRemoteNotification userInfo: [AnyHashable : Any]) {
}
func application(_ application: UIApplication, didReceiveRemoteNotification userInfo: [AnyHashable : Any], fetchCompletionHandler completionHandler: @escaping (UIBackgroundFetchResult) -> Swift.Void) {
}
```
```Objective-C theme={null}
// MARK: - AppDelegate
- (void)application:(UIApplication *)application didReceiveRemoteNotification:(NSDictionary *)userInfo {
}
- (void)application:(UIApplication *)__unused application didReceiveRemoteNotification:(NSDictionary *)userInfo fetchCompletionHandler:(void (^)(UIBackgroundFetchResult))completionHandler {
}
```
## Receive VoIP push notifications
To receive push notifications, use the code snippet below.
```Swift theme={null}
// MARK: - PKPushRegistryDelegate protocol
// Handle incoming pushes
func pushRegistry(registry: PKPushRegistry!, didReceiveIncomingPushWithPayload payload: PKPushPayload!, forType type: String!) {
}
```
```Objective-C theme={null}
// MARK: - PKPushRegistryDelegate protocol
// Handle incoming pushes
- (void)pushRegistry:(PKPushRegistry *)registry didReceiveIncomingPushWithPayload:(PKPushPayload *)payload forType:(NSString *)type {
}
```
## Unsubscribe
For a user to stop receiving push notifications, unsubscribe from receiving push notifications by invoking the `deleteSubscription(withID: subscription.id)` method below. You can also specify the device ID to verify if the subscription is being deleted for a specific device.
```Swift theme={null}
guard let uuidString = UIDevice.current.identifierForVendor?.uuidString else {
return
}
QBRequest.subscriptions(successBlock: { (response, subscriptions) in
for subscription in subscriptions {
if let subscriptionsUIUD = subscription.deviceUDID,
subscriptionsUIUD == uuidString {
QBRequest.deleteSubscription(withID: subscription.id) { (response) in
//Block with response if the request delete Subscription is succeeded.
}, errorBlock: { (response) in
//Block with response if the request delete Subscription is failed.
})
}
}
}, errorBlock: {(response) in
//Block with response instance if the request get subscriptions is failed.
})
```
```Objective-C theme={null}
NSString *deviceIdentifier = [[[UIDevice currentDevice] identifierForVendor] UUIDString];
[QBRequest subscriptionsWithSuccessBlock:^(QBResponse * _Nonnull response, NSArray * _Nullable objects) {
for (QBMSubscription *subscription in objects) {
if ([subscription.deviceUDID isEqualToString:deviceIdentifier]) {
[QBRequest deleteSubscriptionWithID:subscription.ID successBlock:^(QBResponse * _Nonnull response) {
//Block with response if the request delete Subscription is succeeded.
} errorBlock:^(QBResponse * _Nonnull response) {
//Block with response if the request delete Subscription is failed.
}];
}
}
} errorBlock:^(QBResponse * _Nonnull response) {
//Block with response instance if the request get subscriptions is failed.
}];
```
| Argument | Required | Description |
| --------------- | -------- | ----------------------------- |
| subscription.id | yes | ID of QuickBlox subscription. |
## Unsubscribe VoIP push notifications
For a user to stop receiving VoIP push notifications, unsubscribe from receiving VoIP push notifications by invoking the `deleteSubscription(withID: subscription.id)` method below. You can also specify the device ID to verify if the subscription is being deleted for a specific device.
```Swift theme={null}
// MARK: - PKPushRegistryDelegate protocol
func pushRegistry(_ registry: PKPushRegistry, didInvalidatePushTokenFor type: PKPushType) {
guard let uuidString = UIDevice.current.identifierForVendor?.uuidString else {
return
}
QBRequest.subscriptions(successBlock: { (response, subscriptions) in
for subscription in subscriptions {
if let subscriptionsUIUD = subscription.deviceUDID,
subscriptionsUIUD == uuidString,
subscription.notificationChannel == .APNSVOIP {
QBRequest.deleteSubscription(withID: subscription.id) { (response) in
//Block with response if the request delete Subscription is succeeded.
} errorBlock: { (response) in
//Block with response if the request delete Subscription is failed.
}
}
}
}) { (response) in
//Block with response instance if the request get subscriptions is failed.
}
}
```
```Objective-C theme={null}
// MARK: - PKPushRegistryDelegate protocol
- (void)pushRegistry:(PKPushRegistry *)registry didInvalidatePushTokenForType:(PKPushType)type {
NSString *deviceIdentifier = [[[UIDevice currentDevice] identifierForVendor] UUIDString];
[QBRequest subscriptionsWithSuccessBlock:^(QBResponse * _Nonnull response, NSArray * _Nullable objects) {
for (QBMSubscription *subscription in objects) {
if ([subscription.deviceUDID isEqualToString:deviceIdentifier] && subscription.notificationChannel == QBMNotificationChannelAPNSVOIP) {
[QBRequest deleteSubscriptionWithID:subscription.ID successBlock:^(QBResponse * _Nonnull response) {
//Block with response if the request delete Subscription is succeeded.
} errorBlock:^(QBResponse * _Nonnull response) {
//Block with response if the request delete Subscription is failed.
}];
}
}
} errorBlock:^(QBResponse * _Nonnull response) {
//Block with response instance if the request get subscriptions is failed.
}];
}
```
| Argument | Required | Description |
| --------------- | -------- | --------------------------------- |
| subscription.id | yes | ID of the QuickBlox subscription. |
## Troubleshooting
**A subscription is removed after a push is sent and the push isn't delivered**
**Cause**: a device registration token is invalid.
The device registration token is represented as `deviceToken` within the system and is set in the `subscription`. See [this section](/sdks/ios-push-notifications#subscribe) to learn how to subscribe a device to push notifications.
**Tip**: check if the device registration is correct. The device registration token can be invalid due to a number of reasons:
1. Some other data is set instead of a correct device registration token. For example, a Firebase project ID, Firebase user token, etc.
2. The client app unregistered itself from GCM/FCM. This can happen if the user uninstalls the application or, on iOS, if the APNs Feedback Service reported the APNs token as invalid.
3. The registration token expired. For example, Google might decide to refresh registration tokens or the APNs token may have expired for iOS devices.
4. The client app was updated, but the new version is not configured to receive messages.
For all these cases, remove the invalid device registration token and stop using it to send messages. Then, obtain a new token and make sure to create a new subscription with a valid token.
Choose the certificate and enter the password if needed. After this, you will be able to start using push notifications in your iOS application.
## Subscribe
To start receiving push notifications, you need to get the current device push token and subscribe with it on the backend as follows.
A single user can have up to **10** subscriptions on different devices.
```Swift theme={null}
class AppDelegate: UIResponder, UIApplicationDelegate {
func application(_ application: UIApplication, didFinishLaunchingWithOptions launchOptions: [UIApplicationLaunchOptionsKey: Any]?) -> Bool {
UIApplication.shared.registerForRemoteNotifications()
return true
}
...
//MARK: - UNUserNotification
func application(_ application: UIApplication, didRegisterForRemoteNotificationsWithDeviceToken deviceToken: Data) {
guard let identifierForVendor = UIDevice.current.identifierForVendor else {
return
}
let deviceIdentifier = identifierForVendor.uuidString
let subscription = QBMSubscription()
subscription.notificationChannel = .APNS
subscription.deviceUDID = deviceIdentifier
subscription.deviceToken = deviceToken
QBRequest.createSubscription(subscription, successBlock: { (response, objects) in
}, errorBlock: { (response) in
debugPrint("[AppDelegate] createSubscription error: \(String(describing: response.error))")
})
}
func application(_ application: UIApplication, didFailToRegisterForRemoteNotificationsWithError error: Error) {
debugPrint("Unable to register for remote notifications: \(error.localizedDescription)")
}
}
```
```Objective-C theme={null}
@implementation AppDelegate
- (BOOL)application:(UIApplication *)application didFinishLaunchingWithOptions:(NSDictionary *)launchOptions {
[[UIApplication sharedApplication] registerForRemoteNotifications];
return YES;
}
...
- (void)application:(UIApplication *)application didRegisterForRemoteNotificationsWithDeviceToken:(NSData *)deviceToken {
NSString *deviceIdentifier = [[[UIDevice currentDevice] identifierForVendor] UUIDString];
// subscribing for push notifications
QBMSubscription *subscription = [QBMSubscription subscription];
subscription.notificationChannel = QBMNotificationChannelAPNS;
subscription.deviceUDID = deviceIdentifier;
subscription.deviceToken = deviceToken;
[QBRequest createSubscription:subscription successBlock:nil errorBlock:nil];
}
- (void)application:(UIApplication *)application didFailToRegisterForRemoteNotificationsWithError:(NSError *)error {
NSLog(@"Failed to register for notifications:%@", error);
}
@end
```
You cannot test push notifications in the iOS simulator. You need a physical iOS device and an Apple developer account.
The `deviceToken` is a device registration token generated by the APNs or GCM/FCM. The token can be unregistered by the APNs or GCM/FCM anytime. In this case, the device should be registered again and obtain a new token. When a new token is obtained, a new subscription should be created.
## Subscribe for VoIP push notifications
Normally, the VoIP push notifications are used in applications with video/audio calling capabilities.
In the past, a VoIP app had to maintain a persistent network connection with a server to receive incoming calls and other data. This meant writing complex code that sent periodic messages back and forth between the app and server to keep a connection alive, even when the app was not in use. This technique resulted in frequent device wakes that wasted energy. It also meant that if a user quit the VoIP app, calls from the server could no longer be received. Instead of persistent connections, developers should use VoIP push notifications.
VoIP push notifications are different than regular APNs notifications mainly in how they are set up in the iOS app. iOS SDK provides the [PushKit API](https://developer.apple.com/library/archive/documentation/Performance/Conceptual/EnergyGuide-iOS/OptimizeVoIP.html) to implement VoIP push notifications.
```Swift theme={null}
import PushKit
@UIApplicationMain
class AppDelegate: UIResponder, UIApplicationDelegate, PKPushRegistryDelegate {
func application(_ application: UIApplication, didFinishLaunchingWithOptions launchOptions: [UIApplicationLaunchOptionsKey: Any]?) -> Bool {
self.voipRegistration()
return true
}
// Register for VoIP notifications
func voipRegistration() {
let mainQueue = dispatch_get_main_queue()
// Create a push registry object
let voipRegistry: PKPushRegistry = PKPushRegistry(mainQueue)
// Set the registry's delegate to self
voipRegistry.delegate = self
// Set the push type to VoIP
voipRegistry.desiredPushTypes = [PKPushTypeVoIP]
}
// MARK: - PKPushRegistryDelegate protocol
func pushRegistry(registry: PKPushRegistry!, didUpdatePushCredentials credentials: PKPushCredentials!, forType type: String!) {
// Register VoIP push token (a property of PKPushCredentials) with server
let deviceIdentifier: String = UIDevice.current.identifierForVendor!.uuidString
let subscription = QBMSubscription()
subscription.notificationChannel = .APNSVOIP
subscription.deviceUDID = deviceIdentifier
subscription.deviceToken = deviceToken
QBRequest.createSubscription(subscription, successBlock: { (response, objects) in
}, errorBlock: { (response) in
debugPrint("[AppDelegate] createSubscription error: \(String(describing: response.error))")
})
}
}
```
```Objective-C theme={null}
#import
@interface AppDelegate ()
@end
@implementation AppDelegate
- (BOOL)application:(UIApplication *)application didFinishLaunchingWithOptions:(NSDictionary *)launchOptions {
[self voipRegistration];
return YES;
}
// Register for VoIP notifications
- (void) voipRegistration {
dispatch_queue_t mainQueue = dispatch_get_main_queue()
// Create a push registry object
PKPushRegistry * voipRegistry = [[PKPushRegistry alloc] initWithQueue: mainQueue];
// Set the registry's delegate to self
voipRegistry.delegate = self;
// Set the push type to VoIP
voipRegistry.desiredPushTypes = [NSSet setWithObject:PKPushTypeVoIP];
}
// MARK: - PKPushRegistryDelegate protocol
- (void)pushRegistry:(PKPushRegistry *)registry didUpdatePushCredentials: (PKPushCredentials *)credentials forType:(NSString *)type {
// Register VoIP push token (a property of PKPushCredentials) with server
NSString *deviceIdentifier = [[[UIDevice currentDevice] identifierForVendor] UUIDString];
// subscribing for push notifications
QBMSubscription *subscription = [QBMSubscription subscription];
subscription.notificationChannel = QBMNotificationChannelAPNSVOIP;
subscription.deviceUDID = deviceIdentifier;
subscription.deviceToken = deviceToken;
[QBRequest createSubscription:subscription successBlock:nil errorBlock:nil];
}
@end
```
## Send APNs push notifications
You can manually initiate sending of push notifications to a user/users on any event in your application. To do so, you need to form push notification parameters (payload) and set push recipients.
```Swift theme={null}
let event = QBMEvent()
event.notificationType = .push
event.usersIDs = "20,21"
event.type = .oneShot
var pushParameters = [String : String]()
pushParameters["message"] = "Bitcoin trends"
pushParameters["ios_badge"] = "2"
pushParameters["ios_sound"] = "app_sound.wav"
// custom params
pushParameters["thread_likes"] = "24"
pushParameters["thread_id"] = "678923"
if let jsonData = try? JSONSerialization.data(withJSONObject: pushParameters, options: .prettyPrinted) {
let jsonString = String(bytes: jsonData, encoding: String.Encoding.utf8)
event.message = jsonString
}
QBRequest.createEvent(event, successBlock: {(response, events) in
}, errorBlock: {(response) in
})
```
```Objective-C theme={null}
QBMEvent *event = [QBMEvent event];
event.notificationType = QBMNotificationTypePush;
event.usersIDs = @"21,22";
event.type = QBMEventTypeOneShot;
NSMutableDictionary *pushParameters = [NSMutableDictionary dictionary];
pushParameters[@"message"] = @"Bitcoin trends";
pushParameters[@"ios_badge"] = @"2";
pushParameters[@"ios_sound"] = @"app_sound.wav";
// custom parameters
pushParameters[@"thread_likes"] = @"24";
pushParameters[@"thread_id"] = @"678923";
NSError *error = nil;
NSData *sendData = [NSJSONSerialization dataWithJSONObject:pushParameters options:NSJSONWritingPrettyPrinted error:&error];
NSString *jsonString = [[NSString alloc] initWithData:sendData encoding:NSUTF8StringEncoding];
event.message = jsonString;
[QBRequest createEvent:event successBlock:^(QBResponse * _Nonnull response, NSArray * _Nullable events) {
} errorBlock:^(QBResponse * _Nonnull response) {
}];
```
| Argument | Required | Description |
| -------- | -------- | -------------------------------- |
| event | Yes | A model for representing events. |
You can send only FCM data messages to the Android app. QuickBlox doesn't support FCM notification messages.
To process FCM data messages on your app when the app is in the background, you need to handle them. If not handled, they will not pop on the screen even if the app has received such push notification. See [FCM documentation](https://firebase.google.com/docs/cloud-messaging/concept-options#notifications%5Fand%5Fdata%5Fmessages) to learn more about data messages.
If the iOS app is not subscribed to APNs VoIP notifications or the APNs VoIP certificate has expired, the regular APNs will be delivered instead of APNs VoIP.
## Send VoIP push notifications
You can manually initiate sending of push notifications to a user/users on any event in your application. To do so, you need to form push notification parameters (payload) and set push recipients.
```Swift theme={null}
let event = QBMEvent()
event.notificationType = QBMNotificationType.push
event.usersIDs = "20,21"
event.type = QBMEventType.oneShot
let payload = [
"ios_voip": "1",
"VOIPCall": "1",
"sessionID": "767565gfh865486h548k6586h5868",
"opponentsIDs": "20,21"
]
let data = try? JSONSerialization.data(withJSONObject: payload, options: .prettyPrinted)
var message = ""
if let data = data {
message = String(data: data, encoding: .utf8) ?? ""
}
event.message = message
QBRequest.createEvent(event, successBlock: {(response, events) in
}, errorBlock: {(response) in
})
```
```Objective-C theme={null}
QBMEvent *event = [QBMEvent event];
event.notificationType = QBMNotificationTypePush;
event.usersIDs = @"21,22";
event.type = QBMEventTypeOneShot;
NSDictionary *payload = @{
@"ios_voip" : @"1",
@"VOIPCall" : @"1",
@"sessionID" : @"767565gfh865486h548k6586h5868",
@"opponentsIDs" : @"20,21"
};
NSData *data = [NSJSONSerialization dataWithJSONObject:payload options:NSJSONWritingPrettyPrinted error:nil];
NSString *message = [[NSString alloc] initWithData:data encoding:NSUTF8StringEncoding];
event.message = message;
[QBRequest createEvent:event successBlock:^(QBResponse * _Nonnull response, NSArray * _Nullable events) {
} errorBlock:^(QBResponse * _Nonnull response) {
}];
```
| Argument | Required | Description |
| -------- | -------- | -------------------------------- |
| event | Yes | A model for representing events. |
## Receive push notifications
To receive push notifications, use the code snippet below.
```Swift theme={null}
// MARK: - AppDelegate
func application(_ application: UIApplication, didReceiveRemoteNotification userInfo: [AnyHashable : Any]) {
}
func application(_ application: UIApplication, didReceiveRemoteNotification userInfo: [AnyHashable : Any], fetchCompletionHandler completionHandler: @escaping (UIBackgroundFetchResult) -> Swift.Void) {
}
```
```Objective-C theme={null}
// MARK: - AppDelegate
- (void)application:(UIApplication *)application didReceiveRemoteNotification:(NSDictionary *)userInfo {
}
- (void)application:(UIApplication *)__unused application didReceiveRemoteNotification:(NSDictionary *)userInfo fetchCompletionHandler:(void (^)(UIBackgroundFetchResult))completionHandler {
}
```
## Receive VoIP push notifications
To receive push notifications, use the code snippet below.
```Swift theme={null}
// MARK: - PKPushRegistryDelegate protocol
// Handle incoming pushes
func pushRegistry(registry: PKPushRegistry!, didReceiveIncomingPushWithPayload payload: PKPushPayload!, forType type: String!) {
}
```
```Objective-C theme={null}
// MARK: - PKPushRegistryDelegate protocol
// Handle incoming pushes
- (void)pushRegistry:(PKPushRegistry *)registry didReceiveIncomingPushWithPayload:(PKPushPayload *)payload forType:(NSString *)type {
}
```
## Unsubscribe
For a user to stop receiving push notifications, unsubscribe from receiving push notifications by invoking the `deleteSubscription(withID: subscription.id)` method below. You can also specify the device ID to verify if the subscription is being deleted for a specific device.
```Swift theme={null}
guard let uuidString = UIDevice.current.identifierForVendor?.uuidString else {
return
}
QBRequest.subscriptions(successBlock: { (response, subscriptions) in
for subscription in subscriptions {
if let subscriptionsUIUD = subscription.deviceUDID,
subscriptionsUIUD == uuidString {
QBRequest.deleteSubscription(withID: subscription.id) { (response) in
//Block with response if the request delete Subscription is succeeded.
}, errorBlock: { (response) in
//Block with response if the request delete Subscription is failed.
})
}
}
}, errorBlock: {(response) in
//Block with response instance if the request get subscriptions is failed.
})
```
```Objective-C theme={null}
NSString *deviceIdentifier = [[[UIDevice currentDevice] identifierForVendor] UUIDString];
[QBRequest subscriptionsWithSuccessBlock:^(QBResponse * _Nonnull response, NSArray * _Nullable objects) {
for (QBMSubscription *subscription in objects) {
if ([subscription.deviceUDID isEqualToString:deviceIdentifier]) {
[QBRequest deleteSubscriptionWithID:subscription.ID successBlock:^(QBResponse * _Nonnull response) {
//Block with response if the request delete Subscription is succeeded.
} errorBlock:^(QBResponse * _Nonnull response) {
//Block with response if the request delete Subscription is failed.
}];
}
}
} errorBlock:^(QBResponse * _Nonnull response) {
//Block with response instance if the request get subscriptions is failed.
}];
```
| Argument | Required | Description |
| --------------- | -------- | ----------------------------- |
| subscription.id | yes | ID of QuickBlox subscription. |
## Unsubscribe VoIP push notifications
For a user to stop receiving VoIP push notifications, unsubscribe from receiving VoIP push notifications by invoking the `deleteSubscription(withID: subscription.id)` method below. You can also specify the device ID to verify if the subscription is being deleted for a specific device.
```Swift theme={null}
// MARK: - PKPushRegistryDelegate protocol
func pushRegistry(_ registry: PKPushRegistry, didInvalidatePushTokenFor type: PKPushType) {
guard let uuidString = UIDevice.current.identifierForVendor?.uuidString else {
return
}
QBRequest.subscriptions(successBlock: { (response, subscriptions) in
for subscription in subscriptions {
if let subscriptionsUIUD = subscription.deviceUDID,
subscriptionsUIUD == uuidString,
subscription.notificationChannel == .APNSVOIP {
QBRequest.deleteSubscription(withID: subscription.id) { (response) in
//Block with response if the request delete Subscription is succeeded.
} errorBlock: { (response) in
//Block with response if the request delete Subscription is failed.
}
}
}
}) { (response) in
//Block with response instance if the request get subscriptions is failed.
}
}
```
```Objective-C theme={null}
// MARK: - PKPushRegistryDelegate protocol
- (void)pushRegistry:(PKPushRegistry *)registry didInvalidatePushTokenForType:(PKPushType)type {
NSString *deviceIdentifier = [[[UIDevice currentDevice] identifierForVendor] UUIDString];
[QBRequest subscriptionsWithSuccessBlock:^(QBResponse * _Nonnull response, NSArray * _Nullable objects) {
for (QBMSubscription *subscription in objects) {
if ([subscription.deviceUDID isEqualToString:deviceIdentifier] && subscription.notificationChannel == QBMNotificationChannelAPNSVOIP) {
[QBRequest deleteSubscriptionWithID:subscription.ID successBlock:^(QBResponse * _Nonnull response) {
//Block with response if the request delete Subscription is succeeded.
} errorBlock:^(QBResponse * _Nonnull response) {
//Block with response if the request delete Subscription is failed.
}];
}
}
} errorBlock:^(QBResponse * _Nonnull response) {
//Block with response instance if the request get subscriptions is failed.
}];
}
```
| Argument | Required | Description |
| --------------- | -------- | --------------------------------- |
| subscription.id | yes | ID of the QuickBlox subscription. |
## Troubleshooting
**A subscription is removed after a push is sent and the push isn't delivered**
**Cause**: a device registration token is invalid.
The device registration token is represented as `deviceToken` within the system and is set in the `subscription`. See [this section](/sdks/ios-push-notifications#subscribe) to learn how to subscribe a device to push notifications.
**Tip**: check if the device registration is correct. The device registration token can be invalid due to a number of reasons:
1. Some other data is set instead of a correct device registration token. For example, a Firebase project ID, Firebase user token, etc.
2. The client app unregistered itself from GCM/FCM. This can happen if the user uninstalls the application or, on iOS, if the APNs Feedback Service reported the APNs token as invalid.
3. The registration token expired. For example, Google might decide to refresh registration tokens or the APNs token may have expired for iOS devices.
4. The client app was updated, but the new version is not configured to receive messages.
For all these cases, remove the invalid device registration token and stop using it to send messages. Then, obtain a new token and make sure to create a new subscription with a valid token.