> ## Documentation Index
> Fetch the complete documentation index at: https://docs.quickblox.com/llms.txt
> Use this file to discover all available pages before exploring further.
# Send your first message
The **QuickBlox UIKit for Android** comprises a collection of pre-assembled UI components that enable the effortless creation of an in-app chat equipped with all the necessary messaging functionalities.
Our development kit encompasses light and dark themes, colors, and various other features. These components can be personalized to fashion an engaging messaging interface that reflects your brand's distinct identity.
The QuickBlox UIKit fully supports both private and group dialogs. To initiate the process of sending a message from the ground up using Java or Kotlin, please refer to the instructions provided in the guide below.
## Requirements
The minimum requirements for QuickBlox UIKit for Android are:
* Android 5.0 (API level 21) or higher
* Java 8 or higher
* Android Gradle plugin 4.0.1 or higher
## Before you begin
Register a new account following [this link](https://admin.quickblox.com/signup). Type in your email and password to sign in. You can also sign in with your Google or GitHub accounts.
Create the app clicking New app button.
Configure the app. Type in the information about your organization into corresponding fields and click Add button.
Go to Dashboard => YOUR\_APP => Overview section and copy your Application ID, Authorization Key, Authorization Secret, and Account Key .
## Get started
If you build mobile applications for the Android platform then you are no doubt already familiar with [Android Studio](https://developer.android.com/studio), a popular tool and the official Integrated Development Environment (IDE) for Android app development.
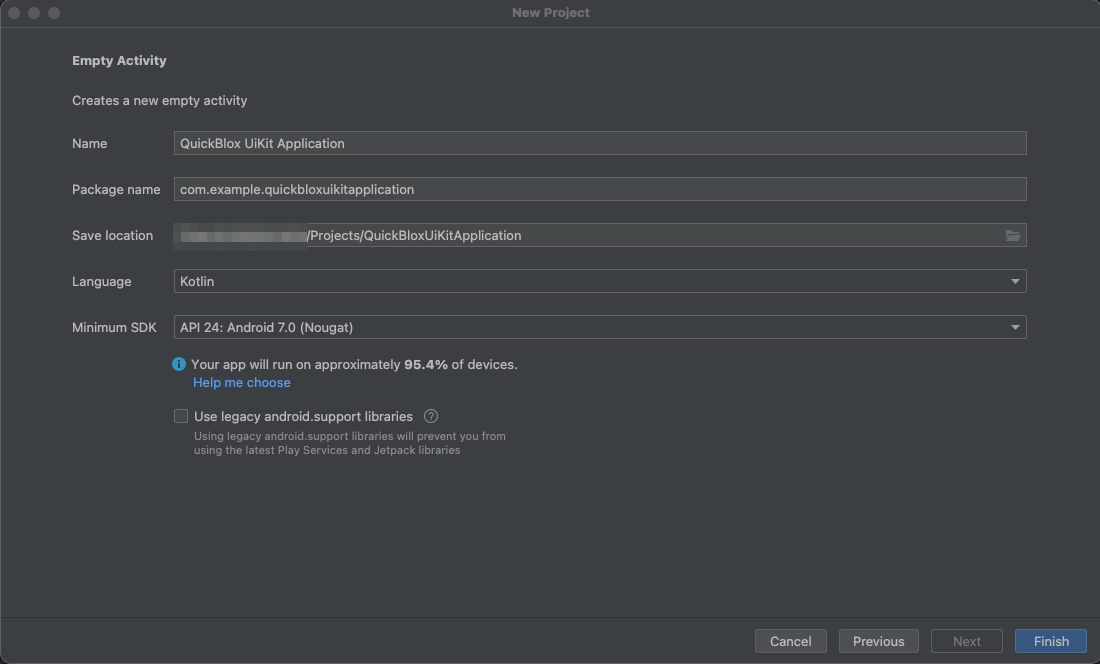
### Step 1. Create a project
1. Launch Android Studio
2. Click **"New project"** button in the Welcome to Android Studio window.
3. Select Empty Activity in **“Phone and Tablet”** Template window and click Next.
4. Set your project name and desired configurations and click **Finish**.
 ### Step 2. Install QuickBlox UIKit
There are 2 ways to install to QuickBlox UIKit from:
* Repository
* Local source
**Install QuickBlox UIKit from repository**
To install **QuickBlox UIKit** to your app, import **QuickBlox UIKit** and **QuickBlox SDK** dependencies via build.gradle file.
Include a reference to the SDK repository in your **project-level build.gradle** file at the root directory or to **settings.gradle** file. Specify the URL of the QuickBlox repository where the files are stored. Following this URL, gradle finds SDK artifacts.
```Kotlin Kotlin theme={null}
repositories {
maven {
url "https://github.com/QuickBlox/android-ui-kit-releases/raw/master/"
}
maven {
url "https://github.com/QuickBlox/quickblox-android-sdk-releases/raw/master/"
}
}
```
Then need to add the implementation of **QuickBlox UIKit** and **QuickBlox SDK** to dependencies in your **module-level(App) build.gradle** file.
```
dependencies {
implementation "com.quickblox:android-ui-kit:0.10.1"
implementation 'com.quickblox:quickblox-android-sdk-messages:4.3.0'
implementation 'com.quickblox:quickblox-android-sdk-chat:4.3.0'
implementation 'com.quickblox:quickblox-android-sdk-content:4.3.0'
}
```
**Install QuickBlox UIKit from local source**
To connect **QuickBlox SDK** to your app, import **QuickBlox SDK** dependencies via **build.gradle** file.
Include a reference to the SDK repository in your **project-level build.gradle** file at the root directory or to **settings.gradle** file. Specify the URL of the QuickBlox repository where the files are stored. Following this URL, gradle finds SDK artifacts.
```Kotlin Kotlin theme={null}
repositories {
google()
mavenCentral()
maven {
url "https://github.com/QuickBlox/quickblox-android-sdk-releases/raw/master/"
}
}
```
Then you need to download the source code of **Android UIKit** from the GitHub repository at [this link](https://github.com/QuickBlox/android-ui-kit) to include UIKit locally in your project.
Specify the path of the UIKit project in **settings.gradle** file.
```Kotlin Kotlin theme={null}
include ':ui-kit'
project(':ui-kit').projectDir = new File('YourFullPathToDir/android-ui-kit/ui-kit')
```
Also, need to add the implementation of the UIKit project to dependencies in your **module-level(App) build.gradle** file.
```Kotlin Kotlin theme={null}
dependencies {
implementation project(':ui-kit')
}
```
### Step 3. Init QuickBlox SDK
To initialize the **QuickBlox Android SDK**, we need to create a class for example name **App** and perform the initialization in the **onCreate()** method. The class App will inherit from the [Application](https://developer.android.comhttps://docs.quickblox.com/reference/android/app/Application) class to ensure proper management of the application's lifecycle and provide a global context.
The Application class is the base class for creating Android applications and serves as a container for global application states and settings. An application can have only one instance of the Application class, which is created by the system when the application is launched.
By inheriting from the Application class, we can create a custom class App that extends the functionality of the base class. In the App class, we can override the onCreate() method, which is called when the application is launched, and perform the initialization of the **QuickBlox Android SDK** there. Thus, the App class becomes the entry point and control point for initializing and configuring various components, including the QuickBlox SDK, during the application's startup.
Also to init *QuickBlox SDK* you need to pass Application ID, Authorization Key, Authorization Secret, and Account Key to the init() method. How to get credentials is described in the [Before you begin](https://dash.readme.com/project/quickbloxdoc/v1.7/docs/send-your-first-message#before-you-begin) section.
```Kotlin Kotlin theme={null}
private const val APPLICATION_ID = "67895"
private const val AUTH_KEY = "lkjdueksu7392kj"
private const val AUTH_SECRET = "BTFsj7Rtt27DAmT"
private const val ACCOUNT_KEY = "9yvTe17TmjNPqDoYtfqp"
class App : Application() {
override fun onCreate() {
super.onCreate()
QBSDK.init(applicationContext, APPLICATION_ID, AUTH_KEY, AUTH_SECRET, ACCOUNT_KEY)
}
}
```
**Security**
It's not recommended to keep your **authKey** and **authSecret** inside an application in production mode, instead of this, the best approach will be to store them on your backend. Instead you can [Initialize QuickBlox SDK without Authorization Key and Secret](/sdks/android-setup#initialize-quickblox-sdk-without-authorization-key-and-secret)
App class needs to be registered in the AndroidManifest.xml file.
```XML XML theme={null}
```
### Step 4. Authenticate and start QuickBlox UIKit
Before sending your first message you need to authenticate users in the **QuickBlox** system. You can read more about different ways of authentication by [this link](/sdks/android-authentication). In our example, we show how to authenticate users with login and password. After successfully **sign-in**, you need to initialize the **QuickBlox UIKit** by invoking **init(applicationContext)** method of the **QuickBlox UIKit** and start the Dialogs screen by invoking **show()** method of the **DialogActivity** from your Activity.
```Kotlin Kotlin theme={null}
class MainActivity : AppCompatActivity() {
override fun onCreate(savedInstanceState: Bundle?) {
super.onCreate(savedInstanceState)
setContentView(R.layout.activity_main)
val user = QBUser()
user.login = "userlogin"
user.password = "userpassword"
QBUsers.signIn(user).performAsync(object : QBEntityCallback {
override fun onSuccess(user: QBUser?, bundle: Bundle?) {
// init QuickBlox UIKit
QuickBloxUiKit.init(applicationContext)
// show Dialogs screen
DialogsActivity.show(this@MainActivity)
}
override fun onError(exception: QBResponseException?) {
// handle exception
}
})
}
}
```
### Step 5. Send your first message
After successful authentication, you will be directed to the chat list screen. To send your first message, follow these steps:
* Tap on the icon located in the top-right corner of the screen, specifically designed for creating a new chat.
* Choose the type of chat you want to create. You can select either a private chat or a group chat.
* If you selected a group chat, enter a name for the chat.
* Select the users with whom you want to create the chat and tap the "Create" button.
* After creating the chat, enter your first message and start sending it.
Now, your first message will be sent to the created chat and will be visible to other users who have joined the chat.
Quick start using our [Android UIKit sample](https://github.com/QuickBlox/quickblox-android-sdk/tree/master/android-ui-kit-sample)
This sample implements authorization functionality and provides an example of color theme customization. Sample code available by this [link](https://github.com/QuickBlox/quickblox-android-sdk/tree/master/android-ui-kit-sample). How to set up and run a sample, see the article in out blog [Getting Started with the QuickBlox Android UIKit](https://quickblox.com/blog/getting-started-with-quickblox-android-ui-kit/).
### Step 2. Install QuickBlox UIKit
There are 2 ways to install to QuickBlox UIKit from:
* Repository
* Local source
**Install QuickBlox UIKit from repository**
To install **QuickBlox UIKit** to your app, import **QuickBlox UIKit** and **QuickBlox SDK** dependencies via build.gradle file.
Include a reference to the SDK repository in your **project-level build.gradle** file at the root directory or to **settings.gradle** file. Specify the URL of the QuickBlox repository where the files are stored. Following this URL, gradle finds SDK artifacts.
```Kotlin Kotlin theme={null}
repositories {
maven {
url "https://github.com/QuickBlox/android-ui-kit-releases/raw/master/"
}
maven {
url "https://github.com/QuickBlox/quickblox-android-sdk-releases/raw/master/"
}
}
```
Then need to add the implementation of **QuickBlox UIKit** and **QuickBlox SDK** to dependencies in your **module-level(App) build.gradle** file.
```
dependencies {
implementation "com.quickblox:android-ui-kit:0.10.1"
implementation 'com.quickblox:quickblox-android-sdk-messages:4.3.0'
implementation 'com.quickblox:quickblox-android-sdk-chat:4.3.0'
implementation 'com.quickblox:quickblox-android-sdk-content:4.3.0'
}
```
**Install QuickBlox UIKit from local source**
To connect **QuickBlox SDK** to your app, import **QuickBlox SDK** dependencies via **build.gradle** file.
Include a reference to the SDK repository in your **project-level build.gradle** file at the root directory or to **settings.gradle** file. Specify the URL of the QuickBlox repository where the files are stored. Following this URL, gradle finds SDK artifacts.
```Kotlin Kotlin theme={null}
repositories {
google()
mavenCentral()
maven {
url "https://github.com/QuickBlox/quickblox-android-sdk-releases/raw/master/"
}
}
```
Then you need to download the source code of **Android UIKit** from the GitHub repository at [this link](https://github.com/QuickBlox/android-ui-kit) to include UIKit locally in your project.
Specify the path of the UIKit project in **settings.gradle** file.
```Kotlin Kotlin theme={null}
include ':ui-kit'
project(':ui-kit').projectDir = new File('YourFullPathToDir/android-ui-kit/ui-kit')
```
Also, need to add the implementation of the UIKit project to dependencies in your **module-level(App) build.gradle** file.
```Kotlin Kotlin theme={null}
dependencies {
implementation project(':ui-kit')
}
```
### Step 3. Init QuickBlox SDK
To initialize the **QuickBlox Android SDK**, we need to create a class for example name **App** and perform the initialization in the **onCreate()** method. The class App will inherit from the [Application](https://developer.android.comhttps://docs.quickblox.com/reference/android/app/Application) class to ensure proper management of the application's lifecycle and provide a global context.
The Application class is the base class for creating Android applications and serves as a container for global application states and settings. An application can have only one instance of the Application class, which is created by the system when the application is launched.
By inheriting from the Application class, we can create a custom class App that extends the functionality of the base class. In the App class, we can override the onCreate() method, which is called when the application is launched, and perform the initialization of the **QuickBlox Android SDK** there. Thus, the App class becomes the entry point and control point for initializing and configuring various components, including the QuickBlox SDK, during the application's startup.
Also to init *QuickBlox SDK* you need to pass Application ID, Authorization Key, Authorization Secret, and Account Key to the init() method. How to get credentials is described in the [Before you begin](https://dash.readme.com/project/quickbloxdoc/v1.7/docs/send-your-first-message#before-you-begin) section.
```Kotlin Kotlin theme={null}
private const val APPLICATION_ID = "67895"
private const val AUTH_KEY = "lkjdueksu7392kj"
private const val AUTH_SECRET = "BTFsj7Rtt27DAmT"
private const val ACCOUNT_KEY = "9yvTe17TmjNPqDoYtfqp"
class App : Application() {
override fun onCreate() {
super.onCreate()
QBSDK.init(applicationContext, APPLICATION_ID, AUTH_KEY, AUTH_SECRET, ACCOUNT_KEY)
}
}
```
**Security**
It's not recommended to keep your **authKey** and **authSecret** inside an application in production mode, instead of this, the best approach will be to store them on your backend. Instead you can [Initialize QuickBlox SDK without Authorization Key and Secret](/sdks/android-setup#initialize-quickblox-sdk-without-authorization-key-and-secret)
App class needs to be registered in the AndroidManifest.xml file.
```XML XML theme={null}
```
### Step 4. Authenticate and start QuickBlox UIKit
Before sending your first message you need to authenticate users in the **QuickBlox** system. You can read more about different ways of authentication by [this link](/sdks/android-authentication). In our example, we show how to authenticate users with login and password. After successfully **sign-in**, you need to initialize the **QuickBlox UIKit** by invoking **init(applicationContext)** method of the **QuickBlox UIKit** and start the Dialogs screen by invoking **show()** method of the **DialogActivity** from your Activity.
```Kotlin Kotlin theme={null}
class MainActivity : AppCompatActivity() {
override fun onCreate(savedInstanceState: Bundle?) {
super.onCreate(savedInstanceState)
setContentView(R.layout.activity_main)
val user = QBUser()
user.login = "userlogin"
user.password = "userpassword"
QBUsers.signIn(user).performAsync(object : QBEntityCallback {
override fun onSuccess(user: QBUser?, bundle: Bundle?) {
// init QuickBlox UIKit
QuickBloxUiKit.init(applicationContext)
// show Dialogs screen
DialogsActivity.show(this@MainActivity)
}
override fun onError(exception: QBResponseException?) {
// handle exception
}
})
}
}
```
### Step 5. Send your first message
After successful authentication, you will be directed to the chat list screen. To send your first message, follow these steps:
* Tap on the icon located in the top-right corner of the screen, specifically designed for creating a new chat.
* Choose the type of chat you want to create. You can select either a private chat or a group chat.
* If you selected a group chat, enter a name for the chat.
* Select the users with whom you want to create the chat and tap the "Create" button.
* After creating the chat, enter your first message and start sending it.
Now, your first message will be sent to the created chat and will be visible to other users who have joined the chat.
Quick start using our [Android UIKit sample](https://github.com/QuickBlox/quickblox-android-sdk/tree/master/android-ui-kit-sample)
This sample implements authorization functionality and provides an example of color theme customization. Sample code available by this [link](https://github.com/QuickBlox/quickblox-android-sdk/tree/master/android-ui-kit-sample). How to set up and run a sample, see the article in out blog [Getting Started with the QuickBlox Android UIKit](https://quickblox.com/blog/getting-started-with-quickblox-android-ui-kit/).