QuickBlox API can be accessed either with session token or with API key.
An API key is exclusively designed for server API requests and not work with SDK implementations. It is intended for direct server-to-server communication and might cause errors or unexpected behavior if used within an SDK environment.
To access QuickBlox API you need to authenticate your application with QuickBlox server. A token-based authentication should be used to provide secure access to QuickBlox API. The token-based authentication works by ensuring that each request to the server contains a token that is verified by the server for authenticity. When the authenticity is verified, the server responds to the request.
API key
An API key is designed for server-to-server communication and should not be shared with or used by end-users directly. It serves as a secure credential to authenticate and authorize requests made to the server API.
Key Features:
- The API key is permanent and does not have an expiration date.
- It grants full permissions to perform any action within the server API.
Obtaining an API Key
To obtain an API key, please follow the instructions Create API key
API Key Usage
- To authenticate requests using the API key, include it in the request headers as follows the example:
curl -X GET \
-H 'Authorization: ApiKey {API_KEY}' \
https://api.quickblox.com/users
Replace {API_KEY}
with the actual API key value.
- Request Execution on Behalf of a User
To execute a request on behalf of a specific user, include the "On-Behalf-Of" header in your request. This allows the server to identify the user on whose behalf the request is being made.
Example Request Header:
curl -X GET
-H 'Authorization: ApiKey {API_KEY}' \
-H 'On-Behalf-Of: {USER_ID}' \
https://api.quickblox.com/users
Replace {USER_ID}
with the unique identifier of the QuickBlox user.
Security Considerations
To maintain the security and integrity of the API key, follow these best practices:
- Keep the API key confidential and do not share it with unauthorized individuals.
- Transmit the API key securely over HTTPS.
- Regularly review and audit the server-side access and permissions associated with the API key.
If an API key is compromised or suspected of being compromised, replace the API key immediately for further action.
Application vs User session token
A token is a piece of data identifying a user or application and providing temporary access to QuickBlox Server API. The token is valid only within the session it was generated. The session gets expired in 2 hours after the last request to the Server API.
A session token is obtained via Create Session request having /session.json
endpoint. Once a token is received, it becomes a part of each request and is placed within its header.
There are two types of tokens: application session token and user session token. The application session token is limited to read-only permissions preventing changes to application data while the user session token is not restricted in permissions and allows for making edits to application data.
Session Token Type | Description |
---|---|
Application session token | This kind of access token is needed to read the app data. Has only READ access to resources. The expiration time after the last Server API request is 2 hours. |
User session token | The user token is the most commonly used type of token. This kind of access token is needed any time the app calls a Server API to read, modify or write a specific user's data on their behalf. Has READ/WRITE access to resources. The expiration time after the last Server API request is 2 hours. |
If you perform a query with an expired token, you receive the error
Required session does not exist
. In this case, you have to recreate a session token.
Want to change session expiration time?
This option is available for Enterprise Plan only. Contact the sales team.
Signature generation
Use a signature mechanism to verify the contents of the Create Session request on the QuickBlox server. The signature is generated using the HMAC-SHA cryptographic hashing algorithm. Then it is sent in the session creation request to verify the end-user. The inputs to a hashing algorithm include:
- A normalized string. The string is formed using the
parameter=value
pairs that should be sorted alphabetically by their text value and separated by the&
character. Use the parameters of the create session request to form the string. - An authorization secret. The secret is known as a cryptographic key and is used to compute the HMAC.
- A hashing algorithm. The cryptographic hash function.
For Basic, Startup, Growth plan, and HIPAA Cloud users
The SHA1 hash algorithm is used to generate a signature.
For Enterprise plan users
- By default, the SHA1 hash algorithm is used to generate a signature.
- Contact our sales team if you need to change SHA1 to SHA256.
Signature generation examples
A signature generation request body is different for each authentication option. See the signature generation examples below:
REQUEST PARAMETERS:
application_id
auth_key
nonce
timestamp
NORMALIZED STRING:
application_id=716730&auth_key=bbfeCwWtz8dqF4F&nonce=33432×tamp=1572434294
AUTHORIZATION SECRET(SECRET KEY):
YYXAU8BEYBfv0Fn
RESULTING SIGNATURE:
be6e49d06389a59d8846edf04789bcd7ada23eb8
REQUEST PARAMETERS:
application_id
auth_key
nonce
timestamp
user[login]
user[password]
NORMALIZED STRING:
application_id=716730&auth_key=bbfeCwWtz8dqF4F&nonce=33431×tamp=1572434594&user[login]=amigo30&user[password]=amigo30pass
AUTHORIZATION SECRET(SECRET KEY):
YYXAU8BEYBfv0Fn
RESULTING SIGNATURE:
99dc8e0a81afc0ff19b509c229c0256d7fe13220
REQUEST PARAMETERS:
application_id
auth_key
keys[token]
nonce
provider
timestamp
NORMALIZED STRING:
application_id=716730&auth_key=bbfeCwWtz8dqF4F&keys[token]=AM46dxjhisdffgry26282352fdusdfusdfgsdf&nonce=33432&provider=facebook×tamp=1572434694
AUTHORIZATION SECRET(SECRET KEY):
YYXAU8BEYBfv0Fn
RESULTING SIGNATURE:
a54e6693b04f9edf6b42c903923f8e204e5316e6
REQUEST PARAMETERS:
application_id
auth_key
firebase_phone[access_token]
firebase_phone[project_id]
nonce
timestamp
NORMALIZED STRING:
application_id=86716&auth_key=XHudVt3ktSV3mpK&firebase_phone[access_token]=eyJhbGciOiJSUzI1NiIsImtpZCI6Ijc3MTBiMDE3ZmQ5YjcxMWUwMDljNmMzNmIwNzNiOGE2N2NiNjgyMTEiLCJ0eXAiOiJKV1QifQ.eyJpc3MiOiJodHRwczovL3NlY3VyZXRva2VuLmdvb2dsZS5jb20vcXVldWUtZGVtby1jbGllbnQiLCJhdWQiOiJxdWV1ZS1kZW1vLWNsaWVudCIsImF1dGhfdGltZSI6MTYyNjQzMjg5OSwidXNlcl9pZCI6InFhZnNjMHpnOHNVSktvdFJkb1J1eUx1UXdiRjMiLCJzdWIiOiJxYWZzYzB6ZzhzVUpLb3RSZG9SdXlMdVF3YkYzIiwiaWF0IjoxNjI2NDMyOTAwLCJleHAiOjE2MjY0MzY1MDAsInBob25lX251bWJlciI6IiszODA5Mzc2MzcyNTMiLCJmaXJlYmFzZSI6eyJpZGVudGl0aWVzIjp7InBob25lIjpbIiszODA5Mzc2MzcyNTMiXX0sInNpZ25faW5fcHJvdmlkZXIiOiJwaG9uZSJ9fQ.ORDJTSGTicsvAeJ-eUQcDvt5Jv-y1c3HteOlzLApTZZ2C-nJZOB4RFpvoviIQwH53PFANB5iXTHBw1a5XBKROeRYEyu8YLg6RsH0wt5f5_hzGsUisgeFleDrz9i3V7NqkITqz2ADcJrWzwF-YDj5TbzCTlHmgeciiuViVbLqyFSKfyYrvFjM7x1IvJYUNVD3XGIq33128eaqHRuWfiaW5PC9ZdvfdOF5UhNpBx330TfM1FV9gNBQxd3cmxCE-bD1kvHQWLk6z8XKTNWZag718_Gf7MVmhqk-bC_KtwQ7IGVMRjPgCdNbA8H1btIcofD2iUVtzTew4et7leR6ujCAcA&firebase_phone[project_id]=56783&nonce=9823&provider=firebase_phone×tamp=1626433392
AUTHORIZATION SECRET(SECRET KEY):
dMFLtwFt4fX567U
RESULTING SIGNATURE:
3fc62b95b4689e5b619bc6f4adfa267f68bc06fc
The request body parameters should be sorted alphabetically by their text value and separated with the
&
symbol.
Signature generation with third-party tool
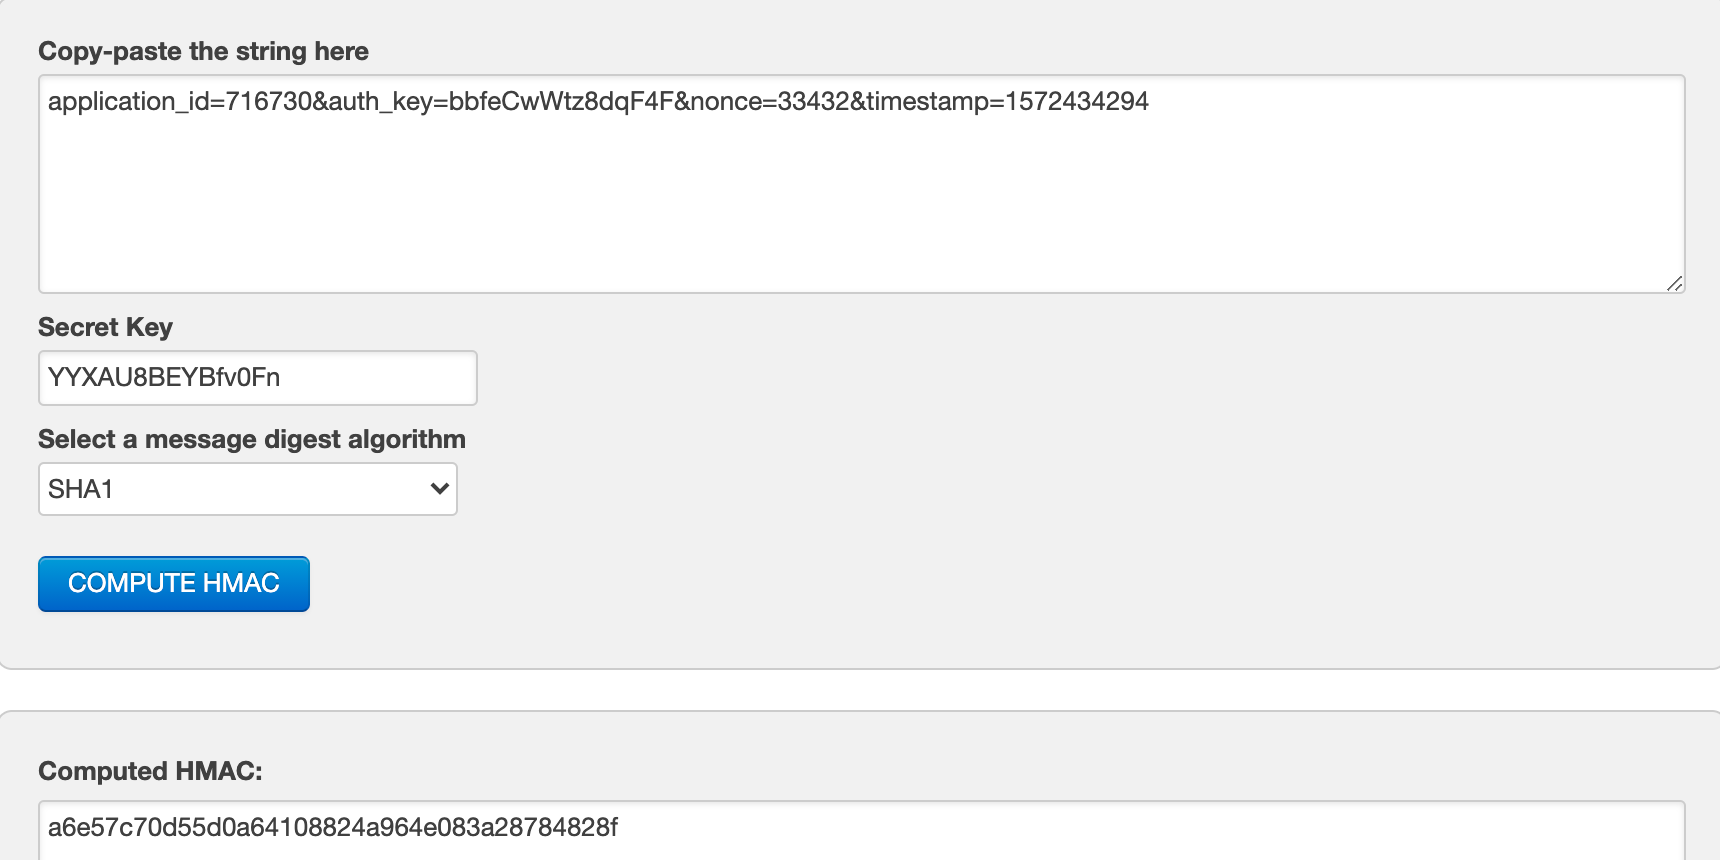
You can test signature generation algorithm with the HMAC-SHA generator. Thus, to generate the signature, proceed as follows:
- Open the HMAC-SHA generator. For example, you can use this one.
- Compose a normalized string from
parameter=value
pairs. For example: application_id=716730&auth_key=bbfeCwWtz8dqF4F&nonce=33432×tamp=1572434294 - Enter the authorization secret(secret key).
- Choose SHA1 hashing algorithm.
- Generate the signature. Your screen should look similar to the screenshot below: