Please use this WebRTC Video Calling to make the Group Calls with 4 or fewer users. Because of Mesh architecture we use for multi-point where every participant sends and receives its media to all other participants, the current solution supports group calls with up to 4 people.
Before you begin
- Register a QuickBlox account. This is a matter of a few minutes and you will be able to use this account to build your apps.
- Configure QuickBlox SDK for your app. Check out Setup page for more details.
- Create a user session to be able to use QuickBlox functionality. See Authentication page to learn how to do it.
- Connect to the Chat server to provide a signaling mechanism for Video Calling API. Follow our Chat page to learn about chat connection settings and configuration.
Initialize WebRTC
Before any interaction with QuickbloxWebRTC, you need to initialize it using the method below.- Swift
- Objective-C
Logging
Logging is a powerful tool to see the exact flow of the QuickbloxWebRTC framework and analyze its decisions. By enabling logs you will be able to debug most issues, or perhaps help us analyze your problems. Check Enable logging section to learn how to enable logging.Background mode
You can use our SDK in the background mode as well, however, this requires you to add a specific app permissions. Under the app build settings, open the Capabilities tab. In this tab, turn on Background Modes and set the Audio, AirPlay and Picture in Picture checkbox to set the audio background mode.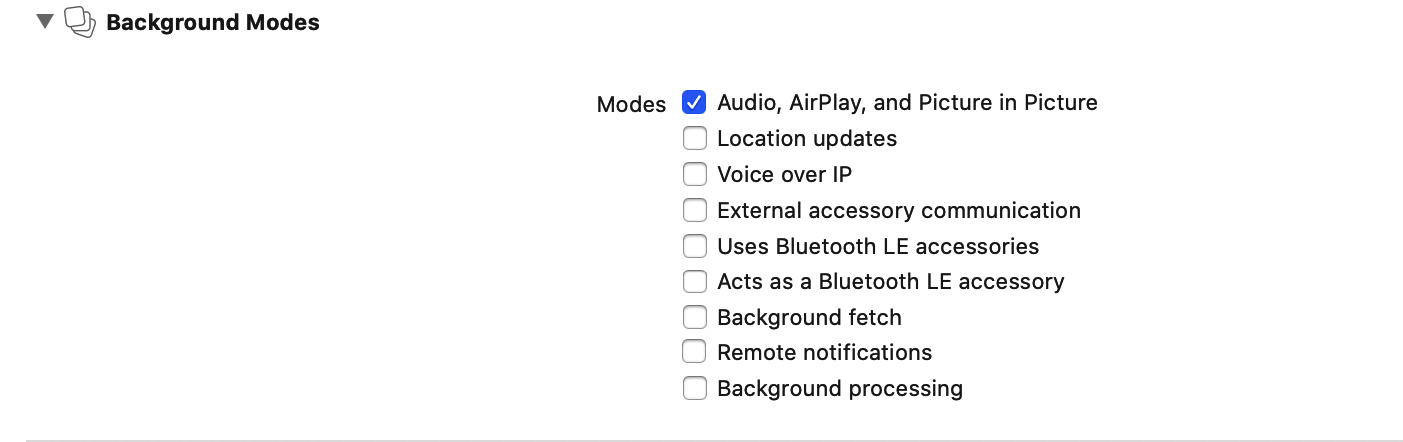
Manage calls
In order to operate and receive calls you need to setup a client delegate. Your class must conform to theQBRTCClientDelegate protocol. Use the method below to subscribe. Learn more details about the event delegate configuration in the Event delegate section.
- Swift
- Objective-C
Initiate a call
To call other users, useQBRTCClient and QBRTCSession methods below.
- Swift
- Objective-C
QBRTCConfig).
- Swift
- Objective-C
self.session refers to the current call session. Each particular audio/video call has a unique sessionID. This allows you to have more than one independent audio/video conference calls. If you want to increase the call timeout, you can increase it up to 60 seconds at maximum.
- Swift
- Objective-C
NoteBy default,
setAnswerTimeInterval value is 45 seconds.- Swift
- Objective-C
Accept a call
In order to accept a call, use theacceptCall() method below.
- Swift
- Objective-C
- Swift
- Objective-C
Reject a call
In order to reject a call, use therejectCall() method below.
- Swift
- Objective-C
- Swift
- Objective-C
End a call
To end a call, use thehangUp() method below.
- Swift
- Objective-C
- Swift
- Objective-C
Local video view
To show your local video track from a camera, you should createUIView on the storyboard and then use the following code.
- Swift
- Objective-C
Remote video view
To show video views with streams that you have received from your opponents, you should createQBRTCRemoteVideoView views on the storyboard and then use the following code.
- Swift
- Objective-C
QBCallSession methods (assuming that they are existent).
- Swift
- Objective-C
Event delegate
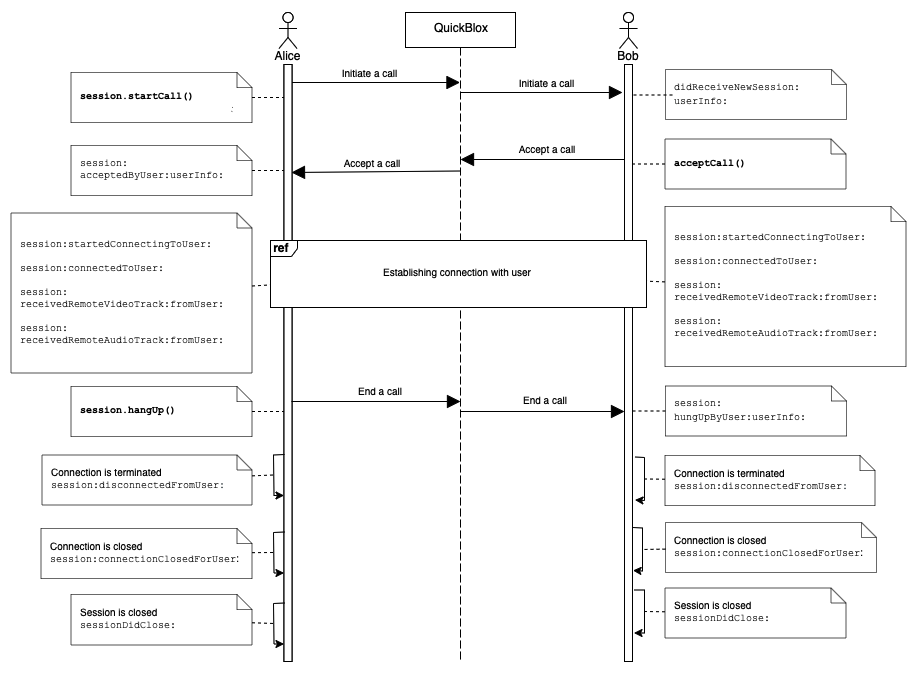
To process events such as incoming call, call reject, hang up, etc. you need to set up the event listener. The event listener processes various events that happen with the call session or peer connection in your app. Using the callbacks provided by the event delegate, you can implement and execute the event-related processing code. For example, thesession(_:acceptedByUser:userInfo:) method of the QBRTCClientDelegate is called when your call has been accepted by the user. This callback receives information about the call session, user ID who accepted the call and additional key-value data about the user.
QuickBlox iOS SDK persistently interacts with the server via XMPP connection that works as a signaling transport for establishing a call between two or more peers. It receives the callbacks of the asynchronous events which happen with the call and peer connection. This allows you to track these events and build your own video calling features around them.
To track call session events, you should use QBRTCSessionEventsCallback listener. The supported event callbacks for a call session and peer connection are listed in the table below.
The following code lists all supported event callbacks for the call session and peer connection along with their parameters as well as shows how to add the listener.
- Swift
- Objective-C
Call session states
Each call session has its own state. You can always access the current state by simply using theQBRTCSession property.
- Swift
- Objective-C
- Swift
- Objective-C
Call reconnection states
NoteSince version 2.8.0 Quickblox-WebRTC SDK supports reconnection functional.
- Swift
- Objective-C
You can also increase disconnect timeout. By default the time is set to 30 seconds. Minimal time is 10 seconds. It’s time while users can have availability to reconnect.
- Swift
- Objective-C
Peer connection states
Each peer connection has its own state. By default, you can access that state by calling this method fromQBRTCSession.
- Swift
- Objective-C
- Swift
- Objective-C
Resources
A regular call workflow.