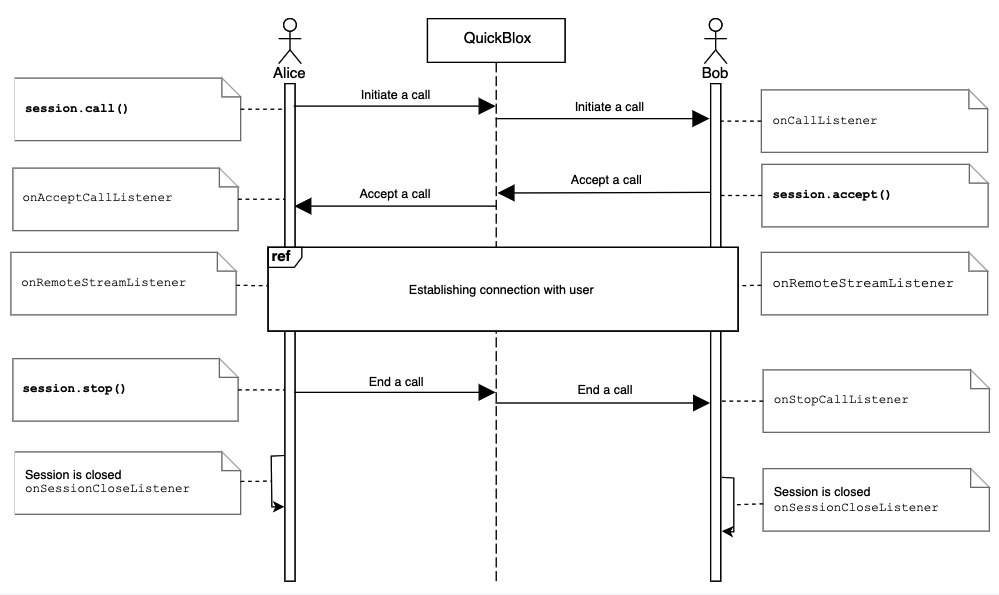
- Local peer is a device running the app right now.
- Remote peer is an opponent device.
- Signaling. At this phase, the peers’ local IPs and ports where they can be reached (ICE candidates) are exchanged as well their media capabilities and call session control messages.
- Discovery. At this phase, the public IPs and ports at which endpoints can be reached are discovered by STUN/TURN server.
- Establishing a connection. At this phase, the data are sent directly to each party of the communication process.
Please use this WebRTC Video Calling to make the Group Calls with 4 or fewer users. Because of Mesh architecture we use for multi-point where every participant sends and receives its media to all other participants, the current solution supports group calls with up to 4 people.
Before you begin
- Register a QuickBlox account. This is a matter of a few minutes and you will be able to use this account to build your apps.
- Configure QuickBlox SDK for your app. Check out Setup page for more details.
- Create a user session to be able to use QuickBlox functionality. See Authentication page to learn how to do it.
- Connect to the Chat server to provide a signaling mechanism for Video Calling API. Follow our Chat page to learn about chat connection settings and configuration.
Initiate a call
To initiate a call, proceed with the steps below.Create session
First, you need to create a call session. This is done by using thecreateNewSession() method. Pass opponent ID/IDs and a call type (video or audio) to it.
The session object can be received either as a result of the createNewSession() method or in each event listener callback. Learn more about the event listener in this section.
JavaScript
Access local media stream
Once a call session is created, you need to get access to the user’s devices (webcam/microphone) in order to make a call.JavaScript
The
mediaParams object has the following fields:
This method lets the browser ask the user for permission to use devices. You should allow this dialog to access the stream. Otherwise, the browser cannot obtain access and will throw an error for
getUserMedia callback function.
For more information about possible audio/video constraints, here is a good code sample from WebRTC team on how to work with getUserMedia constraints.
Attach local media stream
You also need to attach your local media stream to HTML video element. The method below attaches the Media Stream Object to your DOM element and autoplays it.JavaScript
The same method is used for attaching the remote video stream that is received from your opponents.
Make a call
Now that you have attached the local media stream, you can initiate a call by calling thecall() method.
JavaScript
As a result, your opponent will receive an
onCallListener() callback specifying that a new call session has been received.
JavaScript
Your opponent receives an incoming call through either the established connection with the Chat server or a VoIP Push Notifications when the app is in the background.
Accept a call
To accept a call request, callaccept() method.
JavaScript
JavaScript
JavaScript
Reject a call
To reject a call request, usereject() method.
JavaScript
JavaScript
End a call
To end a call, usestop() method and pass sessionId parameter to tell SDK which call session to end.
JavaScript
JavaScript
Call changes
Sometimes, you make changes during an active call (for example, applying some CSS filter to a video element) that needs to be fed to the opponents and updated. To allow for this, you can useupdate() method to send instructions to the opponents on how to update the UI.
JavaScript
JavaScript
Event listener
To process events such as incoming call, call reject, hang up, etc. you need to set up the event listener. The event listener processes various events that happen with the call session or peer connection in your app. Using the callbacks provided by the event delegate, you can implement and execute the event-related processing code. For example, theonAcceptCallListener callback is received when your call has been accepted by the user. This callback receives information about the call session, user ID who accepted the call, and additional key-value data about the user.
QuickBlox JavaScript SDK persistently interacts with the server via XMPP connection that works as a signaling transport for establishing a call between two or more peers. It receives the callbacks of the asynchronous events which happen with the call and peer connection. This allows you to track these events and build your own video calling features around them.
To track call session and peer connection events, you should use the event listener. The supported event callbacks for a call session and peer connection are listed in the table below.
The following code lists all supported event callbacks.
JavaScript
Call session states
The following table lists all supported call session states.Call reconnection states
Since version 2.15.0 Quickblox-WebRTC ```JavaScript JavaScript SDK supports reconnection functional.
Manage reconnection
You could add onReconnectListener to your client code to define session states and manage reconnection states.JavaScript
You can also increase disconnect timeout. By default the time is set to 30 seconds. Minimal time is 10 seconds. It’s time while users can have availability to reconnect. You could set the disconnectTimeInterval in the
CONFIG object and then call the init() method.
JavaScript
Peer connection states
The following table lists all supported states of peer connection:Resources
A regular call workflow.