- Offline messages. Send a chat message when a recipient is offline. In this case, a push notification will be sent automatically if the user is offline.
- Offline calls. Make a video/audio call with offline opponents. In this case, a push notification will be sent manually.
- Requests to contact list. Send requests to add a user to the contact list. In this case, a push notification will be sent manually).
- User tags. Send notifications to specific user groups defined by tags.
Before you begin
- Register a QuickBlox account. This is a matter of a few minutes and you will be able to use this account to build your apps.
- Configure QuickBlox SDK for your app. Check out Setup page for more details.
- Create a user session to be able to use QuickBlox functionality. See Authentication page to learn how to do it.
Configuration
To start working with push notifications, you need to install react-native-push-notification library. Follow the setup steps in the README file. After that, follow the platform-specific steps on this page.Use the 3.2.1 version of the react-native-push-notification library to be able to display push notifications.
iOS
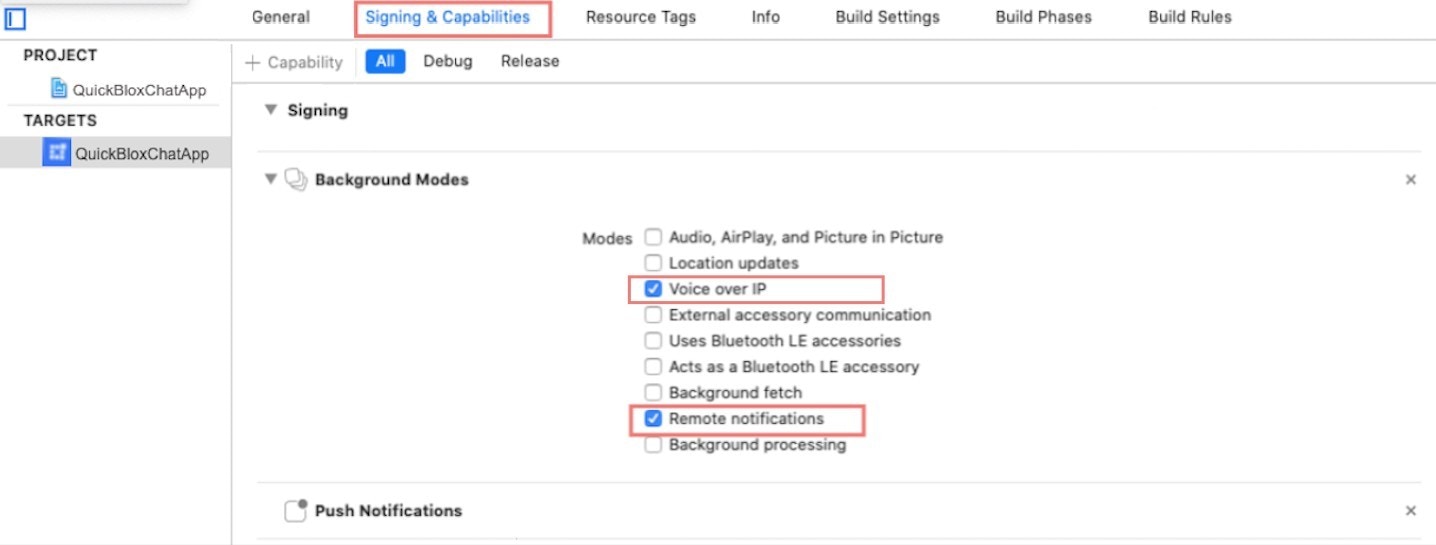
Step1. Create APNs certificate and upload it to the Dashboard. Each iOS application that uses Apple Push Notifications must have an APNs certificate. Upload the APNs certificate to QuickBlox Dashboard => Push Notifications => Settings => Apple Push Notification Service (APNs). To learn how to create APNs certificates and upload them to Dashboard, refer to our guide. Step2. Open your project in Xcode and enable Push Notifications capabilities.- Open Xcode and choose your project file.
- Choose the Signing & Capabilities tab.
- Add a Push Notifications and Background Modes capabilities. To see these sections, you should be logged in to Xcode with your Apple ID that is enrolled in the Apple developer program.
- Turn on a Push Notifications capability.
- Turn on a Background modes capability. This section requires you to add specific app permissions.
- Select a Remote notifications checkbox if you want to receive push notifications when the app goes to background mode.
- Select a Voice over IP checkbox if you want your app to receive incoming Voice-over-IP (VoIP) push notifications and use them to display the system call interface to the user when the app is in the background mode.
Android
Step 1. Configure Firebase project and get API key and Sender ID. First, you should create a Firebase account if you don’t have it. Then you should configure your Firebase project. To learn how to configure a Firebase project and get API key and Sender ID, refer to our guide . Step 2. Add Firebase to your project.- Prepare app dependencies. As part of enabling Firebase services in your Android application, you need to add the google-services plugin to your project android/build.gradle file.
Groovy
Groovy
- Put your google-services.json file for your package into android/app/ folder.
Initialize react-native-push-notification lib
Initialize the react-native-push-notification lib using the code snippet below.JavaScript
Subscribe to push notifications
Subscribe to FCM or APNs service. Once the device is subscribed, the service delivers a notification to it. For VoIP push notifications, specifypush_channel: apns_voip channel.
JavaScript
create() method accepts one argument of the object type that has the following fields:
| Field | Required | Description |
|---|---|---|
| deviceToken | yes | Token received from FCM/APNs. |
| pushChannel | no | Channel for receiving push notifications. |
Send push notifications
You can initiate sending a push notification to a user on any event in your application. To do so, you need to set push notification parameters, push recipients, notification type, sender ID, and type of the notification event. For VoIP push notifications, you need to set theios_voip: 1 parameter.
JavaScript
create() method accepts one argument of the object type that has the following fields:
| Parameter | Required | Description |
|---|---|---|
| notificationType | yes | Type of notifications:- QB.events.NOTIFICATION\_TYPE.PUSH - send push notification.- QB.events.NOTIFICATION\_TYPE.EMAIL - send email. |
| payload | yes | Push notification payload. Can contain a message (string) property and many other key-value pairs (string-string). Refer here for more details. |
| recipientsIds | no | Users’ IDs to deliver notification. |
| senderId | yes | ID of the user who created the event. |
| type | yes | Types of the notification event.- QB.events.NOTIFICATION\_EVENT\_TYPE.ONE\_SHOT - a one-time event (valid only if the date is not specified).- QB.events.NOTIFICATION\_EVENT\_TYPE.FIXED\_DATE - a one-time event that occurs at a specified date (valid only if the date is specified).- QB.events.NOTIFICATION\_EVENT\_TYPE.PERIOD\_DATE - is a reusable event that occurs within a given period from the initial date (valid only if the period is specified). |
How to set up the FCM console and plug into QuickBlox dash board please see How to enable Cloud Messaging API (Legacy) or HTTP v1 API
Receive push notifications
When any notification is opened or received theonNotification callback is called passing an object with the notification data.
JavaScript
JavaScript
Unsubscribe from push notifications
You can unsubscribe from receiving push notification by passing a subscription ID.JavaScript
CallKit and VoIP push notifications
If you need to display a native calling interface for incoming and outgoing calls, you should use CallKit on iOS. It lets you integrate your calling services with other call-related apps on the system. Use Apple CallKit guide to learn how to integrate a CallKit functionality. For iOS, together with the CallKit, you also need to integrate VoIP push notifications. QuickBlox supports iOS VoIP push notifications via the same API described above:- For VoIP pushes, you need to generate a separated VoIP device token. See how to get it here.
- When the token is retrieved, you need to subscribe to VoIP push notifications by passing a
push_channel: apns_voipin the subscription request. - To send a VoIP push notification, use
ios_voip: 1parameter in a push payload of the create event request.
Troubleshooting
A subscription is removed after a push is sent and the push isn’t delivered
Cause: a device registration token is invalid.The device registration token is represented as
deviceToken within the system. See this section to learn how to subscribe a device to push notifications.- Some other data is set instead of a correct device registration token. For example, a Firebase project ID, Firebase user token, etc.
- The client app unregistered itself from GCM/FCM. This can happen if the user uninstalls the application or, on iOS, if the APNs Feedback Service reported the APNs token as invalid.
- The registration token expired. For example, Google might decide to refresh registration tokens or the APNs token may have expired for iOS devices.
- The client app was updated, but the new version is not configured to receive messages.