Overview
Starting from version 0.2.0 of React UIKit, the AI functionality is enabled by default and based on OpenAI’s chat GPT. The QuickBlox AI for React UIKit provides a range of features to enhance the chat experience. With essential messaging functionalities such as answer assistant, users can engage in more interactive conversations. Supported featuresRequirements
The minimum requirements for using AI features are:- JS QuickBlox SDK v2.15.5
- React v.18.0
- TypeScript v.4.9.3
- React UIKit v0.2.0
AI Answer Assist
QuickBlox provides answer assistant functionality that helps users effortlessly send various answers considering chat history.
How to use in React UIKit
In React UIKit version greater then 0.4.0 with JS QuickBlox SDK v2.17.0 to enable QuickBlox AI answer assistant you should set up theAIAnswerAssistWidgetConfig in the configAIApi segment of the QBConfig.ts file to provide your Smart ChatAssist ID from your QuickBlox admin panel.
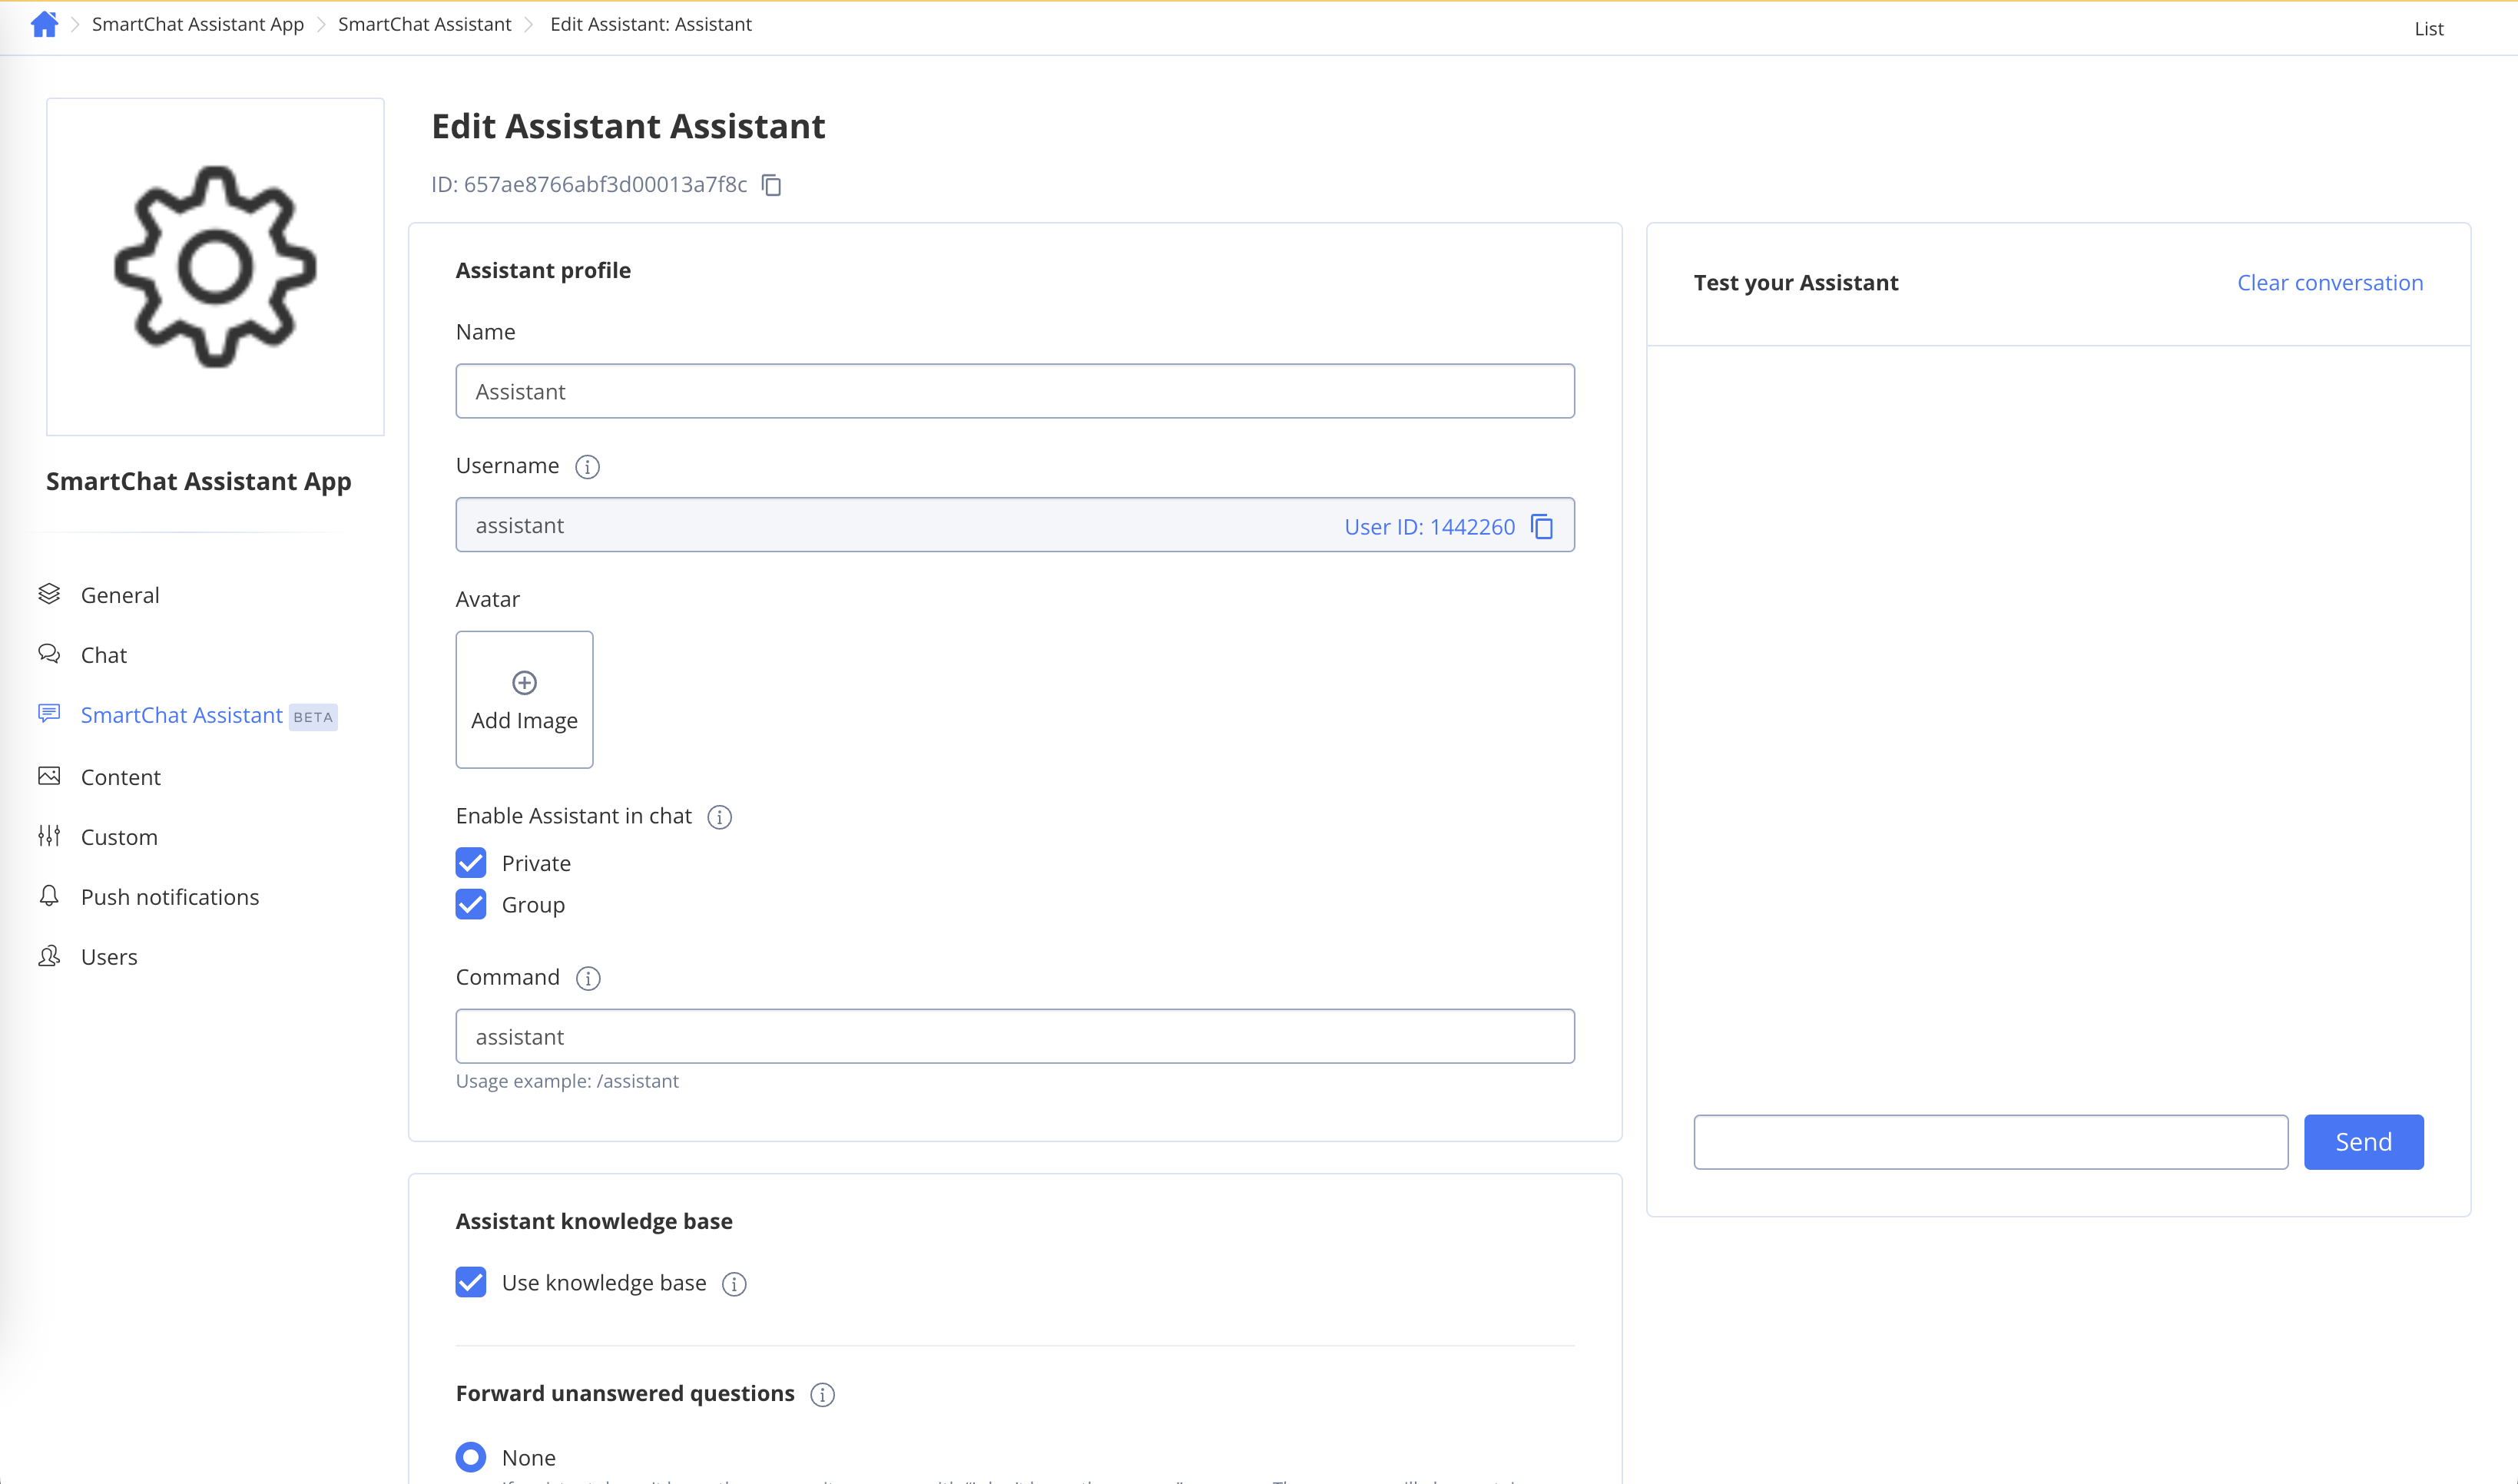
Review your AI Agent
To get ID of AI Agent to use it as smartChatAssistantId param follow the steps below:
- Navigate to the Dashboard => YOUR_APP => AI Agent page.
- Choose the ID of the AI Agent you want to update and click on it.
- Edit the AI Agent settings.
- Click the Save button to save changes.
TypeScript
- Set up the
AIAnswerAssistWidgetConfigin theconfigAIApisegment of theQBConfig.tsfile to provide your API Key. - Optionally, initialize the
AIAssistproperty within theQuickBloxUIKitDesktopLayout(orMessageView) component for customizing the appearance or logic of the AI Assist component.
- Direct: Access Open AI directly from your client code. The
AIAssistcomponent use a raw Open AI token. This is suitable for development or demos, but it’s not the recommended approach for production due to security considerations. - Proxy: Access Open AI through a proxy server. The
AIAssistcomponent use QuickBlox user session token with a proxy server. This is the recommended method for production environments, ensuring a more secure and controlled setup.
apiKey property in the configAIApi section in the QBConfig.ts file. This contains information about configurations for all AI features . After that theAIAssist component will communicate directly with the OpenAI API.
TypeScript
Proxy using configuration
To utilize the QuickBlox AI Answer Assist React hook to communicate through a proxy server (not directly) with OpenAI API,
you should configure the AIAnswerAssistWidgetConfig section in the configuration file, as shown in the code snippet provided below.
The fields
api, servername, port, and sessionToken need to be configured within the proxyConfig section for communication with the proxy server.
TypeScript
AI Answer Assist customization
You have the ability to control AI Answer Assist from code as follows: set it to enabled/disabled, customize the appearance of the component icon, and modify its operational logic. To enable or disable AIAssist use the following code:
JSX
QuickBloxUIKitDesktopLayout is a layout component located within the provider section. We explored an example of its usage in our UIKit documentation, specifically in the Send your First Message section.
To customize the appearance of the component icon, you should create your own React custom hook that must return an object of the AIMessageWidget interface and update the code within the renderWidget method.
For modifying its operational logic, you should create your own React custom hook that must return an object of the AIMessageWidget interface and update the code within the textToWidget method. The interface AIMessageWidget has next structure:
Example code of custom hook:
TypeScript
AIAssist inQuickBloxUIKitDesktopLayout or in MessageView components like this:
Let’s modify the QuickBloxUIKitDesktopLayout component from “Send your first message” page :
JSX
JSX
You can compare the configuration of the QuickBloxUIKitDesktopLayout component with the AI Widget to the default view of the QuickBloxUIKitDesktopLayout component from the “Send your first message” page .
How to use the feature as a standalone library
You can use logic of the React hook features separately from our UI kit is possible by connecting the library as described below. The library qb-ai-answer-assistant contains QBAIAnswerAssistant object wich provide all nececry features. install standalone library QBAIAnswerAssistant can be installed using Node Package Manager. To include it in your JS based project, follow these command:PowerShell
- Import the QBAIAnswerAssistant module:
JavaScript
- Create an array of
ChatMessageobjects representing the chat history:
JavaScript
JavaScript
- Call the
rephrasemethod to generate translate using an API key:
JavaScript
JavaScript
AI Translate
QuickBlox offers translation functionality that helps users easily translate text messages in chat, taking into account the context of the chat history.How to use in React Kit
In React UIKit greater than 0.4.0 with JS QuickBlox SDK v2.17.0, to enable QuickBlox AI Translate, you should set up theAITranslateWidgetConfig in the configAIApi segment of the QBConfig.ts file to provide your Smart ChatAssist ID from your admin panel.
Review your AI Agent
To get ID of AI Agent to use it as smartChatAssistantId param, follow the steps below:
- Navigate to the Dashboard => YOUR_APP => AI Agent page.
- Choose the ID of the AI Agent you want to update and click on it.
- Edit the AI Agent settings.
- Click the Save button to save changes.
TypeScript
- Set up the
AITranslateWidgetConfigin theconfigAIApisegment of theQBConfig.tsfile to provide your API Key. - Optionally, initialize the
AITranslateproperty within theQuickBloxUIKitDesktopLayout(orMessageView) component for customizing the appearance or logic of the AI Translate component.
- Direct: Access Open AI directly from your client code. The
AITranslatecomponent use a raw Open AI token. This is suitable for development or demos, but it’s not the recommended approach for production due to security considerations. - Proxy: Access Open AI through a proxy server. The
AITranslatecomponent use QuickBlox user session token with a proxy server. This is the recommended method for production environments, ensuring a more secure and controlled setup.
apiKey property in the configAIApi section in the QBConfig.ts file. This contains information about configurations for all AI features . AFter that theAITranslate component will communicate directly with the OpenAI API.
TypeScript
Proxy using configuration
To utilize the QuickBlox AI Translate React hook to communicate through a proxy server (not directly) with OpenAI API, you should configure the AITranslateWidgetConfig section in the configuration file, as shown in the code snippet provided below. The fields
api, servername, port, and sessionToken need to be configured within the proxyConfig section for communication with the proxy server.
TypeScript
AI Translate customization
You have the ability to control AI Translate from code as follows: set it to enabled/disabled, customize the appearance of the component icon, and modify its operational logic. To enable or disable AI Translate use the following code:
JSX
QuickBloxUIKitDesktopLayout is a layout component located within the provider section. We explored an example of its usage in our UIKit documentation, specifically in the Send your First Message section.
To customize the appearance of the component icon, you should create your own React custom hook that must return an object of the AIMessageWidget interface and update the code within the renderWidget method.
For modifying its operational logic, you should create your own React custom hook that must return an object of the AIMessageWidget interface and update the code within the textToWidget method. The interface AIMessageWidget has next structure:
Example code of custom hook:
TypeScript
AITranslate inQuickBloxUIKitDesktopLayout or in MessageView components like this:
Let’s modify the QuickBloxUIKitDesktopLayout component from “Send your first message” page :
JSX
JSX
You can compare the configuration of the QuickBloxUIKitDesktopLayout component with the AI Widget to the default view of the QuickBloxUIKitDesktopLayout component from the “Send your first message” page .
How to use the feature as a standalone library
You can use logic of the React hook features separately from our UI kit is possible by connecting the library as described below. The library qb-ai-translate contains QBAITranslate object wich provide all nececry features. install standalone library QBAITranslate can be installed using Node Package Manager. To include it in your JS based project, follow these command:PowerShell
- Import the QBAIAnswerAssistant module:
JavaScript
- Create an array of ChatMessage` objects representing the chat history:
JavaScript
JavaScript
- Call the
translatemethod to generate translate using an API key:
JavaScript
JavaScript
AI Rephrase
QuickBlox provides answer prephrase message functionality that helps users allows you to rephrase the response for an outgoing message in the chosen tone..
How to use in React UIKit
Enabling QuickBlox AI Rephrase Message in React UIKit involves just 2 straightforward actions:- Set up the
AIRephraseWidgetConfigin theconfigAIApisegment of theQBConfig.tsfile to provide your API Key. - Optionally, initialize the
AIRephraseproperty within theQuickBloxUIKitDesktopLayout(orMessageView) component for customizing the appearance or logic of the AI Rephrase component.
- Direct: Access Open AI directly from your client code. The
AIRephrasecomponent use a raw Open AI token. This is suitable for development or demos, but it’s not the recommended approach for production due to security considerations. - Proxy: Access Open AI through a proxy server. The
AIRephrasecomponent use QuickBlox user session token with a proxy server. This is the recommended method for production environments, ensuring a more secure and controlled setup.
apiKey property in the configAIApi section in the QBConfig.ts file. This contains information about configurations for all AI features . AFter that theAIRephrase component will communicate directly with the OpenAI API.
TypeScript
Proxy using configuration
To utilize the QuickBlox AI Rephrase Message React hook to communicate through a proxy server (not directly) with OpenAI API, you should configure the AIRephraseWidgetConfig section in the configuration file, as shown in the code snippet provided below. The fields
api, servername, port, and sessionToken need to be configured within the proxyConfig section for communication with the proxy server.
TypeScript
AI Rephrase customization
You have the ability to control AI Rephrase Message from code as follows: set it to enabled/disabled, customize the appearance of the component icon, and modify its operational logic. To enable or disable Answer Assist use the following code:
JSX
QuickBloxUIKitDesktopLayout is a layout component located within the provider section. We explored an example of its usage in our UIKit documentation, specifically in the Send your First Message section.
To customize the appearance of the component icon, you should create your own React custom hook that must return an object of the AIMessageWidget interface and update the code within the textToWidget method.
For modifying its operational logic, you should create your own React custom hook that must return an object of the AIMessageWidget interface and update the code within the textToWidget method. The interface AIMessageWidget has next structure:
Example code of custom hook:
TypeScript
AIRephrase inQuickBloxUIKitDesktopLayout or in MessageView components like this:
Let’s modify the QuickBloxUIKitDesktopLayout component from “Send your first message” page :
JSX
JSX
How to use the feature as a standalone library
You can use logic of the React hook features separately from our UI kit is possible by connecting the library as described below. The library qb-ai-rephrase contains QBAIRephrase object wich provide all nececry features. Install standalone library QBAIRephrase can be installed using Node Package Manager. To include it in your JS based project, follow these command:PowerShell
- Import the QBAIRephrase module:
JavaScript
- Create an array of
ChatMessageobjects representing the chat history:
JavaScript
JavaScript
- Call the
rephrasemethod to generate translate using an API key:
JavaScript
JavaScript